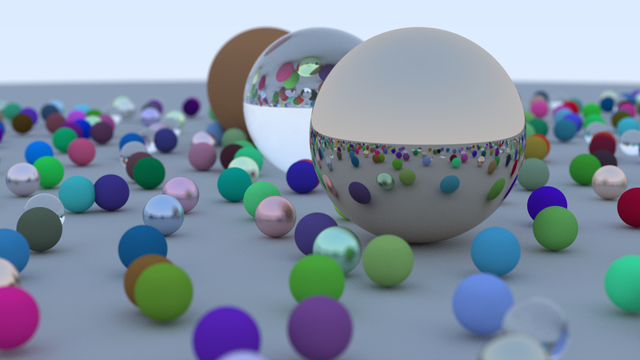
Ray Tracing in One Weekend is a free online book that takes you through the process of programming a ray tracer from scratch. It starts by writing support code to do math with 3-element vectors, building up a 3D scene with spheres and adding materials, and finishing by rendering a large scene of spheres of various sizes and materials.
The book provides source code in C++, which I followed directly my first time through. Having done that, I decided to get a little bolder and repeat the experiment with Rust. This went well enough that I went even further and added multi-threading to speed it up; the picture above is the result of letting this multi-threaded renderer run for a while.
Anyway, this ended up being interesting enough to do a write-up about, so here it is; read on!
# Following With Rust
Translating the logic from C++ to Rust was uneventful;
operator overloading in Rust uses traits instead of an operator keyword, but otherwise all the vector math code ends up looking more-or-less the same as in C++.
# Rendering to a Window
The book outputs the rendered scene into a PPM file, which is an image format that can be created with text output. I decided it'd be nicer if I could see the output of the render right away, without having to spit it out into a file first. My first time through, I did this with C++ and raylib, which worked well enough.
Doing this with Rust, I decided to go with Miniquad. It's smaller and simpler than something like raylib, but it gets the job done. It also has minimal dependencies and compiles very quickly, which makes it really nice for simple projects like this that just need a window to draw to and basic input event handling.
The easiest way to get cross-platform graphics working in Miniquad is using its OpenGL graphics backend. OpenGL is only used to draw the final render into the window; the entire ray tracing logic is implemented in software, writing color values into a pixel buffer whose contents are uploaded into 2D textures for display.
# Real-Time Updates
The book puts its output into an image file. Unfortunately, this means that you can't see the rendered output until it's fully completed; this can take a long time when the render is large and many rays are involved.
The biggest time-eater in the process of ray tracing described by the book is antialiasing. Each pixel has multiple rays traced through it, each with a small random variation in direction. The resulting colors are averaged-together to determine the final color of the pixel. The book achieves this in the simplest way possible: stop at each pixel and fire, say, fifty rays, and average the colors to produce that pixel's final color before moving on.
I realized that showing results in a window presented me with another option: I could instead fire just one ray through each pixel for the whole scene per frame, sum the color values over successive runs, then just divide by the number of render passes to average the resulting colors. This allows ray tracing results to be seen much earlier and more often, as each frame completes.
For small renders, this is enough, but a large scene can take several seconds to even complete a single ray through each pixel of the whole view. To deal with this, I opted for progressive row updates: check if enough time was spent rendering after each row, and break out early if so. The last-rendered row is tracked so the render loop can just pick up where it left off last time. This means that render updates can be viewed with 60 FPS updates!
# Threads Step 1: Split View Rendering
The book renders the entire width of the view to render in a standard 2D nested loop arrangement. In order to divide the work of ray casting across multiple threads, the view needs to be split so that each thread can work independently of the others. I chose to split the view into multiple columns, each one with its own dedicated thread.

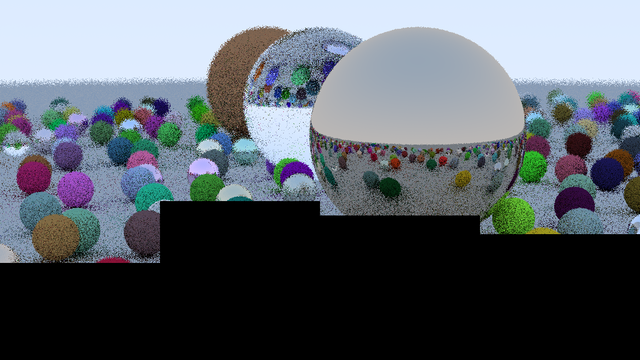
The image above is of the very first render pass of four separate views, each being processed by its own thread. Some of the views have more work to do than the others, so they make less progress in the same time as other, less-burdened views. Yes, it really is this grainy at the beginning; antialiasing with multiple passes counts for a lot of the final quality!
Each view needs its own render state:
- A color buffer that holds the sum of colors for all rays cast for each pixel to calculate its average color.
- A pixel buffer for the displayed red/green/blue/alpha values after averaging, to be uploaded to textures for final display.
- The portion of the scene that it should individually render.
- The number of render passes completed for the view so far.
- Size and on-screen position, which serve as inputs to a simple shader that puts everything in the right place.
Each thread also needs to manage its own pseudorandom number generator (PRNG).
# Pseudorandom Number Generation
As mentioned earlier, the antialiasing technique described by the book needs random numbers to work properly. Random numbers are also used to pick a direction to bounce rays that hit matte materials and metals with fuzzy reflections. There are lots of ways to get them, but it's important here that the multiple threads don't cause any data race problems from, say, fighting over the same random number generator.
To avoid this, as well as taking on any unneeded dependencies, I ported an existing PRNG: xoshiro256+ from https://prng.di.unimi.it.
As suggested on that site, it's seeded by feeding a u64 timestamp through another PRNG (splitmix64), and using its output to fill in its initial state.
The raw values produced by the xoshiro256+ algorithm range from 0 to u64::MAX.
To reduce the range to more usable values while avoiding bias, I use Lemire's Nearly Divisionless Random Integer Generation.
From here, this code can be made to produce f64 values from 0.0 to 1.0 that serve as the random number primitive used by the rest of the ray casting logic.
To get such f64 values from constrained u64 values, I generate a random u64 from 0 to (1 << 53) - 1 and divide it by 1 << 53.
I choose "53" bits here since f64s can't track +1.0 or -1.0 changes beyond that number of bits.
Doing this ensures the random f64 values are generated up to, but never equal to, 1.0, which is needed to avoid invalid values in calculations involving PRNG-produced values.
# Threads Step 2: Controlling Each Thread
As you might have noticed in the earlier picture, some threads have more work to do than others; I wanted every thread to have finished a render pass before any of them start the next. To make this happen, I needed a way for the main (non-render) thread to tell the render threads the number of render passes it wants. To decide when the next render pass should start (i.e. when to increment this number), the main thread needs to be told the number of render passes each thread has completed so far.
Solving this involves the use of channels (std::sync::mpsc), which lets threads talk to each other.
Creating a channel gives us a sender and a receiver, each of which can be given to a different thread.
The receiver puts its thread to sleep while waiting for the sender to give it data.
For each thread, a channel for passes wanted creates a sender for the main non-render thread in a passes_wanted_txs vector, and a receiver for the render thread named passes_wanted_rx.
Another channel for passes completed creates a sender for the render thread named passes_done_tx, and a receiver for the main non-render thread stored in a passes_done_rxs vector.
With all this set up, the main thread just needs to send the number of render passes wanted to each of the render threads to kick off rendering. When each thread finishes its render loop, it sends back the number of render passes it completed so that the main thread can decide if the next render pass should begin the next time around.
If this was all there was to it, there'd be no way for any of the render threads to stop their render loops early.
All the threads check a pause flag, which is a std::sync::atomic::AtomicBool that is shared between all the threads, including the main non-render thread.
The main thread can set this flag to cause the render threads to break from their rendering early.
The high-level render thread logic thus looks like this:
- Receieve number of render passes wanted through
passes_wanted_rx. - If render passes completed by this thread is less than the passes wanted:
- Run the render loop until the
pauseflag is set or a render pass completes.
- Run the render loop until the
- Send the number of render passes completed by this thread to the main thread via
passes_done_tx. - Go to step 1.
Here's a simplified version of the code that does this:
// Top-level render thread code.
while let Ok = passes_wanted_rx.recv
// ...
// View::render method that `view.render(...)` above calls.
# Threads Step 3: Top-Level Coordination
The main thread starts and stops all of the render threads using the senders stored in passes_wanted_txs and the pause flag.
Once per frame it does the following steps:
- Start each render thread by sending the number of passes wanted through each sender in
passes_wanted_txs. - Sleep for most of the duration of the current frame.
- Set the
pauseflag to stop any of the render threads still in the middle of their render loops. - Read back the number of render passes completed by each render thread via
passes_done_rxs. - If all render threads have completed the number of render passes wanted, increment that number to start the next render pass the next time around.
- Unset the
pauseflag for the next time around.
Here's the code for this:
// Camera::render method, called in the main non-render thread.
Doing all of this gives the main thread enough control over the render threads to start the next render pass only when previously-requested render passes have been completed by all of the threads.
Stopping for all of the render threads like this also ensures that all the pixel buffers are available for uploading as texture data for display.
# Wrapping Up
So how did it all turn out? This multi-threaded enhancement to the single-threaded Rust ray tracer ended up speeding up rendering by about 2.5 times, even on my modest hardware. The speed difference is even more noticeable compared to my first C++ version, beating it out by a factor of 4 times, according to my (unscientific) timings!
My attempts to add multi-threading to my C++ ray tracer didn't get very far; Rust's type system guided most of the design of the data sharing and algorithms here, which is likely why this all went as well as it did.
There is some performance left on the table here: the work to be done isn't divided evenly, so some threads are left twiddling their thumbs while others lag behind. Perhaps some sort of row-granular job queue would address this, but I like the relative simplicity of my current approach here.
The source code for all of this can be found here: https://github.com/tung/raytracing