Introduction
Welcome to the RuggRogue Source Code Guide! This is a web book describing the internal workings of RuggRogue: a simple, complete roguelike inspired by the first part of the Rust Roguelike Tutorial. Unlike that tutorial, however, it's made without the help of any game engine or roguelike helper libraries, instead relying on SDL2, with Emscripten for the web port.
RuggRogue itself plays out like many other roguelikes: You fight your way down a procedurally generated dungeon through ever-stronger monsters. Along the way you'll find weapons, armor and magical items that will aid you in your quest.
The source code of RuggRogue can be found at its GitHub repository. It consists of thirteen thousand lines of Rust code across forty four files. How does it all fit together? Read on and find out!
About this Book
RuggRogue is a relatively small open source game, so in theory everything about how it works could be learned by simply reading its source code. However, the code is arranged for the computer to run first and foremost, so broad ideas are obscured by a vast sea of details. The aim of this book is to highlight these ideas, from a high-level perspective all the way down to how they translate into functions and variables.
Studying the code architecture of RuggRogue is interesting for a few reasons. The game is directly inspired by the numerous roguelike tutorials that can found across the Internet, but it goes beyond them in a number of ways. It directly implements algorithms that tutorials typically provide canned solutions to, such as field of view and pathfinding. It also answers questions that such tutorials typically leave as an exercise to the reader, such as game balance, word wrapping and auto-run.
At the same time, RuggRogue is a complete game with a limited scope that doesn't go too much further than those roguelike tutorials. A person who has followed one of them has a realistic chance of learning from the RuggRogue source code without being overwhelmed.
Finally, RuggRogue's source code architecture differs quite a bit from most roguelike tutorials. RuggRogue arranges a lot of its logic into game states with an explicit game state stack (internally referred to as "modes" and "the mode stack"). This allows different screens and menus to keep their data and the code very close together. This technique is hard to find in roguelike tutorials, but it's described in this book.
Who is this Book for?
This book is written for programmers, so prior knowledge is assumed for things like variables, branches, loops, functions and basic data structures such as stacks, vectors and hash maps.
The game is written in the Rust programming language, but I try to keep it simple, so Rust knowledge is helpful to follow along but not mandatory. Readers coming from other programming languages may want to look up Rust topics such as traits (like interfaces in other languages), modules, pattern matching and iterators.
If you're an aspiring roguelike developer, this book will give you broad idea of the scope of a roguelike. Reading a chapter in detail should serve as useful guidance as to how to implement features yourself.
If you're developing a roguelike yourself already, this book should serve as an interesting case study to compare and contrast your existing approaches to various features. You may stumble across ideas you hadn't thought of to enhance the game you're working on.
If you're a programmer that's curious about game development in general, this book will shed some light on how a game functions under the hood. Everything game-related must be handled by the source code, since there's no game engine for anything to hide in.
How to Read this Book
Each chapter of the book is more or less standalone, so they can mostly be read in any order. There are a few cross-references, most of which point backwards.
Chapters vary in balance between describing high-level ideas and fine-grained technical details. Unfortunately, the early chapters are fairly detail-heavy due to establishing the technical base upon which all of the (hopefully) fun gameplay is built upon. If it becomes too much to bear, feel free to skip the chapter and come back later.
In all of the chapters, there are many references to the names of files, functions, variables and other code-specific things. You'll get the most out of this book with the source code handy in another window.
On the other hand, if you're not interested in juggling the game's source code while reading the book, you can still skim the chapters just for the ideas and skip over the source code references.
Chapter Overview
Dependencies: The technology, libraries and tools used to create the game.
Source Code Layout: The location and purpose of each file and directory of the source code.
Overall Game Flow: Game initialization, game loop and mode (game state) stack.
Event Handling: Handling of external events such as player input, window resizing and closing.
Rendering: Drawing grids of tiles onto the screen and performance-improving techniques.
User Interface: How menus work and screens are laid out.
Options: The options menu and how option changes are reflected in real-time.
Word Wrapping: How long lines of text are broken up to fit inside a limited space.
Entity Component System: How data is stored, retrieved and modified.
Game Data: The different types of data components and how entities are created and destroyed.
Saving and Loading: What save files look like and how they work.
Field of View: Determining which tiles the player and monsters can see using shadow casting.
Pathfinding: A* search algorithm for finding paths between points, its uses and subtleties.
Randomness: Pseudo-random number generation, seeds and reproducibility of results.
Map Generation: Data structures and logic for randomly laying out rooms, corridors and stairs.
Map Population: Placement of the player, monsters and items in freshly-generated maps.
Auto-Run: Implementing the smart directional "auto-run" movement command that follows corridors and crosses open space.
Turn Order and Combat: Monster turns, melee combat, damage formula and death handling.
Items: List of items, spawn rates, item-related data structures, menus and usage logic.
Hunger and Regeneration: How hunger fits into the rest of the game and its link to regeneration.
Experience and Difficulty: Game balance, numeric progression and pacing the flow of new monsters, weapons and armor.
Monsters: Mini-chapter with a list of monsters and cross-references to other chapters about how they work.
New Game Plus: Gameplay and implementation details of how successive wins change play-throughs.
Dependencies
RuggRogue doesn't use any roguelike helper libraries, but that doesn't mean it was made from scratch. In order to complete the game in a reasonable time frame, I had to make use of some external tools and libraries.
The Language: Rust
A lot has been said about the benefits of Rust as a programming language, so I'll stick to general points on how it relates to RuggRogue. When I was starting out, there were two things I wanted out of whatever I was going to build the game out of: correctness and performance, and I was willing to take the extra time to make them happen. In those ways, Rust was a perfect fit for the project.
On correctness, Rust's strong type system provided a robust foundation for structuring the game. It also allowed for bold code improvements that I would never have attempted without it; code that would otherwise needed whole rewrites or been left in a sub-par state. My attitude towards bugs is to catch and eliminate them early, and Rust's type and safety checks detect most low-level bugs pretty much as early as possible.
As for performance, I dislike any software that uses more CPU or memory than it needs to do its job. There's lots of software like that nowadays everywhere due to developers working under time pressure, but it still feels disrespectful to waste the time and resources of so many users to save some time for a few developers. But thanks to Rust, RuggRogue doesn't have to join their ranks. It still takes time and effort to improve performance, but the result is a game that doesn't feel awful to have open. I don't know if anybody else cares, even most of the players, but that's very satisfying to me.
Aside from correctness and performance, Rust's tooling and standard library served the creation of RuggRogue very well.
The Libraries
Rust refers to libraries as crates, so if I use the word "crate" anywhere, it's safe to mentally substitute it with "library". RuggRogue uses the following crates to do handle various things it doesn't already handle itself:
bitflags
bitflags enables the creation of compact bitmask values with symbolic names. RuggRogue uses it to encode the state of the Shift, Ctrl and Alt modifier keys in a single value that the game logic can check later.
bitvec
bitvec provides a memory-dense representation of what would otherwise be a vector of booleans that would be each be a byte and thus be eight times larger in memory. Reducing memory usage improves cache utilization, which makes the game faster in general. RuggRogue uses bitvecs to keep track of which map tiles the player has seen on the current dungeon level, as well as the tiles within each entity's field of view.
rand, rand_xoshiro
rand provides convenient APIs for extracting and using numbers from a backing random number generator. rand_xoshiro is one such backing whose implementation is simple, fast and high quality for non-cryptographic needs, like games. RuggRogue uses these crates to generate random numbers for level generation, item and monster spawning and combat calculations.
sdl2
sdl2 or "Rust-SDL2" as the crate refers to itself provides access to SDL.
SDL itself is a library that provides access to windows, input events and display in a cross-platform manner.
RuggRogue enables the image feature to load PNG files for tiles and ASCII symbols.
SDL is the only non-Rust external dependency of RuggRogue, which has interesting implications. By choosing SDL instead of pure Rust alternatives, RuggRogue is able to avoid having to compile literally dozens of additional dependent crates, which drastically saves on initial compile times and final binary size. On top of that, it means that unoptimized debug builds of RuggRogue run almost as fast as optimized release builds; for reference, the performance difference between debug and release builds of the pure Rust approach can be as high as 5x to 10x!
There is one big downside to using a non-Rust dependency in a Rust project, which is that it forces other developers who want to build the game to install SDL themselves; a task that requires some specialized platform-specific knowledge. It's easiest on Linux, which is what I developed RuggRogue on: a package manager installs SDL2 and SDL2_image in a standard location, Rust knows how to look in that standard location, and everything is flowers and sunshine. It's hardest on Windows, which is used by almost 90% of people with a computer, since there's no standard location for development packages, so tools have no idea how to cooperate without messing with paths and deciphering cryptic error messages when you inevitably screw it up.
serde, serde_json
serde provides plumbing and infrastructure to enable serialization and deserialization of data structures. serde_json uses that plumbing to convert data to and from the JSON text-based data format. RuggRogue uses these crates to convert its data structures into JSON when saving the game to a file, and convert them back out when loading a saved game from a file.
shipyard
shipyard is an Entity Component System (or "ECS") crate that provides:
- data storage in the form of entities with data components attached,
- systems that are functions that run on subsets of entities based on which components they have, and
- workloads that are bundles of ordered systems that are to be executed repeatedly.
However, RuggRogue only uses the entity-and-component data storage of Shipyard, and mostly uses conventional functions, reaching for systems only when convenient and avoiding workloads entirely. This avoids having lots of message queues to do cross-system communication, and thus a lot of red tape, since systems can't directly call other systems in the classic ECS arrangement. On the other hand, I have to carefully handle every function call, every branch and every loop to make sure everything runs at exactly the right time, and the right number of times, which the flat and linear model of system-based workloads sidesteps entirely. My "EC-only" approach isn't necessarily better than the full ECS approach, but it makes it very different to what it otherwise would have been.
wyhash
wyhash is a hashing crate; it ingests some data and calculates a hash value for that data. Remember rand and rand_xoshiro? There's more to the random number story in RuggRogue. RuggRogue uses wyhash to create seeds for temporary random number generators that it uses.
The Web Support: Emscripten
The way that RuggRogue runs on the web is by telling Cargo (Rust's main build tool) to build for the wasm32-unknown-emscripten target.
If we ignore the unknown, wasm32 is the target architecture (this would be something like x86_64 for native), while emscripten is the target OS (that's linux if I build the game natively for myself).
wasm32 is the 32-bit flavor of WebAssembly, which is a machine-code-like binary format that web browsers can run in a sandbox as an alternative to JavaScript.
But WebAssembly can only muck about with memory and numbers; it has to call host functions to do interesting things, e.g. JavaScript functions in a web browser.
This is where Emscripten comes in. Emscripten provides a whole bunch of host functions that make a WebAssembly blob believe it's running in a classic desktop-like environment. For example, Emscripten provides POSIX-like file system APIs that enable the same file system code to compile and run unmodified in a web browser as it does natively. Critically for RuggRogue, Emscripten implements the SDL API, so the windowing, input event handling and rendering all work in a web browser with minimal changes. When Emscripten works, it's like magic.
But Emscripten's magic is imperfect. A part of it is differences imposed by the browser environment that Emscripten operates in. In a native application, processes automatically share access to the CPU due to pre-emptive multi-processing managed by the operating system. In a browser, a tab has a single main thread, and if, say, a game runs its own main loop that never yields control back to the tab, that tab will just lock up. A game that wants to run in a tab can't have a real main loop. Instead, it has to be adapted to run just a single iteration of its main loop, and have Emscripten yield control to the browser. Emscripten then runs this loop at around 60 FPS on the game's behalf. So everything is good, right?
Unfortunately, RuggRogue has a special requirement for its own game loop. When RuggRogue isn't handling an input event or animating something, it waits for an event, acting more like a GUI program than a game. I pored over a lot of documentation, but for the life of me I could not find a good way to get Emscripten to support this kind of execution flow. In order for RuggRogue to keep its own game loop while running in a browser tab without locking it up, I had to reach for a transformation known as Asyncify. The link explains what it does better than I can here. Sadly, it's a pretty invasive transformation with a high CPU cost, but it allows CPU savings to occur when the player is idle, so it's still a net win.
Asyncify saves CPU by substituting sleep calls that RuggRogue makes during its main loop with the browser's setTimeout JavaScript function.
But there's a problem: RuggRogue relies on fine-grained sleep calls for smooth gameplay, but setTimeout has delays when called repeatedly in a deep call stack.
It just so happens that the Asyncify transformation leads to very deep call stacks.
The result?
RuggRogue suffers unavoidable stutter in the web version.
There's no way around it without redoing its approach to web support entirely.
As well as the stutter, Emscripten is tricky to use with Rust in general.
In particular, it relies on the output format of LLVM tools.
These formats are not stable across versions, so Emscripten relies on the most recent revision of LLVM at the time of development.
Meanwhile, Rust runs its own version of LLVM which is not the most recent revision of LLVM at any given time.
In order to correctly build a program with Rust and Emscripten, they usually have to use matching LLVM versions.
The LLVM version used by Rust can be found using rustc --version --verbose, but I couldn't find how to do the same for Emscripten anywhere I searched.
The use of version 1.39.20 is from Therocode's blog, who I can only assume did a deep dive into the release histories of Emscripten and LLVM to discover the version number.
Using the newest version of Emscripten with Rust will likely not work.
I would strongly consider taking the extra time to learn Rust and WebAssembly without the Emscripten bit in the future. I don't know if it would have gained results any quicker, but it seems like it would have dodged a lot of the headaches mentioned above.
The Migrated Off Of: Piston
RuggRogue did not begin life as an SDL game; it began life as a Piston game. Piston is one of the earliest Rust game engines that existed, if not the earliest. I initially chose it because it seemed like the only game engine that would let me write my own game loop, and because I didn't know any better.
RuggRogue no longer uses Piston. Using Piston to draw a grid of characters onto the screen in the most obvious way led to extremely poor performance. Trawling through documentation spread out across Piston's many sub-crates did not reveal any way to improve performance, so eventually it was just dropped entirely. Switching from Piston to plain SDL both drastically dropped the compile time and boosted the performance of RuggRogue by a lot.
Source Code Layout
RuggRogue comes to about 13,000 lines of source code. In Rust terms, the entire RuggRogue source code comprises a package made up of two crates: a library crate and a binary crate. The library crate contains things that RuggRogue needs to function that aren't specific to it as a game. The binary crate has the game-specific stuff and makes use of the library crate to form the complete game when built.
The Library Crate
Some people consider SDL to be a game engine, but what it provides is so low-level that it's really more of a layer to build a game engine on top of. RuggRogue's library crate is effectively a small, custom game engine for RuggRogue the game. It also has some utilities that are useful to RuggRogue as a roguelike, but are otherwise independent of the game itself.
The library crate lives in src/lib/, and is made up of the following files:
src/lib/lib.rs- The "crate root" of the library crate, in Rust terms, that pulls together all of the other files that make up the library crate.src/lib/field_of_view.rs- Field of view calculation.src/lib/input_buffer.rs- A first-in-first-out queue of simplified input events translated from SDL input events, consumed by the game proper.src/lib/path_find.rs- A* path finding algorithm that monsters use to pursue the player.src/lib/run.rs- Window initialization and the main game loop.src/lib/tilegrid.rs- A pixel-perfect tile grid implementation, used to render everything that shows up on screen; this is the biggest source code file in the game!src/lib/util.rs- Contains small utility structs, namelyColor,PositionandSize.src/lib/word_wrap.rs- Word wrapping algorithm that splits a long string into lines of at most a given number of characters.
In theory, the existence of this library crate means that other Rust projects could make use of it. In practice, it might be tricky, since I only included enough features to make RuggRogue functional. Faced with the task of writing my own game engine, my guiding principle was to never write code I didn't have an immediate use for. Unused code is untested code, and untested code is buggy code.
The Binary Crate
The binary crate contains all of the logic that is specific to RuggRogue as a game.
The top-level src/ directory is a melting pot of different things:
src/main.rs- The crate root of the binary crate that pulls together the rest of the files listed below, with the entry point of the game that sets everything up and launches the game loop.src/bitgrid.rs- HoldsBitGrid, a struct used to track map tiles revealed by the player, as well as which tiles are contained in the fields of view of entities.src/chunked.rs- HoldsChunkedMapGrid, a struct that handles a dirty rectangles drawing scheme to avoid having to repeatedly redraw large portions of the map on screen.src/components.rs- Definitions of component structs, which are data associated with entities.src/damage.rs- Damage calculations and handling of dead entities.src/experience.rs- Experience and difficulty tracking, as well as the definition of how combat stats relate to experience level values.src/gamekey.rs- Translation of SDL key values into game-specific action keys.src/gamesym.rs- Symbolic representation of tile appearances and their ASCII equivalents, as well as a hard-coded mapping for the tileset used by the game.src/hunger.rs- Hunger and regeneration tracking.src/item.rs- All item-related functionality and book-keeping, along with handling of item-inflicted status effects.src/magicnum.rs- Arbitrary values used to help seed the different random number generators created in other places in the source code.src/map.rs- Holds theTileandMapstructs, handles map generation and maintenance of a tile-based spatial cache for performance.src/menu_memory.rs- Holds aMenuMemorystruct that remembers the last position of the cursor in various menus.src/message.rs- The message buffer.src/monster.rs- Monster turn handling and AI.src/player.rs- Player input and turn handling, as well as auto-run logic.src/render.rs- Drawing of entities on the map.src/saveload.rs- Everything to do with saving the game to and loading a game from a save file.src/spawn.rs- Spawning and despawning of all entities, including filling map rooms with spawns, along with monster, weapon and armor appearances.src/ui.rs- Arrangement and drawing of the main game interface, i.e. the map, sidebar and messages.src/vision.rs- Updates fields of view for entities that have one and need it updated.
You'll also notice the src/modes/ directory.
This is the home of what I call the mode stack as well as the modes that go on it.
There'll be more on this later on, but modes represent screens, menus and dialogs, while the mode stack determines what modes appear on screen and which one updates at any given time.
The files in src/modes/ consist of:
src/modes/mod.rs- The Rust sub-module that pulls together the individual mode files, as well as holding the mode stack logic.src/modes/app_quit_dialog.rs- Confirmation dialog when the player tries to close the window in the native build of the game.src/modes/dungeon.rs- The main gameplay screen that drives the core gameplay loop and pulls all of the game logic together.src/modes/equipment_action.rs- Menu of actions that can be performed when selecting an equipped item.src/modes/equipment_shortcut.rs- Quick hotkey-reachable menu to remove or drop an equipped item without having to go through the inventory.src/modes/game_over.rs- The game over and victory screens.src/modes/inventory.rs- The inventory menu.src/modes/inventory_action.rs- Menu of actions that can be performed when selecting an inventory item.src/modes/inventory_shortcut.rs- Quick hotkey-reachable menu to perform an action on an item without having to go through the inventory.src/modes/message_box.rs- A simple message box.src/modes/options_menu.rs- The options menu where settings can be changed.src/modes/pick_up_menu.rs- Menu of items that the player can pick up at their current map position.src/modes/target.rs- A screen that allows the player to choose a target position when they use an item that needs a target.src/modes/title.rs- The title screen.src/modes/view_map.rs- A screen that lets the player move the camera around and describe map positions.src/modes/yes_no_dialog.rs- A simple yes-or-no dialog.
Assets
The assets/ directory has files loaded by the game at runtime:
assets/gohufont-8x14.png- A PNG of IBM Code Page 437 rendered with GohuFont, the default font of the game.assets/terminal-8x8.png- A PNG of IBM Code Page 437 rendered with a smaller 8-by-8 pixel font that came from theresources.zipof the Rust Roguelike Tutorial.assets/urizen/urizen-onebit-tileset-mono.png- A custom black-and-white version of one of the tileset images from the Urizen 1Bit Tilesets by vurmux.assets/urizen/readme.txt- Description of my changes to the Urizen tileset image.assets/urizen/LICENSE- License text for Urizen 1Bit Tilesets.
Everything Else
There's a bunch of non-Rust or not-quite-Rust files that can also be found in the source code:
BUILD.md- Instructions for building RuggRogue from source.Cargo.toml- RuggRogue's package metadata that describes the source code structure and dependencies and is used by Cargo to build the game..cargo/config.toml- Extra Cargo configuration for building the web version of the game.clippy.toml- Settings for Clippy, Rust's source code linter.index.html- HTML page that hosts the web version of the game.LICENSE.md- License text for RuggRogue.README.md- Basic information about RuggRogue.ruggrogue.js- Support JavaScript needed for the web version of the game.
Finally, there's book.toml and the book/ directory, which is the very book you are reading right now!
If you have the RuggRogue source code, you can install mdbook and run mdbook build --open for your very own local copy.
Overall Game Flow
The overall flow of the game can be divided into three main parts:
- initialization
- the main game loop
- the mode stack that the main game loop continuously updates
We'll look at each of these in turn.
Initialization
The main function in src/main.rs is where it all begins.
One of the most important things initialized is the world, courtesy of the Shipyard crate, whose sole purpose is to store and provide access to all game-related data.
There's a bunch of calls to world.add_unique to add uniques, which are the closest thing the game has to global variables.
"Uniques" are Shipyard's term for "resources", which is the term used by other Rust ECS crates such as Specs, Legion and bevy_ecs.
In any case, the uniques that RuggRogue adds to its world are a mix of essential and dummy data.
Inserting dummy data now means it can be replaced unconditionally later, simplifying that code.
The most important thing initialized is the mode stack, which is initialized with a mode representing the title screen. The mode stack deserves its own section, so that will be covered later; just keep it in mind for now.
The final bit of initialization in the main function is RunSettings, which controls the behavior of the ruggrogue::run function that launches the main loop of the game.
Alongside the basic window settings and frames per second is the tileset_infos field.
If you want to add new tilesets and fonts, this is where they're added.
The game's option menu assumes that fonts come before tilesets.
Note that if you add or remove fonts, you'll want to change the NUM_FONTS constant in src/modes/options_menu.rs to match your changes.
If you want to add a tileset, check out the urizen_tileset_info function in src/gamesym.rs for an example of how to map display symbols to tiles.
At the end of the main function is a call to ruggrogue::run that launches the main game loop with a callback that continuously updates the aforementioned mode stack.
The Main Game Loop
The main game loop lives in the run function that can be found in src/lib/run.rs.
Note that we've gone from the binary crate to the library crate at this point.
We can start the game loop now, right?
I lied, there's more initialization.
This initialization is a lot more technical than the stuff that main was setting up before.
Most of the initialization here is to use SDL to prepare a window, a canvas representing the drawable area of that window and an event pump, which is how the game can react to player inputs and window resizing.
Beyond SDL, the layers variable is noteworthy.
It's a vector of TileGridLayers, which in turn are vectors of TileGrids.
Everything that appears on screen does so via this structure; it can be thought of as a hand-rolled scene graph.
TileGrids and TileGridLayers will be covered in more detail in a later chapter.
Alright, we can finally move onto the game loop proper, that is, everything inside while !done { ... }.
The game loop is modelled directly from the one described under "Play catch up" in the Game Programming Patterns book.
The idea of this kind of game loop is that you think of wall clock time as producing a resource that is repeatedly consumed in fixed amounts by running the update logic.
However, it's heavily adapted to the needs of RuggRogue, which are kind of unusual compared to a conventional video game.
The biggest thing I wanted to avoid with RuggRogue was constantly spending CPU time running update logic when there was nothing to update. I didn't want RuggRogue to turn the player's laptop into a hand warmer because they left the game window open while doing something else. In this respect, RuggRogue's game loop is closer to that of a GUI program than a video game. This sole requirement unfortunately rules out the use of almost every single Rust game engine, including bracket-lib and Bevy (at least in its current pre-editor state). Virtually all of the Rust game engines out there have their own game loop that they want you to use, with no way to tell it to wait for an event before updating again. To be honest, I wasn't intending to write my own game engine for RuggRogue, but this one requirement kind of forced me into it, and the rest is history.
There are two parts to making RuggRogue wait for input when needed: the active_update flag and the RunControl enum.
When active_update is true, updates are continuously requested at the desired FPS rate, and when it's false it'll wait for an event before updating instead.
The active_update flag is initially set, since the game needs to update at least once in order to draw the title screen.
The RunControl enum found at the top of src/lib/run.rs is how updates tell the game loop to set the active_update flag.
Every update function from the main gameplay to the smallest dialog returns one of the variants of RunControl.
Anything that finishes its work in a single frame returns RunControl::WaitForEvent, such as the player moving a single step or moving a menu cursor.
Things that require repeated updates instead return RunControl::Update, such as the player auto-running along a corridor or resting until healed.
RunControl::Quit is only returned when the mode stack empties out, which means there's nothing left to update or show on screen.
If you're reading the code, you may wonder why there's a big if with two whole branches that run the update callback.
This is to ensure correct time book-keeping when going back and forth between active and and inactive updating.
For example, say that there's an update, then the player waits for ten seconds before pressing a key that triggers active updates.
If the game is set to run at 30 FPS with active updates, this would trigger 300 catch-up updates without special handling!
The Mode Stack
I've hinted at this idea of a "mode stack" before, so it's time to go into it in more detail. The idea of a mode is a unit of state with associated update and drawing logic that has exclusive, or modal (hence the name), access to update and control logic at any given time. The game has a single mode stack that houses all of the modes, drawing all of the modes in their stacked order while updating only the top mode.
At this point, you might be thinking, "Hey, wait a minute, isn't this just a game state stack? Why come up with a different name for something everybody else has already settled on?" Indeed, you'll get a lot more useful results from search engines if you type "game state stack" instead of whatever the heck I'm calling it. However, I didn't come up with a different name for no reason. There is a dizzying amount of writing about game development on the Internet that goes over how to do different things, but in very similar and easy-to-confuse terms. "State" is one of those words that means slightly different things to different people. "State" refers to the pattern of bits in memory and allocated resources, but "state" is also a computer science concept for finite state machines. Using different names for different ideas makes thinking about complex problems easier, and I refer to "modes" instead of "states" here for this reason. My original inspiration for this approach comes from "The Interface Stack Model" (emphasis mine), but "interface" is unfortunately already a term used in object-oriented programming. This approach is also somewhat similar to "Pushdown Automata" from the Game Programming Patterns book. Anyway, enough about names, you can substitute "mode" with "state" and everything here should still make sense.
If RuggRogue is a living being, the main game loop would be its heart, pumping updates, while the mode stack would be its brain, deciding how to react to inputs and what gets drawn on screen.
The mode stack can be found near the bottom of src/modes/mod.rs, which is back in the binary crate.
This might seem strange; surely something as general as this mode stack belongs in the library crate instead, right?
However, my experience on this game says otherwise.
The original mode stack was much simpler than the one that exists in the game code now.
I treated it as a living, breathing thing and evolved it to suit the needs of the game, and you can't really put something that constantly evolves into a library that presents a stable interface.
The mode stack must be game code, not library code.
The mode stack is represented by the ModeStack struct (surprise), which is just a vector of Mode structs, along with a single ModeStack::update function.
The ModeStack::update function more or less does the following:
- Call
Mode::prepare_gridson all of the modes in the stack to create and position tile grids that the modes draw onto. - Call
Mode::updateon the top mode and catch its result. - React to the returned result if needed, e.g. to push a new mode or pop the top mode.
- Call
Mode::drawon all of the modes in the stack to fill in the contents of tile grids that will later be displayed on screen.
These mode-related functions exist just above the mode stack code inside the impl Mode block.
The purpose of these functions is to dispatch to the function of the same name in each mode according to its type.
For example, if there's a YesNoDialogMode at the top of the mode stack, ModeStack::update would call Mode::update which in turn would call YesNoDialogMode::update, which can be found in src/modes/yes_no_dialog.rs.
You'll notice that the dispatching code is mostly a copy-paste job; there are a couple of alternatives that would have been much more concise, but I decided against using.
Idiomatic Rust code would have made a Mode trait instead of an enum and relied on dynamic dispatch using Box<dyn Mode>, but having every mode living in different parts of heap memory was something I wanted to avoid for performance reasons.
There's also an enum_dispatch crate that does what I did by hand automatically, but I didn't want to pull in dependencies for things I could easily write myself.
Mode::update returns a 2-tuple of ModeControl and ModeUpdate, whose definitions are just above impl Mode in src/modes/mod.rs.
ModeControl represents what the update function of any given mode wants to have done to the stack, like ModeControl::Switch, ModeControl::Push or ModeControl::Pop.
Note the ModeResult in ModeControl::Pop: every mode is accompanied by a corresponding mode result, e.g. YesNoDialogMode can pop itself off the stack and return either YesNoDialogModeResult::Yes or YesNoDialogModeResult::No.
The next mode whose update function is called will receive this result via its pop_result parameter.
Rust's expressive type system is invaluable for dispatch logic based on types like this.
A lot of articles written about game state stacks gloss over result handling, but it's the difference between a dialog returning something meaningful and just vanishing into thin air, so if you want proper dialogs and not just inert windows, it's crucial.
ModeUpdate determines what should happen after ModeStack::update is done.
ModeUpdate::Update and ModeUpdate::WaitForEvent correspond to active and inactive-style of main game loop updating described earlier.
You may have noticed the while loop surrounding most of the code in ModeStack::update; ModeUpdate::Immediate exists solely as a fallthrough case to repeat that loop.
ModeUpdate::Immediate is used to make the next mode's update function run in the current frame instead of the next.
This is useful to handle the result of a dialog straight away when it closes instead of lagging for a frame.
One last detail I left out is Mode::draw_behind.
Remember how modes represent screens as well as menus and dialogs?
There's no need to draw behind a mode that covers the entire screen, so Mode::prepare_grids and Mode::draw are skipped for other modes behind fullscreen modes like this, and Mode::draw_behind is what decides if a mode is fullscreen.
If you want an example of a simple mode, the simplest one can be found in src/modes/yes_no_dialog.rs.
The most important mode is probably DungeonMode, which represents the main gameplay screen and handles player and monster turn distribution; this can be found in src/modes/dungeon.rs.
Event Handling
As a game, it's crucial for RuggRogue to react to events. The most important events are the key presses of the player playing the game, but there are other kinds that need to be handled too, like window resizing, mouse inputs and attempts to close the game window. This chapter will talk about where events come from and how the game responds to them.
Receiving Events
Our journey begins in the ruggrogue::run function in the src/lib/run.rs file.
The sdl2 crate provides what's called an event pump, which is the source of all events that the game will see.
This event pump is stored in the aptly-named event_pump variable so that the main game loop can pull events out of it with its wait_event and poll_iter methods.
Each event from the event pump is handled in two phases:
- Do things that need to be handled straight away.
- Enqueue the event in an input buffer so that it can be handled later during a proper game tick.
Some events are directly handled only and aren't enqueued, such as window resizing and mouse inputs. On the other hand, key press events have a little bit of direct handling before being enqueued for the game logic to handle them properly later. Events that the game doesn't care about are simply ignored.
Direct Event Handling
There are three kinds of events that are handled directly in the game's main loop: window resizing, mouse inputs and a couple of rendering-related events.
Window resize events update the window_size variable in the main loop with the new window size.
This is later sent into the update callback that was given to the ruggrogue::run function so that the updating and drawing logic are always aware of the size of the game window.
The updating logic in particular needs this info so that menus know how far to scroll when pressing the page up and page down keys.
The game hides the mouse cursor in response to key presses; mouse input events reveal it again. These include mouse movement, mouse button presses and mouse wheel movement.
The two rendering-related events that need direct handling are both things that can happen on Windows with DirectX being used as the graphics backend for SDL:
sdl2::event::Event::RenderTargetsResethappens when graphical texture data needs to be updated.sdl2::event::Event::RenderDeviceResethappens when textures have been lost and need to be recreated entirely.
In both cases the game will flag its graphics-related data to do the right thing the next time that they need to be drawn to the screen.
The Input Buffer
Once any direct handling is done, the event may be added to the input buffer. The game logic will almost always run less often than the main loop, so the purpose of the input buffer is to save events from the main loop so that the game logic can react to them later.
The inputs variable in the ruggrogue::run function holds the input buffer.
This is an InputBuffer struct that enqueues mainly keyboard events when its InputBuffer::handle_event function is called with an event.
The InputBuffer struct is defined in the src/lib/input_buffer.rs file.
When the game logic wishes to check for input events, it follows these steps:
- The game logic calls the
InputBuffer::prepare_inputfunction to retrieve a single input event from the buffer. - The game logic calls the
InputBuffer::get_inputfunction to check the prepared input event. - The end of the game loop calls the
InputBuffer::clear_inputfunction to make way for the next call to theInputBuffer::prepare_inputfunction.
The events stored in the InputBuffer struct are a stripped-down form of SDL's events in the form of small InputEvent enums that mainly hold SDL key codes that are unique for each keyboard key.
As InputEvents are pulled from the InputBuffer, the InputBuffer tracks the press state of the modifier keys (i.e. Shift, Ctrl and Alt) that the game logic can read using the InputBuffer::get_mods function.
The game logic will typically combine the prepared input and modifier key state into a logical game key, represented by the GameKey enum defined in the src/gamekey.rs file.
The gamekey::from_keycode function in that file translates the SDL key code values into logical game key values.
Note that multiple key codes can translate into a single game key, e.g. the up cursor key, 8 on the number pad and k all translate into the GameKey::Up value.
Player Input Logic
Every game mode pulls inputs from the input buffer, but the most important of these modes is DungeonMode.
The DungeonMode::update function defined in the src/modes/dungeon.rs file is the central place that drives player and monster turns.
Player inputs are handed off from this function to the player::player_input function defined near the bottom of the src/player.rs file.
Under normal circumstances, where the player is not asleep or auto-running, the player::player_input function will prepare, retrieve and translate an input event into a game key.
How each game key is handled falls into one of three categories:
- Movement - Move the player or melee attack an adjacent enemy with the
try_move_playerhelper function. - Wait in place - Cause the player to wait a single turn with the
wait_playerhelper function. - Anything else - Return a value that the
DungeonMode::updatefunction should handle instead, usually by manipulating the mode stack to show a dialog or menu.
The return value of the player::player_input function is a PlayerInputResult enum variant whose definition is found near the top of the src/player.rs file.
The most important values are PlayerInputResult::NoResult and PlayerInputResult::TurnDone, which control whether or not the DungeonMode::update function should finish the player's turn and advance time.
Valid player actions will typically alter the world state during the player::player_input function call and then cause it to return the PlayerInputResult::TurnDone value.
The AppQuit Event
In the native build of RuggRogue, when the player attempts to close the game window, the sdl2 crate emits the sdl2::event::Event::Quit event.
This is translated into an InputEvent::AppQuit event that gets inserted into the InputBuffer in the InputBuffer::handle_event function.
This means that every place in the game logic that checks for input must also respond to this InputEvent::AppQuit event.
Responses fall into one of three categories:
- Most modes pop themselves off the mode stack and return an
AppQuitresult, e.g. aFooMode::updatefunction returns aFooModeResult::AppQuitresult. DungeonModepushes an instance ofAppQuitDialogMode(defined in thesrc/modes/app_quit_dialog.rsfile) to show a save-and-exit confirm dialog; it also does this if any mode on top of it in the mode stack returns its ownAppQuitresult.AppQuitDialogModeignoresAppQuitevents while waiting for the player to pick a response.
The combined effect of these responses will either quit the game outright (by emptying out the mode stack) or show a save-and-exit confirm dialog if the player is in the middle of playing the game (the DungeonMode catches AppQuit events and mode results to show the dialog).
Rendering
This chapter is about how RuggRogue uses SDL to display things on the screen. This will cover the game's overall rendering strategy, the use of tile grids to organize what's displayed, tilesets, the overarching phases involved in displaying things and finally a couple of strategies to improve drawing performance.
Rendering Strategy
For a 2D tile-based roguelike game such as RuggRogue, there are two common strategies to getting pixels onto the screen when considering modern video hardware. There's software rendering, where the CPU decides what each pixel on screen should look like, then uploads the whole screen as a texture for the GPU to ultimately display. This is simple, but slow, especially considering that the CPU also has to deal with game logic. On the other hand, there's the hardware rendering approach using texture atlasses, where tilesets are uploaded for the GPU in advance and the CPU feeds data buffers that describe where said tiles should be displayed on screen for the GPU. This is much faster than the software approach, but a fair bit more complex, on top of of requiring an API that can create graphics pipelines with custom shaders.
Instead of either of those things, RuggRogue adopts a hybrid rendering strategy that combines elements of both software and hardware rendering. The game breaks down what it wants to display on screen into tile grids whose contents are rendered by the CPU in a software rendering fashion. It then uses SDL's drawing API to arrange those tile grids on screen, which is aware of video hardware and thus makes up the hardware rendering portion of the strategy.
So why hybrid rendering? Early in development, RuggRogue rendered its grids by drawing the background of each cell as a colored rectangle, followed by the contents of the cell in the foreground color. This approach was unplayably slow, to the point that transitioning to pure software rendering was a noticeable performance improvement. The source of this slowness is the approach to drawing used by many 2D graphics libraries and game engines that advertise "hardware-accelerated graphics". These libraries and engines provide ad-hoc drawing APIs where, at any time, the CPU can tell the GPU to draw something. This approach is known as immediate mode drawing, which is impossible for accelerated graphics hardware to handle quickly. Any 2D drawing API that doesn't use or allow the creation of a graphics pipeline to feed data into shaders will be slow in this way. SDL's bundled drawing API, like many others, falls in this performance pit. SDL provides an OpenGL escape hatch, but OpenGL is its own can of worms that I didn't feel like dealing with when I just wanted to get things on screen fast.
SDL's immediate mode drawing approach isn't useless though. SDL's drawing API in general avoids the complexity of graphics APIs that require the creation of full-blown graphics pipelines, shader compilation and linking. It also only really suffers performance issues when it's used to draw a lot of small things; it's actually quite fast when drawing a few large things instead. In RuggRogue, these large things are tile grids, and this is how the hybrid rendering strategy came to be. It's probably not as fast as a proper graphics pipeline, but it's much simpler to put together. It also separates the drawing of the contents of a tile grid from where and how it's shown on screen, which makes drawing and arranging tile grids on screen easier.
Just before diving into the rest of this, there a couple of SDL-specific things to keep in mind. SDL's drawing API stores image data in two ways: surfaces and textures. An SDL surface is an image buffer in RAM that the CPU can render into. An SDL texture is image data that exists in video hardware that the GPU can sample from and display on screen. RuggRogue uses both of these things, typically by rendering into an SDL surface and uploading its contents into an SDL texture for display.
Tile Grids
As you may have guessed, a tile grid is a grid of tiles (surprise). Everything that RuggRogue displays is a tile grid, from the main gameplay screen and sidebar to the smallest dialog. There are three parts to the tile grid system: tile grid layers that hold tile grids, tilesets and the tile grids themselves.
Tile Grid Layers
TileGridLayer can be found at the bottom of src/lib/tilegrid.rs.
Its definition is rather boring: a vector of tile grids along with a drawing-related flag.
What matters more is its purpose and usage.
A TileGridLayer represents all of the tile grids that belong to a specific mode in the mode stack.
The main game loop (in the run function in src/lib/run.rs) composes tile grid layers into a vector stored in the layers variable.
The mode stack (at the bottom of src/modes/mod.rs) receives the layers vector and is responsible for ensuring that each of its modes gets a corresponding TileGridLayer.
The mode stack also sets the draw_behind flag that the main game loop later uses to determine the bottom-most visible TileGridLayer whose tile grids should be displayed on screen.
In this way, the layers variable in the main game loop is effectively the game's scene graph.
Tilesets
Tilesets are represented by the appropriately-named Tileset struct that can be found towards the top of src/lib/tilegrid.rs.
Tilesets hold image data representing individual tiles that are drawn into tile grid buffers.
Tilesets perform three main tasks:
- Loading and storing tile image data for quick rendering later.
- Converting tile image data into grayscale to enable recoloring.
- Rendering tile image data onto surfaces provided by tile grids themselves.
Loading of a tileset is controlled by the TilesetInfo struct near the top of src/lib/tilegrid.rs.
They can be seen in action in the main function in src/main.rs, where they define basic font and tileset information for loading.
The definition of TilesetInfo is well-commented, but the font_map and symbol_map are worth mentioning.
They hold the information needed for tilesets to translate their logical grid cell contents into tile images.
Tile image data is prepared specifically to facilitate fast rendering.
The tileset image is reduced down to only the tiles that the font_map and symbol_map refer to; all other tile image data is discarded after the loading process is done.
In addition, the surviving tile images are arranged as a one-tile-wide surface.
Image data is stored in row-major order, so this arrangement ensures that the different pixel rows of each tile image are as closely packed as possible to minimize cache misses while rendering.
To support recoloring, tile image data is stored in grayscale.
The grayscaling process occurs in the Tileset::transfer_tiles function.
A "grayness" value is calculated from the input image data.
A "grayness" of zero is set to transparent black, while anything else is set to white with "grayness" serving as alpha.
The job of rendering tile image data onto a surface is done by the Tileset::draw_tile_to function.
If you read the source code of this function, you'll notice references to CellSym and text_fallback.
CellSym will be covered in the next section.
text_fallback refers to the Symbol::text_fallback function all the way at the top of src/lib/tilegrid.rs.
Symbol itself is a Rust trait, and the purpose of text_fallback is to provide a font alternative to a game symbol if it doesn't define a graphical tile image.
RuggRogue's fallbacks can be found in the GameSym::text_fallback function in src/gamesym.rs, which is the text_fallback function inside the impl Symbol for GameSym block if you're not used to reading Rust syntax.
Apart from symbol fallback handling, Tileset::draw_tile_to recolors tiles using the SDL-provided set_color_mod function that multiplies the foreground color with the grayscaled tile image data from before.
The rendering proper is handled by calling the SDL-provided blit function, which performs surface-to-surface software rendering.
Tile Grids
The TileGrid struct defined around the middle of src/lib/tilegrid.rs covers a lot of different responsibilities.
It probably has too many responsibilities and I'd consider splitting it up if I were to do this again, but endless refactoring also means endless game development cycles.
So keep in mind that what I'm about to describe is the state I left it in when I decided that the game eventually needed to be finished and is not necessarily an ideal design.
I'll briefly touch on all of the key players involved before covering how stuff works.
A TileGrid consists of a few major parts:
- Two
RawTileGridstructs: one holds the logical contents of the grid, while the other is the same data from the previous frame. - An SDL surface
bufferthat holds the grid contents rendered with the tile grid's associated tileset. - An SDL texture that serves as the GPU-side destination of the contents of that buffer.
- A
TileGridViewthat describes where and how the tile grid should appear on the screen. - A bunch of dirty flags to avoid redoing work that isn't needed.
The RawTileGrid is defined above the TileGrid struct in src/lib/tilegrid.rs.
It holds a grid of Cells (itself defined above RawTileGrid and not to be confused with the Rust standard library struct) that consist of a CellSym, a foreground color and a background color.
The role of CellSym (defined above Cell) is to hold either a character or a symbol.
This symbol is a non-library type that implements the Symbol trait whose definition is a the top of src/lib/tilegrid.rs.
The Symbol trait is implemented on the game side by the GameSym enum that can be found in src/gamesym.rs.
The purpose of GameSym is to provide distinct symbolic names to tile appearances, such as "Player", "Ration", "DownStairs" or "WallNe" (north-east wall corner).
This allows drawing code to use these symbolic names to represent tile appearances in a flexible manner.
TileGridView is defined just above TileGrid in src/lib/tilegrid.rs.
It holds the position, size and offset within a bounding box in which its TileGrid owner will be clipped.
The color_mod field alters the color of the whole tile grid at display time, which is mainly used to dim tile grids associated with inactive background modes.
It also holds an integer zoom factor that the options menu can alter to zoom the map and the user interface.
The Rendering Process
Up until now, I've been using the terms "draw", "display" and "render" rather loosely. To make this process easier to understand, I'll switch to these specific terms that describe how a tile goes from being drawn to displayed on screen, in this order:
- Draw: Plotting of a character or symbol into a tile grid cell with foreground and background colors.
- Render: Combining tile grid cells and colors with tileset data to produce a pixel appearance in a tile grid's buffer.
- Upload: Uploading a tile grid's rendered buffer into the GPU-accessible texture associated with the tile grid.
- Display: Putting the tile grid on the screen using the information in the
TileGridView.
Drawing is the first thing that happens when the game wants something to appear on screen.
Drawing happens through the public functions of TileGrid, such as TileGrid::print and TileGrid::put_sym_color.
These functions are called from the draw functions of modes that can typically be found at the bottom of any of the files in the src/modes/ directory.
Map drawing specifically occurs near the bottom of src/chunked.rs; a file that is covered in its own section a bit later.
Entity drawing happens in the deceptively-named src/render.rs file that, despite its name, only handles entity 'drawing' and not 'rendering' in these terms.
The TileGrid drawing functions dispatch to similar functions in RawTileGrid that perform the actual drawing by setting the cell (a character or symbol) along with its foreground and background colors.
Rendering is how cells are turned into pixel data.
This happens in the TileGrid::render function that is called near the top of TileGrid::display just before that function goes about its business.
Recall the two RawTileGrids in TileGrid.
The front tile grid holds what the game logic has drawn to the tile grid, while the back tile grid is the same data but from the previous frame.
The TileGrid::render function renders a logical tile into its corresponding buffer location only if the same cell in the front and back grids are visibly different.
If a tile doesn't change, it doesn't get rendered.
The end of TileGrid::render updates the back grid with the contents of the front grid in preparation for the next frame.
Uploading occurs after rendering to update the contents of the tile grid's GPU-side texture with its CPU-side rendered buffer.
This is the texture.update(...) part of the TileGrid::display function, provided by SDL.
Displaying the uploaded tile grid texture is, unsurprisingly, the job of the TileGrid::display function.
The main loop all the way over in src/lib/run.rs goes through all of the tile grid layers in its layers vector, and then calls this function on each tile grid in each layer.
The majority of the TileGrid::display function is dedicated to calculating where and how the tile grid should appear and calling canvas.copy(...) to put the tile grid texture on screen.
This is what happens in the straightforward case, but if you read the code in this function you'll notice there's a lot more going on.
Why are there four separate calls to canvas.copy?
In order to understand this, I'm going to need to go into the technique I've used here that I call "wrapped offset rendering".
Improving Rendering Performance with Wrapped Offset Rendering
When playing RuggRogue, the camera is generally always centered on the player, so when the player moves, the entire view of the map shifts accordingly. Consider the following scenario. If the player moves one tile to the right, the player is drawn stationary in the center tile of the tile grid while the entire dungeon is drawn one tile over to the left. According to our tile grid rendering strategy, the player's tile is in the same place, so they won't need to be rendered again. However, every single dungeon tile has shifted, so any tile that wasn't next to an identical tile will need to be rendered again, even though it's only the player that really moved. Rendering multiple shifted dungeon tiles versus a single player tile seems pretty inefficient. There must be some way to render only the player and their immediate surroundings while avoiding the need to render most of the visible dungeon tiles again.
What if, when the player moves one tile to the right, we offset all drawing one tile to the right internally as well? This would normally cause drawing in the far right cell columns to overflow, so we need to wrap them over to the now-unused left cell columns instead. The rendering phase will pick up that the player has moved one tile to the right, while the dungeon map remains stationary. But the whole point of drawing the player at the center of the screen is, well, to have them centered.
This is where we get clever. At display time, we undo the offset that was set when drawing, so the player that was drawn a tile over to the right is shifted a tile back to the left, thus recentering everything. The wrapped column of cells that was drawn in the left column can then be split off and displayed over on the right side, where they were originally intended to be. Presto! We only had to render the player and immediate surroundings again, while the rest of the dungeon tiles can be skipped during rendering. It is this central idea that underpins what I call wrapped offset rendering.
As you can probably guess from the example, wrapped offset rendering is used to reduce the number of dungeon tiles that need to be rendered when the player moves around.
The tile grid representing the dungeon map is given the player's position via its TileGrid::set_draw_offset function, which immediately passes it over to RawTileGrid::set_draw_offset, since the RawTileGrid handles drawing.
The RawTileGrid::index function underpins how all drawing functions 'see' the grid cell storage, and this is where the offset and wrapping are applied to affect drawing operations.
Meanwhile, the rendering process is blind to all of this offset business and renders whatever it sees.
This sets the stage for understanding why TileGrid::display calls canvas.copy (up to) four separate times.
All of the calculations in the lower half of TileGrid::display are to undo the wrapped offset rendering to display everything in the right place.
Only one canvas.copy call is needed if the offset is (0, 0).
Two canvas.copy calls are needed if exactly one of the x-axis or the y-axis have a non-zero offset.
Finally, four canvas.copy calls are needed if both the x-axis and y-axis have non-zero offsets.
These additional calls take wrapped rows and columns of the grid and put them on the opposite side of the tile grid at display time, all in the name of reducing tile rendering.
If you're considering using this wrapped offset rendering technique in your own projects, there's a couple of points to keep in mind. First, this is probably only really effective for software rendering and not hardware rendering, since graphics hardware renders all pixels every frame anyway. Second, this approach won't work as well if tiles are constantly changing, like if they're being animated. It is the unique combination of partial software rendering, a player-centric camera and a mostly static dungeon that makes wrapped offset rendering an effective performance-improving technique for RuggRogue.
In order for wrapped offset rendering to work, it needs an appropriate offset.
This happens early on in the ChunkedMapGrid::draw function in the src/chunked.rs file, which feeds the top-left corner of the top-left map chunk on screen into TileGrid::set_draw_offset, and all is well.
...
Wait, what's a "chunk"?
Improving Map Drawing Performance with Chunked Drawing
It turns out that the performance rabbit hole goes even deeper than mere wrapped offset rendering. Some time after I had finished work on getting wrapped offset rendering into a functioning state, I found myself profiling the web version of the game. Performance still wasn't great at this time, and I wanted to know why. What I saw in the profile data stuck out to me: drawing of the map was dominating execution time. Not rendering, where all the pixels of each tile have to be handled, but just deciding what tiles were going to look like to begin with? Well, I suppose that's what happens when you optimize a bottleneck: it moves elsewhere, and here it moved from rendering to map drawing. It's worth noting that RuggRogue has a resizable window, but it doesn't stretch or zoom its contents to fit the window size. Instead, it adds or removes space to accommodate more or less tiles. In other words, if RuggRogue's window is very large, the game has to draw a lot of tiles, and the web version of the game was struggling with this. In fact, it wasn't even strictly map drawing that was the bottleneck, the sheer number of tile grid cells that could potentially show a map tile was the performance bottleneck. I had to do something to reduce the number of tile grid cells that had to be considered when drawing the map.
So I made a deal with the Programming Devil: I traded code simplicity for performance by pursuing a dirty rectangles approach to map drawing. The idea here is that instead of deciding the appearance of every single cell in the map tile grid every single frame, I'd divide the map tile grid into chunks of 8-by-8 tiles that would be drawn once and would only be revisited on request. Therefore, the tile grid associated with the map is the only tile grid in the game whose contents are not fully redrawn every single frame. I refer to this approach as chunked map drawing.
The entirety of the chunked map drawing implementation can be found in the aptly-named src/chunked.rs file.
The most important part of that file is the ChunkedMapGrid struct that contains all of the book-keeping and logic required to make chunked map drawing a reality.
The screen_chunks field of ChunkedMapGrid is a vector of small ScreenChunk structs.
The data in the ScreenChunk is the chunk of the map to be drawn, while the position of each ScreenChunk in the vector implies its position on the screen, i.e. the map tile grid.
In order to maximize performance, we want to avoid the need to constantly redraw partial chunks near the edges of the screen whenever the camera moves.
Therefore, we must maintain a map tile grid whose dimensions are a whole multiple of the chunk size (i.e. 8 tiles) and is big enough to cover the available screen space given to it.
These calculations are performed in the ChunkedMapGrid::prepare_grid function, and the results are stored in the new_chunks_across and new_chunks_down variables.
Special care is taken to ensure the width and height of this grid is strictly greater than its screen dimension if the screen width or height is exactly a multiple of the chunk pixel dimensions to enable shifting.
Now that we have a map tile grid whose bounds exceed the screen space, we need to ensure that the display of the grid itself is shifted so that the camera is centered on screen. There are two values we need to know in order to calculate how much to shift the map tile grid by:
- the pixel width of the screen, halved
- the x-value of the central pixel of the tile relative to the left edge of the map tile grid
The latter value is the sum of the pixels between the central chunk and the left edge, and the pixels between the center of the camera tile and the left edge of the central chunk in which it resides.
The difference between those two values is computed early in the ChunkedMapGrid::draw function and stored in grid.view.dx in order to shift the grid the correct amount.
A similar process is used to fill grid.view.dy as well, substituting "x" with "y" and "width" with "height".
With size and position sorted, the next thing to work out is which screen chunk shows which map chunk.
This is the job of the screen_chunks field of the ChunkedMapGrid struct.
This is a vector of ScreenChunk structs that holds metadata for each chunk of the map tile grid that needs to be filled in.
Screen chunks are stored in this vector in row-major order, so 0 is the top-left 8-by-8 chunk of grid cells, 1 would be next to it on the right, and so on.
The map_chunk stores the 8-by-8 chunk of map tiles that the screen chunk should be showing.
Map chunks are stored as pairs of integers, but the idea is the same as for screen chunks, except representing map chunks instead, so (0, 0) is the top-left 8-by-8 chunk of map tiles, (0, 1) is to the left, (1, 0) is below, and so on.
The screen chunks are filled with map chunk data by figuring out which map chunk the top-left screen chunk should be showing, and populating the other screen chunks from there.
This is the task of the ChunkedMapGrid::screen_top_left_map_chunk function.
It takes the tile position of the camera on the map, and subtracts half a screen's width- and height-worth of tiles from it; whatever map chunk it lands in is assigned to be shown in the top-left screen chunk.
Each screen chunk is accompanied by a dirty flag.
When map chunks are assigned to a screen chunk, the new map chunk value is compared against the existing value remembered by the screen chunk.
If a change is detected, the dirty flag is set.
The presence of the dirty flag triggers the final checking and drawing of map tiles onto the tile grid on screen.
Map rendering is minimized by feeding the top-left tile of the top-left screen chunk into the TileGrid::set_draw_offset function, tying into the wrapped offset rendering described in the previous section.
All of this work is done by the ChunkedMapGrid::draw function.
If we stopped here, we'd only be redrawing chunks of the map as they enter from the edges of the screen.
We still need to handle the player, whose actions cause the contents of the map grid in their field of view to change pretty much every single turn.
When the player, or really the camera, moves around the map, the ChunkedMapGrid::mark_dirty function sets the dirty flags of the corresponding screen chunks.
When the player descends into a new map, the ChunkedMapGrid::mark_all_dirty function sets the dirty flags of every screen chunk.
These calls are made in the DungeonMode::update function after it performs most of its logic.
Wrap Up
Whew, I think that's everything. As you can see, rendering is a simple process involving hybrid rendering, tile grids, tile grid layers, tilesets, raw tile grids, surfaces, textures, tile grid views, cells, cellsyms, symbols, drawing, rendering, uploading, displaying, wrapped offset rendering and chunked map drawing.
...
Okay, maybe it's not so simple. So after all of that, how's the performance of the game? The performance of the web version is... passable. It's far better than the initial version, but I can't improve it any further short of rethinking the web port from the ground-up. In contrast, the native build of the game is butter smooth, both the debug build but especially the release build. I'm really happy about how this all turned out.
If you've read this far, congratulations.
src/lib/tilegrid.rs is the longest source code file in the game, and src/chunked.rs is probably the most complicated.
Future chapters shouldn't be anywhere near as complicated as this one.
Hopefully this gives an idea about how 2D tile grid rendering works overall, and some hints about what's involved in pulling it all together.
User Interface
This chapter covers how RuggRogue handles menus and dialogs, the layout and drawing of the main game screen, and how application closing is handled.
Menus
Most of RuggRogue's interface exists in the form of menus and dialogs. As mentioned in the overall game flow chapter, menus and dialogs are represented as modes in the game's mode stack. Because of this, there's no real difference between a "menu" and a "dialog": they both present themselves as tile grids, react to player input and return some result. This is a perfect excuse to demonstrate how menus work by using a dialog as an example instead.
The YesNoDialogMode struct in the src/modes/yes_no_dialog.rs file is the simplest dialog, and therefore the simplest menu, in the game.
The struct itself contains the prompt field that is shown to the player and a yes_selected boolean that the player can change by pressing keys.
Every menu and dialog holds data like this: one or more fields related to presentation, and a selection that represents a player-controlled cursor.
Sometimes this selection will be accompanied by a subsection field for more complex menus; the YesNoDialogMode doesn't need one, so it doesn't have one.
Above the definition of YesNoDialogMode is the YesNoDialogModeResult enum.
When the YesNoDialogMode is closed, it returns an instance of YesNoDialogModeResult to the mode immediately below it in the mode stack.
There are three variants: Yes, No and AppQuit.
The first two variants should be obvious; the AppQuit variant is explained in the Event Handling chapter.
If the game wants to show a yes-or-no prompt, it has to create a YesNoDialogMode using the YesNoDialogMode::new function.
There's an example of this when the player chooses to "save and exit" in the options menu.
This corresponds to the OptionsMenuMode in src/modes/options_menu.rs; look for the "Save and return to title screen" message near the end of the OptionsMenuMode::update function.
There are two important things that need to be done to show a yes-or-no prompt:
- Create a
ModeControl::Pushwith an instance ofYesNoDialogModecreated with theYesNoDialogMode::newfunction. - Clear the input queue using
inputs.clear_input()followed byModeUpdate::Immediatefor same-frame result handling while avoiding double-handling of keys.
The mode stack will then take the YesNoDialogMode that was wrapped in the ModeControl::Push return value, add it to the mode stack and prepare a fresh TileGridLayer for it.
Once a mode is present in the mode stack, it calls these mode-related functions in order:
prepare_gridsupdate, if the mode is at the top of the stackdraw
Back in src/modes/yes_no_dialog.rs, the YesNoDialogMode::prepare_grids function is the very first function that is called when the YesNoDialogMode is on the stack.
This ensures that the update and draw functions have the same view of the screen and tile grids on any given frame.
The first thing this function does is calculate the dimensions of the tile grid it wants to draw in, whether or not such a tile grid even exists yet.
On the very first call, the vector of TileGrids corresponding to the TileGridLayer assigned to the mode is empty, so the YesNoDialogMode::prepare_grids function will create a fresh TileGrid with the desired dimensions.
On subsequent calls that tile grid will already exist, so it will just be resized instead.
The YesNoDialogMode::prepare_grids function wraps up by setting its tileset, position (TileGrid::view_centered is a helper to adjust the TileGridView) and zoom factor.
The fact that this information is calculated and assigned every frame is what allows the options menu to instantly take effect on the entire interface.
The YesNoDialogMode::update function is how the dialog responds to player input.
First, an input is pulled in from the input queue by calling the input.prepare_input function.
Next, that input event is read out by calling the input.get_input function.
Assuming it's a key press event, it is then translated into a logical game key by calling the gamekey::from_keycode function.
The YesNoDialogMode::update function reacts to GameKey::Left and GameKey::Right by altering the selected option.
The YesNoDialogMode::draw function draws the dialog itself.
The first thing it does is dim itself if it's not the top-most mode on the stack by setting color_mod to Color::GRAY in response to the value of the active parameter.
The drawing itself takes place after that, drawing the box border and message.
When drawing the "Yes" and "No" options, it reads the yes_selected field of the mode to highlight whichever option the player currently has selected.
Eventually the player will pick either the "Yes" or "No" options.
This is picked up in the YesNoDialogMode::update function when it receives GameKey::Confirm or GameKey::Cancel as a input key.
At this point, the YesNoDialogMode will create an instance of either YesNoDialogModeResult::Yes or YesNoDialogModeResult::No, and wrap it in ModeControl::Pop to tell the mode stack to pop the YesNoDialogMode and send the YesNoDialogModeResult to whatever mode pushed it on to begin with.
This takes us back to the "save and exit" logic in the OptionsMenuMode::update function in src/modes/options_menu.rs file.
The YesNoDialogModeResult will be received in the pop_result parameter of the OptionsMenuMode::update function, and then responded to in the block starting with if let Some(result) = pop_result.
In this case, OptionsMenuMode responds to YesNoDialogModeResult::Yes by popping itself off the mode stack with its own OptionsMenuModeResult::ReallyQuit value.
This covers the entire life-cycle of a yes-or-no dialog:
- A mode that wants a yes-or-no dialog creates a
YesNoDialogModeinstance that gets pushed onto the mode stack. - The
YesNoDialogMode::prepare_gridsfunction is called to create a tile grid or adjust an existing one. YesNoDialogMode::updateresponds to player inputs.YesNoDialogMode::drawdraws the dialog itself.YesNoDialogMode::updateeventually pops itself off the mode stack with an instance ofYesNoDialogModeResult.- The original mode beneath catches the
YesNoDialogModeResultand reacts to it.
This life-cycle is the foundation of every single dialog and menu in the game, even the InventoryMode, found in the src/modes/inventory.rs and the biggest of all the menus.
The Main Game Screen
The majority of the gameplay takes place in DungeonMode, which can be found in the src/modes/dungeon.rs file.
It is responsible for handling player control, distributing turns and drawing the main game interface.
This section describes how the interface is laid out and drawn; player control and turn order will be covered in a later chapter.
The main game screen consists of multiple tile grids that the dungeon mode creates in its mode-stack-designated tile grid layer:
- The map grid that shows the dungeon map, the player, items and monsters.
- The status grid that shows the player's status information, such as their level, health, hunger and turns.
- The item grid that shows the player's equipment and number of carried inventory items.
- The message frame grid that draws a border around the message log.
- The message grid that shows the message log.
The distinction between the message frame grid and the message grid is a bit janky. The split was part of a plan to use wrapped offset rendering to increase message rendering performance, but it never ended up happening. If I were to revisit this part of the code I would just have a single message grid that draws its frame like everything else.
The DungeonMode::new function prepares the book-keeping for the dungeon mode, the most important part of which is for chunked map drawing, described in detail back in the Rendering chapter.
Things get slightly more interesting with the DungeonMode::prepare_grids function, which immediately delegates all of its work to the ui::prepare_grids function.
This function can be found at the very bottom of the src/ui.rs file, and is responsible for calculating and setting the size and position of all the main game screen tile grids.
Despite living in a separate file, it serves the same function as any code found in the prepare_grids function of any other mode.
After setting the size of the map grid, it calls the ChunkedMapGrid::prepare_grid function so that it can prepare and adjust itself to the map tile grid and screen dimensions.
Back in src/modes/dungeon.rs, the DungeonMode::draw function is responsible for coordinating the drawing of all the main game screen tile grids.
Pretty much all of the drawing is delegated here as well.
The ChunkedMapGrid::draw function renders the map itself, while entities on the map are drawn via the render::draw_renderables function, defined in the src/render.rs file.
All of the sidebar tile grids are drawn via the ui::draw_ui function, found in the src/ui.rs file.
The ui::draw_ui function in turn calls the draw_status, draw_item_info and draw_messages functions to fill out each of the grids.
The draw_messages function in particular applies word wrapping to message lines; this is covered in its own chapter.
Apart from DungeonMode, there are two other modes that also draw the main game screen in this fashion: TargetMode and ViewMapMode.
TargetMode is defined in src/modes/target.rs and allows the player to pick a target tile when using an item that needs a target.
ViewMapMode is defined in src/modes/view_map.rs and allows the player to pan the camera while describing map tiles.
Both of these modes show dynamically-updating text in the message area by filling in the optional prompt parameter when calling the ui::draw_ui function.
Options
RuggRogue provides the player with an options dialog that can be brought up by either pressing the Esc key during play or choosing "Options" at the title screen. This dialog allows the player to choose:
- whether the map uses a graphical tileset or an ASCII display with one of the fonts
- the font of the user interface (i.e. the sidebar and menus)
- 1x or 2x zoom for the map
- 1x or 2x zoom for the user interface
The game offers two fonts: the 8-by-8 pixel Terminal font and the 8-by-14 pixel GohuFont. The graphical tileset available for the map is a monocolor version of the Urizen OneBit Tilesets by vurmux.
If the options dialog is brought up while playing the game, it presents an option to save the game and exit back to the title screen.
Options Data
The data for options exists in the form of the Options struct near the top of the src/ui.rs file:
pub struct Options {
    pub tileset: u32,
    pub font: u32,
    pub map_zoom: u32,
    pub text_zoom: u32,
}
The tileset and font fields decide which of the fonts or tilesets are used when drawing the map and the user interface respectively.
The game treats fonts as tilesets that can only display characters, so these fields are essentially indexes into a single list of tilesets.
The game makes an effort to limit the font field to only the two 'font-like' tilesets, as will be explained later.
The map_zoom field is the numeric zoom factor for the map display that can be toggled between 1x and 2x zoom.
The text_zoom field serves the same purpose but for the user interface instead.
The default values of these options are set all the way back in the main function in the src/main.rs file, like so:
world.add_unique(Options {
    tileset: 2,
    font: 0,
    map_zoom: 1,
    text_zoom: 1,
});
The above default values display the map using the Urizen graphical tileset, the user interface using GohuFont, and show them both at 1x zoom.
The numeric indexes of the tileset and font fields refer to the tilesets loaded further down in the main function:
let settings = RunSettings {
    // ...
    tileset_infos: vec![
        TilesetInfo::<GameSym> {
            image_path: PathBuf::from("assets/gohufont-8x14.png"),
            tile_size: (8, 14).into(),
            tile_start: (0, 0).into(),
            tile_gap: (0, 0).into(),
            font_map: TilesetInfo::<GameSym>::map_code_page_437(),
            symbol_map: HashMap::new(),
        },
        TilesetInfo::<GameSym> {
            image_path: PathBuf::from("assets/terminal-8x8.png"),
            tile_size: (8, 8).into(),
            tile_start: (0, 0).into(),
            tile_gap: (0, 0).into(),
            font_map: TilesetInfo::<GameSym>::map_code_page_437(),
            symbol_map: HashMap::new(),
        },
        gamesym::urizen_tileset_info(),
    ],
};
In order, these are GohuFont, the Terminal font and the Urizen graphical tileset, referred to by the tileset and font fields of the Options struct as 0, 1 and 2 respectively.
Note that the fonts are listed before the tileset; this fact is exploited by the options dialog to limit font customization to only the fonts.
The Options Dialog
The options dialog is represented by the OptionsMenuMode that lives in the src/modes/options_menu.rs file.
This dialog allows the player to view and change the game options to suit their preferences.
There's a menu item labelled "Back" at the bottom of the dialog that dismisses it when chosen.
If the options dialog is brought up in the middle of a game, it will read "Save and Exit" instead, and dismissing it will save the game and return the player to the title screen.
The flag that controls this is the prompt_to_save boolean argument sent to the OptionsMenuMode::new function when the dialog is created.
Pressing the left and right keys alters the values of the various options; this takes place in the OptionsMenuMode::update function.
The "Font" option that controls the user interface font is limited to only fonts by being checked against the NUM_FONTS constant near the top of the src/modes/options_menu.rs file.
It's currently hard-coded to be 2; adding more fonts would require updating this value accordingly.
Real-Time Options Updates
If you mess with the options a bit, you'll notice that changes to the options are reflected immediately on the screen. The rendering system consults the option values directly, so they'll update in real time. To understand how this happens, we need to recap some concepts from the Rendering chapter:
| Concept | Description |
|---|---|
| Displayed tile grid | The physical appearance of a tile grid on the screen. |
TileGridView | The size, position and zoom factor associated with a tile grid. |
| Tile grid texture | The GPU-side texture loaded with the pixels representing a tile grid. |
| Tile grid pixel buffer | The CPU-side buffer of the tile grid pixels, uploaded to the GPU-side texture. |
tileset_index field of TileGrid | Index of the tileset that the tile grid should be rendered with. |
TileGrid tile data | The logical cells of the tile grid. |
Most of the data above depend on other data in the table. The dependencies are as follows:
- Displayed tile grid
TileGridView- Tile grid texture
- Tile grid pixel buffer
tileset_index- Tile data
- Tile grid pixel buffer
Changes to the tileset and font in the options dialog affect the tileset_index.
This invalidates the tile grid pixel buffer, tile grid texture and displayed tile grid.
Changes to the tileset_index of tile grids are made through the TileGrid::set_tileset function in the src/lib/tilegrid.rs file that ensures that all this invalidation takes place.
The TileGrid::display function ensures that any stale data is updated, thus enabling real-time option updates.
Changes to the zoom options affect the TileGridView of different tile grids in the game.
This invalidates the displayed tile grid.
For "Font" zoom, the text_zoom field of the Options struct is directly read out by the various prepare_grids functions of most modes.
It is then used to calculate the size, position and zoom factor for the TileGridView of each TileGrid.
The common case of a tile grid centered in the screen is handled by the TileGrid::view_centered function, filling in the TileGridView with just a single call.
The map_zoom field of the Options struct is specifically read out by the ChunkedMapGrid::prepare_grid function in the src/chunked.rs file.
This function performs special sizing and positioning to ensure that the play area is covered and that there's a single center tile for the camera focus
The map_zoom field impacts the pixel size of the tile grid cells on screen and thus must be accounted for here.
Both preparing and displaying of tile grids must be done every single frame in response to potential window resize events, so option changes accounted for by these processes will occur in real time.
Word Wrapping
If you play RuggRogue, you'll notice the messages that appear in the sidebar. There's enough room for messages up to 32 characters long to appear unbroken; anything longer than that must be word wrapped. Word wrapping is the act of breaking a long line down into a sequence of shorter lines that fit inside a desired width while keeping words whole.
All of RuggRogue's word wrapping is done by the ruggrogue::word_wrap function in the src/lib/word_wrap.rs file.
If you're not used to Rust's iterator system, the logic might be hard to follow, so I'm going to do something a bit different here than in the rest of the book: we're going to build the whole thing from the ground up!
This chapter contains runnable code samples; press the "play" button in the top corner to build and run the examples (they get fed through the Rust Playground).
If you get time-outs, there's a button to copy the code to the clipboard, and you can paste that into a file and throw it at rustc to run the demo if you have Rust installed.
Before we start, read the iterators chapter of the Rust book. No, really, I'll wait; you'll want to be familiar with Rust's iterators before continuing.
...
Okay, now that you've read that (or not), the key take-away is this idea of iterator adaptors: functions that take an existing iterator and produces a new one that adds their own processing to the end.
The job of the ruggrogue::word_wrap function is to create an iterator that takes a string slice (a reference to a sequence of characters in a string) and produces multiple string slices that all fit within a given width.
RuggRogue prints these word-wrapped strings onto tile grids, so the width here is measured as the number of characters per line.
Broadly speaking, the ruggrogue::word_wrap function creates an iterator that does the following:
- Break the input string into lines based on any existing line break characters in the string itself.
- Break each line down into characters and their byte offsets (all Rust strings are UTF-8 encoded).
- Prepare the characters and byte offsets for word scanning.
- Scan for words, emitting the byte offsets of whole words and individual whitespace characters.
- Prepare the word and whitespace byte offset data for line building.
- Build line data by fitting a sequence of whitespaces followed by a word onto the current line if it fits, or starting a new line with only the word if it doesn't.
- Convert the line data back into strings.
Step 1: Break on Existing Lines
This all starts really basic: we need a function that takes an input string and a maximum character width, and returns an iterator. To see the results of all of this, we need some sample input and some output logic, maybe something like this:
fn main() {
    let max_length = 15;
    let msg = "  I'm nöbödy!  Whö are yöu?
Are yöu nöbödy, töö?
Then there's a pair of us - don't tell!
They'd banish us, you know.

  How dreary to be somebody!
How public, li-ke a ƒrog
To tell your name the live-long day
To an admiring bog!

  - nobody";

    for tmp in word_wrap(msg, max_length) {
        println!("{:?}", tmp);
    }
}

fn word_wrap(input: &str, max_length: usize) -> impl Iterator<Item = &str> {
    assert!(max_length > 0);

    input.lines()
}
I've taken the liberty of throwing in some random non-ASCII characters to ensure that we're handling the difference between bytes and characters, as you have to when handling UTF-8 encoded strings.
You should see the input string just being broken into the lines using Rust's str::lines function, which returns a simple iterator that does just that.
Rust's for loops automatically understand iterators, so that's what the main function does to produce its output.
From here on, we'll leave out the main function to focus on the word_wrap function that we're building up, but it will still be there when you run the code samples.
There's a toggle button in the top right of these samples to show the full demo code if you want to see it.
Step 2: Characters and Byte Offsets
In order to perform word wrapping we'll need to know how each line breaks down into characters, so we know what's whitespace and what belongs to a word. We'll also need the byte offsets of each of these characters, which can be larger than a single byte if they're not in the ASCII character range. The byte offsets will be used to create the final string slices that refer back to the original input string data; we don't want to allocate string storage to replicate parts of strings that already exist!
fn main() {
    let max_length = 15;
    let msg = "  I'm nöbödy!  Whö are yöu?
Are yöu nöbödy, töö?
Then there's a pair of us - don't tell!
They'd banish us, you know.

  How dreary to be somebody!
How public, li-ke a ƒrog
To tell your name the live-long day
To an admiring bog!

  - nobody";

    for tmp in word_wrap(msg, max_length) {
        println!("{:?}", tmp);
    }
}

fn word_wrap(input: &str, max_length: usize) -> impl Iterator<Item = (usize, char)> + '_ {
    assert!(max_length > 0);

    input.lines().flat_map(move |line| {
        line.char_indices()
    })
}
Running the above sample should print a long list of characters and their byte offsets.
Rust's str::char_indices gives us the characters and byte offsets that you'll see if you run the code sample.
This by itself would give us a nested iterator: one iterator of chars-and-offsets per line.
We use Rust's Iterator::flat_map function to remove this nesting to get ourselves a single long list of chars-and-offsets.
Note that the byte offsets shown are relative to the start of each line, not the input string as a whole.
Step 3: Prepare for Word Scanning
The word scanning that we're going to do next is done a character at a time, but we need to perform some finalization at the end. But iterators in Rust only do things on a per-item basis. How do we get an iterator to do something after the last item?
We're going to use Rust's Option type to wrap each item inside a Some variant.
We'll then use Iterator::chain with a one-item iterator of the None variant using iter::once to act as the final sentinel value.
Putting it together gives us something that looks like this:
fn main() {
    let max_length = 15;
    let msg = "  I'm nöbödy!  Whö are yöu?
Are yöu nöbödy, töö?
Then there's a pair of us - don't tell!
They'd banish us, you know.

  How dreary to be somebody!
How public, li-ke a ƒrog
To tell your name the live-long day
To an admiring bog!

  - nobody";

    for tmp in word_wrap(msg, max_length) {
        println!("{:?}", tmp);
    }
}

fn word_wrap(input: &str, max_length: usize) -> impl Iterator<Item = (usize, Option<char>)> + '_ {
    assert!(max_length > 0);

    input.lines().flat_map(move |line| {
        line.char_indices()
            .map(|(pos, ch)| (pos, Some(ch)))
            .chain(std::iter::once((line.len(), None))) // character sentinel
    })
}
Running the code sample should produce the same characters and offsets wrapped with Some, with a single None representing the end of each line.
Step 4: Scan for Words
Now that we have characters, offsets and a sentinel to mark the end of each line, how do we detect words?
For that we'll use Rust's iter::scan function.
I recommend reading its official documentation.
The idea here is that we want to step through each character, building up memory of where each word begins, and the previous character to detect where each word should end.
We also treat hyphens as the end of a word, and break any words that exceed the maximum line width.
Every time we detect the end of a word, we need to emit data with Some, otherwise we'll emit a None to indicate that we're still processing characters.
fn main() {
    let max_length = 15;
    let msg = "  I'm nöbödy!  Whö are yöu?
Are yöu nöbödy, töö?
Then there's a pair of us - don't tell!
They'd banish us, you know.

  How dreary to be somebody!
How public, li-ke a ƒrog
To tell your name the live-long day
To an admiring bog!

  - nobody";

    for tmp in word_wrap(msg, max_length) {
        println!("{:?}", tmp);
    }
}

fn word_wrap(input: &str, max_length: usize) -> impl Iterator<Item = Option<(usize, usize, usize, bool)>> + '_ {
    assert!(max_length > 0);

    input.lines().flat_map(move |line| {
        line.char_indices()
            .map(|(pos, ch)| (pos, Some(ch)))
            .chain(std::iter::once((line.len(), None))) // character sentinel
            .scan(None, move |state, (pos, ch)| {
                // Break into words and single spaces.
                if let Some(ch) = ch {
                    if let Some((in_word, start_pos, char_count, last_char)) = state {
                        if *char_count >= max_length || *last_char == '-' || ch.is_whitespace() {
                            // Line-length or hyphen-divided word, or mid-line whitespace.
                            let was_word = *in_word;
                            let last_start_pos = *start_pos;
                            let last_char_count = *char_count;
                            *in_word = !ch.is_whitespace();
                            *start_pos = pos;
                            *char_count = 1;
                            *last_char = ch;
                            Some(Some((last_start_pos, pos, last_char_count, was_word)))
                        } else if *in_word {
                            // Word continuation.
                            *char_count += 1;
                            *last_char = ch;
                            Some(None)
                        } else {
                            // Entering a word after whitespace.
                            let was_word = *in_word;
                            let last_start_pos = *start_pos;
                            let last_char_count = *char_count;
                            *in_word = true;
                            *start_pos = pos;
                            *char_count = 1;
                            *last_char = ch;
                            Some(Some((last_start_pos, pos, last_char_count, was_word)))
                        }
                    } else {
                        // Start of the line.
                        let in_word = !ch.is_whitespace();
                        let start_pos = pos;
                        let char_count = 1;
                        let last_char = ch;
                        *state = Some((in_word, start_pos, char_count, last_char));
                        Some(None)
                    }
                } else {
                    // End of the line.
                    if let Some((in_word, start_pos, char_count, _)) = state {
                        // Finish the final word or whitespace.
                        Some(Some((*start_pos, pos, *char_count, *in_word)))
                    } else {
                        // Empty line.
                        Some(Some((pos, pos, 0, false)))
                    }
                }
            })
    })
}
If you run the above code, you'll see that the output is a mixture of Some and None variants.
The Nones represent intermediate working steps when a character is scanned but a word or whitespace hasn't been fully processed yet.
The Some means a whole word or single whitespace character has been processed.
The Some holds a 4-tuple consisting of three numbers and boolean flag.
The first two numbers are the byte offset of the start (inclusive) and end (exclusive) of each word or whitespace character.
The third number is the length of the word, in characters.
The boolean is true when it represents a word, or false for a whitespace character.
Note the bottom of the code that picks up the None sentinel value at the end of the line to finish the last word or whitespace character.
Step 5: Prepare for Line Scanning
In order to build characters up into words, we needed to wrap each value with Some and add a None sentinel value.
We need to perform scanning again, this time for words.
If you ran the previous code sample, you'll notice that our data is already wrapped up in Some, but there's a lot of None values mixed in there.
We're going to use iter::filter along with Option::is_some to clear out those None values.
We'd also like to re-add that single None value to mark the end of the line again to handle the final word or whitespace after we perform line scanning.
fn main() {
    let max_length = 15;
    let msg = "  I'm nöbödy!  Whö are yöu?
Are yöu nöbödy, töö?
Then there's a pair of us - don't tell!
They'd banish us, you know.

  How dreary to be somebody!
How public, li-ke a ƒrog
To tell your name the live-long day
To an admiring bog!

  - nobody";

    for tmp in word_wrap(msg, max_length) {
        println!("{:?}", tmp);
    }
}

fn word_wrap(input: &str, max_length: usize) -> impl Iterator<Item = Option<(usize, usize, usize, bool)>> + '_ {
    assert!(max_length > 0);

    input.lines().flat_map(move |line| {
        line.char_indices()
            .map(|(pos, ch)| (pos, Some(ch)))
            .chain(std::iter::once((line.len(), None))) // character sentinel
            .scan(None, move |state, (pos, ch)| {
                // Break into words and single spaces.
                // ...
                if let Some(ch) = ch {
                    if let Some((in_word, start_pos, char_count, last_char)) = state {
                        if *char_count >= max_length || *last_char == '-' || ch.is_whitespace() {
                            // Line-length or hyphen-divided word, or mid-line whitespace.
                            let was_word = *in_word;
                            let last_start_pos = *start_pos;
                            let last_char_count = *char_count;
                            *in_word = !ch.is_whitespace();
                            *start_pos = pos;
                            *char_count = 1;
                            *last_char = ch;
                            Some(Some((last_start_pos, pos, last_char_count, was_word)))
                        } else if *in_word {
                            // Word continuation.
                            *char_count += 1;
                            *last_char = ch;
                            Some(None)
                        } else {
                            // Entering a word after whitespace.
                            let was_word = *in_word;
                            let last_start_pos = *start_pos;
                            let last_char_count = *char_count;
                            *in_word = true;
                            *start_pos = pos;
                            *char_count = 1;
                            *last_char = ch;
                            Some(Some((last_start_pos, pos, last_char_count, was_word)))
                        }
                    } else {
                        // Start of the line.
                        let in_word = !ch.is_whitespace();
                        let start_pos = pos;
                        let char_count = 1;
                        let last_char = ch;
                        *state = Some((in_word, start_pos, char_count, last_char));
                        Some(None)
                    }
                } else {
                    // End of the line.
                    if let Some((in_word, start_pos, char_count, _)) = state {
                        // Finish the final word or whitespace.
                        Some(Some((*start_pos, pos, *char_count, *in_word)))
                    } else {
                        // Empty line.
                        Some(Some((pos, pos, 0, false)))
                    }
                }
            })
            .filter(Option::is_some)
            .chain(Some(None)) // word sentinel
    })
}
The output should be the same as before, but with all of the None values gone, except for a final None to mark the end of each line.
Step 6: Build Lines by Scanning Words and Whitespaces
We now have everything we need to create a scanner that builds up lines. The idea of this scanner is to extend a line continuously with a sequence of whitespace characters followed by a single word. If the sum of the character counts of that sequence and the existing line fits in the desired width, we append the whole thing to the line. If not, we'll emit the line as-is, and start a new line without the preceeding whitespace characters.
fn main() {
    let max_length = 15;
    let msg = "  I'm nöbödy!  Whö are yöu?
Are yöu nöbödy, töö?
Then there's a pair of us - don't tell!
They'd banish us, you know.

  How dreary to be somebody!
How public, li-ke a ƒrog
To tell your name the live-long day
To an admiring bog!

  - nobody";

    for tmp in word_wrap(msg, max_length) {
        println!("{:?}", tmp);
    }
}

fn word_wrap(input: &str, max_length: usize) -> impl Iterator<Item = Option<(usize, usize)>> + '_ {
    assert!(max_length > 0);

    input.lines().flat_map(move |line| {
        line.char_indices()
            .map(|(pos, ch)| (pos, Some(ch)))
            .chain(std::iter::once((line.len(), None))) // character sentinel
            .scan(None, move |state, (pos, ch)| {
                // Break into words and single spaces.
                // ...
                if let Some(ch) = ch {
                    if let Some((in_word, start_pos, char_count, last_char)) = state {
                        if *char_count >= max_length || *last_char == '-' || ch.is_whitespace() {
                            // Line-length or hyphen-divided word, or mid-line whitespace.
                            let was_word = *in_word;
                            let last_start_pos = *start_pos;
                            let last_char_count = *char_count;
                            *in_word = !ch.is_whitespace();
                            *start_pos = pos;
                            *char_count = 1;
                            *last_char = ch;
                            Some(Some((last_start_pos, pos, last_char_count, was_word)))
                        } else if *in_word {
                            // Word continuation.
                            *char_count += 1;
                            *last_char = ch;
                            Some(None)
                        } else {
                            // Entering a word after whitespace.
                            let was_word = *in_word;
                            let last_start_pos = *start_pos;
                            let last_char_count = *char_count;
                            *in_word = true;
                            *start_pos = pos;
                            *char_count = 1;
                            *last_char = ch;
                            Some(Some((last_start_pos, pos, last_char_count, was_word)))
                        }
                    } else {
                        // Start of the line.
                        let in_word = !ch.is_whitespace();
                        let start_pos = pos;
                        let char_count = 1;
                        let last_char = ch;
                        *state = Some((in_word, start_pos, char_count, last_char));
                        Some(None)
                    }
                } else {
                    // End of the line.
                    if let Some((in_word, start_pos, char_count, _)) = state {
                        // Finish the final word or whitespace.
                        Some(Some((*start_pos, pos, *char_count, *in_word)))
                    } else {
                        // Empty line.
                        Some(Some((pos, pos, 0, false)))
                    }
                }
            })
            .filter(Option::is_some)
            .chain(Some(None)) // word sentinel
            .scan(None, move |state, word_data| {
                // Build up lines up to max_length.
                if let Some((word_start, word_end, word_char_count, is_word)) = word_data {
                    if let Some((line_start, line_end, final_end, line_char_count)) = state {
                        if is_word {
                            if *line_char_count + word_char_count <= max_length {
                                // Word fits on line, so include it.
                                *line_end = word_end;
                                *final_end = word_end;
                                *line_char_count += word_char_count;
                                Some(None)
                            } else {
                                // Word exceeds line, so start a new line with it instead.
                                let last_line_start = *line_start;
                                let last_line_end = *line_end;
                                *line_start = word_start;
                                *line_end = word_end;
                                *final_end = word_end;
                                *line_char_count = word_char_count;
                                Some(Some((last_line_start, last_line_end)))
                            }
                        } else {
                            if *line_char_count + word_char_count <= max_length {
                                // Whitespace fits on line, so include it when finishing words.
                                *final_end = word_end;
                            }
                            *line_char_count += word_char_count;
                            Some(None)
                        }
                    } else {
                        // The first word.
                        let line_start = word_start;
                        let line_end = if is_word { word_end } else { word_start };
                        let final_end = word_end;
                        let line_char_count = word_char_count;
                        *state = Some((line_start, line_end, final_end, line_char_count));
                        Some(None)
                    }
                } else {
                    // End of words.
                    if let Some((line_start, _, final_end, _)) = state {
                        // Finish the line.
                        Some(Some((*line_start, *final_end)))
                    } else {
                        // Empty line.
                        Some(Some((0, 0)))
                    }
                }
            })
    })
}
Running the above sample code will output just the byte offsets of the start (inclusive) and end (exclusive) of each wrapped line.
All those Some and None values are littered in there, and at this point we really only need the data inside each Some.
There's a trick we can do here: Rust can treat an Option like a container that has no items (None) or a single item (Some(...)).
What's more, Rust can convert an Option into an iterator, so if we squint hard enough, we sort of have a list of iterators.
We can therefore use the iter::flatten function to clean out the None values and extract the data from the Some variants in one fell swoop!
fn main() {
    let max_length = 15;
    let msg = "  I'm nöbödy!  Whö are yöu?
Are yöu nöbödy, töö?
Then there's a pair of us - don't tell!
They'd banish us, you know.

  How dreary to be somebody!
How public, li-ke a ƒrog
To tell your name the live-long day
To an admiring bog!

  - nobody";

    for tmp in word_wrap(msg, max_length) {
        println!("{:?}", tmp);
    }
}

fn word_wrap(input: &str, max_length: usize) -> impl Iterator<Item = (usize, usize)> + '_ {
    assert!(max_length > 0);

    input.lines().flat_map(move |line| {
        line.char_indices()
            .map(|(pos, ch)| (pos, Some(ch)))
            .chain(std::iter::once((line.len(), None))) // character sentinel
            .scan(None, move |state, (pos, ch)| {
                // Break into words and single spaces.
                // ...
                if let Some(ch) = ch {
                    if let Some((in_word, start_pos, char_count, last_char)) = state {
                        if *char_count >= max_length || *last_char == '-' || ch.is_whitespace() {
                            // Line-length or hyphen-divided word, or mid-line whitespace.
                            let was_word = *in_word;
                            let last_start_pos = *start_pos;
                            let last_char_count = *char_count;
                            *in_word = !ch.is_whitespace();
                            *start_pos = pos;
                            *char_count = 1;
                            *last_char = ch;
                            Some(Some((last_start_pos, pos, last_char_count, was_word)))
                        } else if *in_word {
                            // Word continuation.
                            *char_count += 1;
                            *last_char = ch;
                            Some(None)
                        } else {
                            // Entering a word after whitespace.
                            let was_word = *in_word;
                            let last_start_pos = *start_pos;
                            let last_char_count = *char_count;
                            *in_word = true;
                            *start_pos = pos;
                            *char_count = 1;
                            *last_char = ch;
                            Some(Some((last_start_pos, pos, last_char_count, was_word)))
                        }
                    } else {
                        // Start of the line.
                        let in_word = !ch.is_whitespace();
                        let start_pos = pos;
                        let char_count = 1;
                        let last_char = ch;
                        *state = Some((in_word, start_pos, char_count, last_char));
                        Some(None)
                    }
                } else {
                    // End of the line.
                    if let Some((in_word, start_pos, char_count, _)) = state {
                        // Finish the final word or whitespace.
                        Some(Some((*start_pos, pos, *char_count, *in_word)))
                    } else {
                        // Empty line.
                        Some(Some((pos, pos, 0, false)))
                    }
                }
            })
            .filter(Option::is_some)
            .chain(Some(None)) // word sentinel
            .scan(None, move |state, word_data| {
                // Build up lines up to max_length.
                // ...
                if let Some((word_start, word_end, word_char_count, is_word)) = word_data {
                    if let Some((line_start, line_end, final_end, line_char_count)) = state {
                        if is_word {
                            if *line_char_count + word_char_count <= max_length {
                                // Word fits on line, so include it.
                                *line_end = word_end;
                                *final_end = word_end;
                                *line_char_count += word_char_count;
                                Some(None)
                            } else {
                                // Word exceeds line, so start a new line with it instead.
                                let last_line_start = *line_start;
                                let last_line_end = *line_end;
                                *line_start = word_start;
                                *line_end = word_end;
                                *final_end = word_end;
                                *line_char_count = word_char_count;
                                Some(Some((last_line_start, last_line_end)))
                            }
                        } else {
                            if *line_char_count + word_char_count <= max_length {
                                // Whitespace fits on line, so include it when finishing words.
                                *final_end = word_end;
                            }
                            *line_char_count += word_char_count;
                            Some(None)
                        }
                    } else {
                        // The first word.
                        let line_start = word_start;
                        let line_end = if is_word { word_end } else { word_start };
                        let final_end = word_end;
                        let line_char_count = word_char_count;
                        *state = Some((line_start, line_end, final_end, line_char_count));
                        Some(None)
                    }
                } else {
                    // End of words.
                    if let Some((line_start, _, final_end, _)) = state {
                        // Finish the line.
                        Some(Some((*line_start, *final_end)))
                    } else {
                        // Empty line.
                        Some(Some((0, 0)))
                    }
                }
            })
            .flatten()
    })
}
Running the above code sample should produce a cleaned-up version of the output from the previous code sample.
Step 7: Convert Data back into String Slices
We originally wanted string slices of word-wrapped lines, which trivially builds on the work that's been done up to this point.
fn main() {
    let max_length = 15;
    let msg = "  I'm nöbödy!  Whö are yöu?
Are yöu nöbödy, töö?
Then there's a pair of us - don't tell!
They'd banish us, you know.

  How dreary to be somebody!
How public, li-ke a ƒrog
To tell your name the live-long day
To an admiring bog!

  - nobody";

    for tmp in word_wrap(msg, max_length) {
        println!("{:?}", tmp);
    }
}

fn word_wrap(input: &str, max_length: usize) -> impl Iterator<Item = &str> {
    assert!(max_length > 0);

    input.lines().flat_map(move |line| {
        line.char_indices()
            .map(|(pos, ch)| (pos, Some(ch)))
            .chain(std::iter::once((line.len(), None))) // character sentinel
            .scan(None, move |state, (pos, ch)| {
                // Break into words and single spaces.
                // ...
                if let Some(ch) = ch {
                    if let Some((in_word, start_pos, char_count, last_char)) = state {
                        if *char_count >= max_length || *last_char == '-' || ch.is_whitespace() {
                            // Line-length or hyphen-divided word, or mid-line whitespace.
                            let was_word = *in_word;
                            let last_start_pos = *start_pos;
                            let last_char_count = *char_count;
                            *in_word = !ch.is_whitespace();
                            *start_pos = pos;
                            *char_count = 1;
                            *last_char = ch;
                            Some(Some((last_start_pos, pos, last_char_count, was_word)))
                        } else if *in_word {
                            // Word continuation.
                            *char_count += 1;
                            *last_char = ch;
                            Some(None)
                        } else {
                            // Entering a word after whitespace.
                            let was_word = *in_word;
                            let last_start_pos = *start_pos;
                            let last_char_count = *char_count;
                            *in_word = true;
                            *start_pos = pos;
                            *char_count = 1;
                            *last_char = ch;
                            Some(Some((last_start_pos, pos, last_char_count, was_word)))
                        }
                    } else {
                        // Start of the line.
                        let in_word = !ch.is_whitespace();
                        let start_pos = pos;
                        let char_count = 1;
                        let last_char = ch;
                        *state = Some((in_word, start_pos, char_count, last_char));
                        Some(None)
                    }
                } else {
                    // End of the line.
                    if let Some((in_word, start_pos, char_count, _)) = state {
                        // Finish the final word or whitespace.
                        Some(Some((*start_pos, pos, *char_count, *in_word)))
                    } else {
                        // Empty line.
                        Some(Some((pos, pos, 0, false)))
                    }
                }
            })
            .filter(Option::is_some)
            .chain(Some(None)) // word sentinel
            .scan(None, move |state, word_data| {
                // Build up lines up to max_length.
                // ...
                if let Some((word_start, word_end, word_char_count, is_word)) = word_data {
                    if let Some((line_start, line_end, final_end, line_char_count)) = state {
                        if is_word {
                            if *line_char_count + word_char_count <= max_length {
                                // Word fits on line, so include it.
                                *line_end = word_end;
                                *final_end = word_end;
                                *line_char_count += word_char_count;
                                Some(None)
                            } else {
                                // Word exceeds line, so start a new line with it instead.
                                let last_line_start = *line_start;
                                let last_line_end = *line_end;
                                *line_start = word_start;
                                *line_end = word_end;
                                *final_end = word_end;
                                *line_char_count = word_char_count;
                                Some(Some((last_line_start, last_line_end)))
                            }
                        } else {
                            if *line_char_count + word_char_count <= max_length {
                                // Whitespace fits on line, so include it when finishing words.
                                *final_end = word_end;
                            }
                            *line_char_count += word_char_count;
                            Some(None)
                        }
                    } else {
                        // The first word.
                        let line_start = word_start;
                        let line_end = if is_word { word_end } else { word_start };
                        let final_end = word_end;
                        let line_char_count = word_char_count;
                        *state = Some((line_start, line_end, final_end, line_char_count));
                        Some(None)
                    }
                } else {
                    // End of words.
                    if let Some((line_start, _, final_end, _)) = state {
                        // Finish the line.
                        Some(Some((*line_start, *final_end)))
                    } else {
                        // Empty line.
                        Some(Some((0, 0)))
                    }
                }
            })
            .flatten()
            .map(move |(start, end)| &line[start..end])
    })
}
And that's it! If you run this code, you'll see the original input wrapped into lines no longer than 15 characters each. Note that lines with non-ASCII multi-byte characters still count characters correctly, and hyphenated words are split across lines.
Conclusion
Using Rust's iterator API to perform word wrapping has a couple of advantages over something like hand-rolled loops.
As part of the standard library, I have strong confidence that these iterator adaptor functions are always correct.
Writing lots of nested loops by hand means extra code and lots of extra small book-keeping variables, each of which is a chance for bugs to slip in and cause headaches.
Using iterators also encapsulates all of these tracking variables into a single bundle inside the iterator: calling the ruggrogue::word_wrap function returns an iterator immediately so a for loop can process it all at its own pace.
However, I still don't feel like this iterator approach is the easiest code to read. But in order to write a simpler version, stable Rust would need a language feature known as generators; look them up if you're curious. Still, this word wrapping code manages to perform its work on demand, avoid memory allocations and is fast enough to run every frame, so all-in-all it worked out pretty well for the game.
Entity Component System
Up until now, most of the data that has been covered in this book has been about technical things that the game needs just to run, like input events, surfaces, textures and timing information. But beyond that is the data that defines RuggRogue as a game, such as the player, the map, monsters and items. This game-specific data is all managed by a crate named Shipyard, and this chapter is all about Shipyard and how RuggRogue uses it.
By its own description:
Shipyard is an Entity Component System focused on usability and speed.
Here, an entity is a lightweight ID whose role is to associate groups of components that hold the data describing the entity. The main benefit of this is that it avoids the "talking sword" problem that you'd run into with an object-oriented approach: if you have NPCs that you can talk to, and a sword you can pick up and swing, how do you represent a talking sword? In the object-oriented style of modelling game data, problems like this end up poking holes in the encapsulation the classes are supposed to have, and functionality drifts up the inheritance tree into a gigantic all-encompassing mega-class. Game data modelled with entities and components instead avoids both of those issues; see Catherine West's RustConf 2018 closing keynote (video and notes) for more information.
In a game built fully in the ECS-style, systems are just functions that manipulate groups of entities according to what components they have.
Shipyard 0.4
RuggRogue uses Shipyard 0.4, but at the time of writing it is not the most recent version of Shipyard, which is 0.5. So what gives? Well, 0.4 was the most up-to-date version of Shipyard when I started work on RuggRogue, and when 0.5 came out I ported the game over to it. Unfortunately, this broke the web build, so it had to be reverted. Therefore, RuggRogue uses Shipyard 0.4 and not 0.5.
In order to understand how RuggRogue reads and modifies its own game data, you'll need to understand the basics of Shipyard 0.4. This is the point where I would link to the Shipyard 0.4 User's Guide that existed when I started writing the game, except it was replaced wholesale when Shipyard 0.5 came out, which has a bunch of differences. I could build and host that old guide myself, but putting up documentation for an older version of somebody else's library with no indication that it's stale would be problematic. As such, most of this chapter is going to serve as a crash course on Shipyard 0.4, which should provide a foundation for understanding the code in RuggRogue that works with game data.
If you have Rust installed and you have the RuggRogue source code, you can peruse a detailed reference to Shipyard 0.4's API, along with all of the other crates used by RuggRogue, by typing cargo doc --open.
Shipyard's source code also contains its user guide that can be built with mdBook, so you can check out older versions of its source code and run it through mdBook to read it.
The World
All data in Shipyard is stored in a World that consists of:
- Entities: They're just IDs, but the world tracks which ones are still alive.
- Components: Associated with entities; Shipyard stores components of each unique type in separate storages.
- Uniques: Like components, but not associated with any entity; often called resources in other Rust ECS crates.
RuggRogue creates one as the very first thing in the main function in the src/main.rs file:
let world = World::new();
Every bit of data specific to RuggRogue as a game is stored in the world, such as the map, the player, monsters and items.
Uniques
As mentioned above, a unique is some data stored in the world that isn't associated with an entity like a component would be. They're not technically required in an ECS, but many Rust ECS crates provide something like them as a convenience. For example, here's how RuggRogue stores the current game seed:
pub struct GameSeed(u64);

let world = World::new();
let game_seed = std::env::args()
    .nth(1)
    .and_then(|arg| arg.as_str().parse().ok())
    .unwrap_or_else(rand::random);

world.add_unique(GameSeed(game_seed)); // <-- adding a unique to the world
Since RuggRogue uses a single world to store all game data and passes it everywhere, uniques effectively act like global variables, without a lot of the incidental downsides of actual global variables.
Unique data is accessed by requesting a UniqueView or UniqueViewMut borrow out of the world with World::borrow:
// immutable borrow of GameSeed unique
let game_seed = world.borrow::<UniqueView<GameSeed>>();
println!("{:?}", game_seed.0);
// mutable borrow of GameSeed unique
let game_seed = world.borrow::<UniqueViewMut<GameSeed>>();
game_seed.0 = 1234567890;
There is no way to remove or directly replace a unique in Shipyard 0.4. The ability to remove uniques was only added in Shipyard 0.5, so RuggRogue hacks around this limitation when it needs to.
Entity and Component Basics
An entity is a lightweight ID that's just a number in Shipyard's case. A component is some data associated with an entity. Each entity can have zero or one component of each type associated with it.
Entities are created with a special borrow of EntitiesViewMut, like so:
// creating a empty entity with no components
let mut entities = world.borrow::<EntitiesViewMut>();

let entity_id = entities.add_entity((), ());
Entities are often made starting out with component data that is modified using ViewMut:
struct Position {
    x: i32,
    y: i32,
}

struct Renderable {
    ch: char,
}

let mut entities = world.borrow::<EntitiesViewMut>();
let mut positions = world.borrow::<ViewMut<Position>>();
let mut renderables = world.borrow::<ViewMut<Renderable>>();

// creating an entity with a Position component and a Renderable component
let entity_id = entities.add_entity(
    (&mut positions, &mut renderables),
    (
        Position { x: 1, y: 2 },
        Renderable { ch: '@' },
    ),
);
Deleting an entity requires clearing it out of every component storage, and thus requires the special AllStoragesViewMut borrow:
let mut all_storages = world.borrow::<AllStoragesViewMut>();

all_storages.delete(entity_id_to_delete);
Components can be added to entities after creation with an immutable EntitiesView borrow along with mutable ViewMut component borrows of the relevant storages:
struct Name(String);

struct GivesExperience(u64);

let entities = world.borrow::<EntitiesView>();
let mut gives_experiences = world.borrow::<ViewMut<GivesExperience>>();
let mut names = world.borrow::<ViewMut<Name>>();

// adding Name and GivesExperience components to goblin_entity_id
entities.add_component(
    (&mut gives_experiences, &mut names),
    (
        GivesExperience(20),
        Name("Goblin".to_string()),
    ),
    goblin_entity_id,
);
Components can be deleted from an entity on demand with just a mutable ViewMut borrow on the relevant component storage:
let mut names = world.borrow::<ViewMut<Name>>();

names.delete(entity_id_to_make_nameless);
To check if an entity has a component, we can check if the View of the component storage contains the entity ID:
struct Monster; // <-- empty tag struct

if world.borrow::<View<Monster>>().contains(entity_id) {
    // entity_id has a Monster component
}
A component can be checked for and accessed via a View or ViewMut as well using Rust's if let pattern matching syntax:
struct CombatStats {
    hp: i32,
}

let mut combat_stats = world.borrow::<ViewMut>();

if let Ok(combat_stats) = (&mut combat_stats).try_get(entity_id) {
    // entity_id has a CombatStats component, so do a bit of damage to it
    combat_stats.hp -= 1;
}
Iterating Entities and Components
A common operation in RuggRogue is to iterate over all entities that have a certain set of components on them.
That can be achieved with the iter function of the Shipyard::IntoIter trait:
use Shipyard::IntoIter;

struct Name(String);

struct Position {
    x: i32,
    y: i32,
}

let names = world.borrow::<View<Name>>();
let positions = world.borrow::<View<Position>>();

// iterate over all entities that have both Name and Position components
for (name, pos) in (&names, &positions).iter() {
    println!("{} is at ({},{})", name.0, pos.x, pos.y);
}
The entity IDs can be retrieved as well using the with_id function from Shipyard::Shiperator:
use Shipyard::IntoIter;
use Shipyard::Shiperator;

for (id, (name, pos)) in (&names, &positions).iter().with_id() {
    // do something with id, name and pos
}
I believe Shipyard::IntoIter and Shipyard::Shiperator are no longer needed in Shipyard 0.5; consult its current documentation if you want to know more.
The EntityId
Entities are uniquely identified by the Shipyard::EntityId type, which, as mentioned before, is just a number internally.
Since it's so lightweight, we can use it to model relationships between different entities.
For example, here's what equipping a player entity with weapon and armor entities might look like:
struct Equipment {
    weapon: Option<EntityId>,
    armor: Option<EntityId>,
}

struct AttackBonus(i32);

struct DefenseBonus(i32);

// create the player, weapon and armor entities
let (player_id, weapon_id, armor_id) = {
    let mut entities = world.borrow::<EntitiesViewMut>();
    let mut attack_bonuses = world.borrow::<ViewMut<AttackBonus>>();
    let mut defense_bonuses = world.borrow::<ViewMut<DefenseBonus>>();
    let mut equipments = world.borrow::<ViewMut<Equipment>>();

    // Equipment component for the player
    let player_id = entities.add_entity(
        &mut equipments,
        Equipment {
            weapon: None,
            armor: None,
        },
    );

    // AttackBonus component for the weapon
    let weapon_id = entities.add_entity(&mut attack_bonuses, AttackBonus(2));

    // DefenseBonus component for the armor
    let armor_id = entities.add_entity(&mut defense_bonuses, DefenseBonus(1));

    (player_id, weapon_id, armor_id)
};

// later on...
{
    let mut equipments = world.borrow::<ViewMut<Equipment>>();

    // equip the player if they have an Equipment component
    if let Ok(player_equip) = (&mut equipments).try_get(player_id) {
        // put the weapon and armor in the player's Equipment component
        player_equip.weapon = Some(weapon_id);
        player_equip.armor = Some(armor_id);
    }
}
This pretty much covers all of the ways that RuggRogue uses Shipyard to handle its own game data.
Conclusion
You should now have a general idea of how RuggRogue stores and accesses its data using Shipyard. Insofar as Rust ECS crates go, I'm so-so on Shipyard, since it came with a lot of functionality that I never used. I could use it for future projects, but I can just as easily see myself exploring other options or even cobbling my own data storage to suit my own needs.
Game Data
The Entity Component System chapter covered how RuggRogue uses Shipyard to store its game data. This chapter is all about what that data actually is. Game data here refers to all the data that defines RuggRogue as a game that isn't just technical book-keeping, such as the player, the map, items and monsters.
As mentioned in the entity component system chapter, game data is divided into two kinds:
- Uniques that are independent of entities.
- Components that are associated with an entity.
All game data is stored in a world that's passed pretty much everywhere throughout the code of RuggRogue. The world stores exactly one of each type of unique, and every entity has either zero or one instance of each type of component. This chapter will provide a run-down of what each of those types are, and will wrap up by covering how and when entities are spawned and despawned.
Uniques
The following types are stored as uniques in RuggRogue's game world.
BaseEquipmentLevel
Found in: src/main.rs
32-bit integer of the minimum power level of weapons and armors that spawn throughout the game. It's set when starting a new loop of New Game Plus to ensure that all spawned equipment in this loop will be more powerful than in the previous loop.
Camera
Found in: src/chunked.rs
Position that should be centered upon when drawing the map on the main game screen. Usually this is the position of the player, but it can be shifted around in view mode.
Difficulty
Found in: src/experience.rs
Tracks the total amount of experience to be gained by defeating every monster on the current level, as well as the ID of an entity that gains experience like the player. Together, this tracking data calculates how much experience the player could gain upon defeating all of the monsters on each level. The outcome of this tracking is used to determine the power level of items and monsters spawned on future levels.
GameSeed
Found in: src/main.rs
64-bit unsigned integer that is used to provide random number sequences that are unique to each playthrough. It's set to a random value or via a command line argument when starting a new game. Loading a game populates this value from the save file.
Map
Found in: src/map.rs
The map of the current dungeon level. Mainly consists of a grid of tiles representing the level itself, but also includes the current dungeon depth, tracking of tiles the player has previously seen and a spatial cache of positions to entities.
MenuMemory
Found in: src/menu_memory.rs
Tracks the last cursor position in various menus throughout the game so that they can be restored when the menu is opened again. This makes it easier for the player to deal with longer menus repeatedly.
Messages
Found in: src/message.rs
Holds the message log that appears in the sidebar in the main gameplay screen. It has a maximum capacity of messages, and old messages will be cleared out as new ones are added when this capacity is exceeded.
MonsterTurns
Found in: src/monster.rs
A heap that holds the entity IDs of monsters that should be given a turn to act between player turns. The heap gives turns to monsters nearest to the player first.
Options
Found in: src/ui.rs
Stores the tilesets and zoom settings of the tile grids that show the map in the main gameplay mode and the user interface as a whole.
PickUpHint
Found in: src/item.rs
A flag that determines whether the game should append a hint of the key to press to pick up items when the player steps over one. It's set at the start of each new game, and is unset once the player picks up an item.
PlayerAlive
Found in: src/player.rs
A flag that's true when the player is alive and false when they've died.
This determines whether the player should keep getting turns, as well as if they should get a win screen or game over screen when the game ends.
PlayerId
Found in: src/player.rs
ID of the entity representing the player. This is consulted pretty much universally throughout the game to read from or modify data associated with the player.
TurnCount
Found in: src/main.rs
64-bit unsigned integer representing the number of elapsed turns since the start of each game. It's shown in the user interface and in the game ending screens.
Wins
Found in: src/main.rs
64-bit unsigned integer that counts the number of times the player has won the game. This impacts the number of items and monsters that spawn in successive New Game Plus runs.
Components
The following types represent components that are associated with entities.
As mentioned before, an entity can have either zero or one instance of each of these components.
Components can all be found in the src/components.rs file.
AreaOfEffect
Attached to item entities to determine the radius of their circular area of effect when they're used.
Asleep
Attached to player or monster entities when they are afflicted with the sleep status. This contains a bit of hit point tracking to check if the affected entity took damage between turns, which reduces their sleepiness.
BlocksTile
Tag component that is attached monster entities to block other monsters from stepping into their tile. This causes monsters to find paths around each other when pursuing the player.
CombatBonus
Attached to weapon and armor entities to determine how much extra attack and defense they confer when wielded or worn.
CombatStats
Attached to player and monster entities to track hit points, as well as hold base attack and defense values. This is the main component that is dealt with during combat. When hit points reach zero here, the entity dies.
Consumable
Tag component that is attached to items that indicates that the item can be used and that it will be consumed on use.
Coord
Attached to player, monster and item entities to hold their coordinates on the current level's map when they are on the map. In particular, items will lose this component when picked up, and gain it again when dropped on the ground.
EquipSlot
Attached to item entities to determine whether they can be equipped as a weapon or armor.
Equipment
Tracks the entity IDs of the weapon and armor equipped by an entity. In practice, only the player has one of these components.
Experience
Attached to the player to track their experience level and total experience points.
The Difficulty unique also has an entity with this component attached to track the total experience that can be gained per dungeon level.
FieldOfView
Attached to players and monsters to determine their immediate fields of view. It consists of a grid of flags that track which tiles are visible relative to a position on the map.
GivesExperience
Attached to monsters to determine how many experience points they should grant when defeated.
HurtBy
Attached to entities that take damage to track the source of that damage. This is used to determine who to grant experience to when something dies, as well as provide a reason on the game over screen when the player dies. This component is cleared from all entities at the end of each turn.
InflictsDamage
Attached to consumable items to determine how much damage they should inflict when used.
InflictsSleep
Attached to items to inflict sleep on targeted entities when used.
Inventory
Attached to an entity to hold items that the entity picks up. In practice, only the player is given one of these.
Item
Tag component attached to an entity to indicate that it is an item. An entity must have this component in order to appear in the player's pick up menu.
Monster
Tag component attached to an entity to indicate that it is a monster. This grants turns and artificial intelligence to the entity that they belong to between player turns.
Name
Attached to entities to refer to them in menus and messages throughout the game.
Nutrition
Attached to items to provide nutrition when used.
Player
Attached to the player to store player-specific data, which in practice is tracking of their auto-run state.
There's a few places in the code that try to support multiple players, but the vast majority of the game logic leans on the singular PlayerId unique instead.
ProvidesHealing
Attached to items to indicate the amount of hit points they should restore on their targets.
Ranged
Attached to consumable items to indicate that they can be used on a target at range.
If the player uses an item with this component, they can target a distant space with the item.
If the item also has an AreaOfEffect component, that distant space will be the center of the area of effect.
RenderOnFloor
One of two tag components that tells the game to draw the entity on the map.
Entities with this component are drawn below entities with a RenderOnMap component.
RenderOnMap
One of two tag components that tells the game to draw the entity on the map.
Entities with this component are drawn above entities with a RenderOnFloor component.
Renderable
Attached to entities that are drawn on the map to determine their visual appearance, such as their game symbol, foreground and background colors.
Stomach
Attached to the player to give them hunger and regeneration mechanics.
Fullness tracked in this component slowly drains over time, and is replenished when an item with a Nutrition component is used.
An entity with normal levels of fullness will slowly regenerate hit points over time.
An entity with an empty stomach will instead take damage over time.
Tally
Attached to the player to track interesting statistics throughout the course of their game, such as damage taken, damage inflicted and number of defeated monsters. The statistics are shown to the player when their game ends, win or lose.
Victory
Tag component attached to an item that results in the player winning the game when the item is used. One item with this specific component is spawned once the player has descended deep enough into the dungeon.
Spawning Entities
All entity spawning logic is centralized in the src/spawn.rs file.
Most entities are spawned at map generation time when the fill_rooms_with_spawns function is called, which in turn calls the following functions:
spawn_guaranteed_equipmentto spawn level-appropriate equipment at an steady but unpredictable pace.spawn_guaranteed_rationto spawn a single ration per level.fill_room_with_spawnsto randomly populate rooms with items and monsters.
Items are spawned via the spawn_random_item_at function that calls one of the following functions at random:
spawn_weaponspawn_armorspawn_health_potionspawn_magic_missile_scrollspawn_fireball_scrollspawn_sleep_scroll
The spawn_weapon and spawn_armor functions consider the current difficulty to determine the power level of the equipment they create.
Monsters are spawned via the spawn_random_monster function that then calls the spawn_monster function to create the monster entity itself.
Like the spawn_weapon and spawn_armor functions, the spawn_monster function considers the current difficulty level when determining the monster to create and its power level.
The positions of entities that exist on the map are stored in the Coord component of the entity.
This means that an entity with a Coord component is considered to be "on the map".
In addition to this, the map maintains a spatial cache that tracks a list of entity IDs for any given position.
This may seem redundant, but it drastically improves performance when dealing with entities by position by avoiding the need to iterate over all entities and check their positions manually.
The consequence of all this is that any entity that is added to the map needs to be given a Coord component and be placed correctly in the map's spatial cache.
Items and monsters are placed in the spatial cache at the end of their respective spawn-related functions.
This placement is done by calling the Map::place_entity function, whose definition can be found in the src/map.rs file.
There are exactly two entities that are not automatically added to the map's spatial cache: the difficulty tracker and the player.
The difficulty tracking entity has only an Experience component.
Its role is to track the total amount of experience that could be gained by defeating all monsters on the current map in order to gauge an appropriate power level to spawn items and monsters on future levels.
The difficulty tracking entity is created by the spawn_difficulty function in the src/spawn.rs file, and its entity ID is stored in the id field of the unique Difficulty struct defined in the src/experience.rs file.
The difficulty tracking entity is spawned when a new game is started, namely in the new_game_setup function defined in the src/modes/title.rs file.
The player entity is created by the spawn_player function defined in the src/spawn.rs file, which is called when starting a new game in the new_game_setup function.
The ID of the player entity is needed almost everywhere in the game, so it's stored in the PlayerId unique for easy access.
As mentioned before, the player entity is not automatically added to the map's spatial cache, but unlike the difficulty tracking entity, it eventually needs to be added so that the player can move around and do things on the map.
When this needs to happen, the add_coords_to_players function (defined in src/player.rs) is called, followed by the place_player_in_first_room function (defined in src/map.rs) to position it and add it to the spatial cache.
You may notice that the difficulty tracking and player entities are also created in the main function in the src/main.rs file.
These are dummy entities whose only purpose is to guarantee that these entities exist so that code that replaces these entities can despawn them unconditionally, which makes their logic simpler.
Despawning Entities
Entities are despawned for a number of reasons:
- Despawning items and monsters when moving between dungeon levels.
- Despawning monsters when they are defeated.
- Despawning items and monsters after the game over sequence.
- Despawning old entities when starting or loading a game.
We'll cover each of these in turn.
Moving Between Dungeon Levels
The simplest and most common reason for entities to be despawned is when the player descends to the next dungeon level.
Moving between levels means replacing the current map with a fresh map, which in turn means despawning entities on the current map so they can be replaced with new spawns.
This is the task of the despawn_coord_entities function (defined in src/spawn.rs), which is called by the player_do_descend function (defined in src/player.rs) when the player takes the downstairs of the current level.
It simply despawns entities that have a Coord component, which are the ones that belong to the map.
But the player has a Coord component; how does it avoid being despawned when moving between levels?
The answer is simple: all entities with the Player tag component are stripped of their Coord component by the remove_coords_from_players function in the src/player.rs file.
Once this despawning is done, player entities regain their Coord component through the add_coords_to_players function in the same file.
There's also the matter of the items belonging to the player: how do they avoid being despawned between levels?
The Coord component is removed from items while being picked up by the remove_item_from_map function in the src/item.rs file.
Conversely, a Coord component is attached to dropped items by the add_item_to_map function in the same file.
These functions take care to manage the map's spatial cache, which must be correct while the map exists.
Defeating Monsters
The next most common reason to despawn entities is when the player defeats a monster.
This is the job of the despawn_entity function in the src/spawn.rs file, which despawns an entity by its ID.
This is called when a monster dies in the handle_dead_entities function in the src/damage.rs file.
The monster is removed from the map's spatial cache just before being despawned, for the same reason as when an item is picked up off the map.
After Game Over
The game over sequence is where things get interesting with respect to entity despawning.
When a monster is defeated, it's despawned as usual.
However, when the player is defeated, their entity is not despawned.
Instead, the unique PlayerAlive flag is set to false, and the player is whisked away to the game over screen.
The game over screen shows a bunch of information about the player at the time that they were defeated, but it also shows the reason that they were defeated to begin with.
If the reason is due to a monster, then it needs the name of the monster in order to display it.
This means that the monster entity still exists in the game over screen.
In fact, the entire map and all the entities in it still exist in the game over screen!
It is only when the player leaves the game over screen that it clears up most of these entities by calling the post_game_cleanup function in the src/modes/title.rs file, which calls the despawn_coord_entities function mentioned earlier to do its heavy lifting.
There is exactly one entity that is not despawned by the post_game_cleanup function: the player entity.
The reason for this is to support the new game plus feature, which carries the player into the next iteration of the game, items, stats and all.
Starting or Loading a Game
If the post_game_cleanup function never despawns the player, then what does?
In the case of starting a new game, this is done by the new_game_setup function in the src/modes/title.rs file.
This is why the dummy player entity is created when the game is first launched: it simplifies this logic.
Meanwhile, loading a game from a save file pretty much loads replacement entities for everything.
Assuming the load was successful, all of the old entities are manually despawned by the loading code using the despawn_entity function that you should probably be familiar with now.
This despawning is done by the load_game function in the src/saveload.rs file.
If you take a moment to think, you'll realize there's something missing in this explanation: what happens to the inventory items and equipment carried by the player when the player is despawned?
The answer is that all of those are despawned as well in the despawn_entity function.
The code in that function gathers up the entity IDs of any equipped weapon and armor, as well as the entity IDs of all inventory items, and deletes them along with the original entity itself.
All of this ceremony around despawning entities referred to by other entities is needed to avoid leaving entities unreachable. An entity is considered reachable if:
- Its ID is stored in a unique, e.g. the
idfield of theDifficultyunique, or thePlayerId. - It has a
Coordcomponent, meaning that it exists on the current map. - Its ID is stored in a component owned by another entity that is reachable, like the
EquipmentorInventorycomponents.
If an entity doesn't fit in any of the above cases, it is considered unreachable, which is the equivalent of a memory leak.
By despawning entities through the despawn_entity function instead of deleting them raw, we avoid making entities unreachable and thus leaking memory.
Saving and Loading
RuggRogue features a pretty basic save system. When the player chooses to save and exit from the options menu, all game data is written into a save file. The title screen will detect the presence of this file and show an option to load the game. The game also auto-saves at a couple of other points, such as when the player takes the stairs, and when they're about to win the game. If the player dies, any detected save file is deleted. If the player chooses to start a new game and a save file exists, a prompt will appear to delete it first.
All of this save-and-load action happens in the fittingly-named src/saveload.rs file, which will be the focus of most of this chapter.
The Save File Format
When the game is saved, save data will be written to a file named savegame.txt in the same directory as the game itself.
This file is in plain text format where each line represents either a unique or a component, made up of three tab-separated fields of data.
Each unique line consists of an asterisk character, the type name of the unique and the unique data.
Each component line consists of the ID of the entity it belongs to, the type name of the component and the component data.
Here is an example of the contents of a small, complete save file:
*	GameSeed	9542716676452101438
*	TurnCount	10
*	Wins	0
*	BaseEquipmentLevel	0
*	Difficulty	{"id":[8,0],"exp_for_next_depth":40}
*	Messages	{"capacity":100,"msg_queue":["This is a test save!"],"num_highlighted":0}
*	PlayerAlive	true
*	PlayerId	[5,0]
*	Map	{"depth":1,"width":80,"height":50,"tiles":[["W",1952],["F",8],["W",72],["F",8],["W",72],["F",8],["W",72],["F",8],["W",72],["F",8],["W",72],["F",8],["W",72],["F",8],["W",72],["F",8],["W",1760]],"rooms":[{"x1":32,"y1":24,"x2":39,"y2":31}],"seen":{"width":80,"height":50,"bv":[[1,4000]]}}
[2,0]	BlocksTile	null
[3,0]	CombatBonus	{"attack":0.0,"defense":1.4}
[4,0]	CombatBonus	{"attack":3.2,"defense":0.0}
[5,0]	CombatStats	{"max_hp":40,"hp":40,"attack":4.8,"defense":2.4}
[2,0]	CombatStats	{"max_hp":14,"hp":14,"attack":8.0,"defense":4.0}
[6,0]	Consumable	null
[7,0]	Consumable	null
[5,0]	Coord	{"x":33,"y":25}
[7,0]	Coord	{"x":33,"y":30}
[2,0]	Coord	{"x":38,"y":30}
[6,0]	Coord	{"x":38,"y":25}
[3,0]	EquipSlot	"Armor"
[4,0]	EquipSlot	"Weapon"
[5,0]	Equipment	{"weapon":[4,0],"armor":[3,0]}
[5,0]	Experience	{"level":1,"exp":0,"next":50,"base":0}
[8,0]	Experience	{"level":1,"exp":0,"next":50,"base":0}
[2,0]	Experience	{"level":1,"exp":0,"next":0,"base":0}
[5,0]	FieldOfView	{"tiles":{"width":17,"height":17,"bv":[[0,108],[1,10],[0,7],[1,10],[0,7],[1,10],[0,7],[1,10],[0,7],[1,10],[0,7],[1,10],[0,7],[1,10],[0,7],[1,9],[0,8],[1,9],[0,8],[1,7],[0,21]]},"range":8,"center":[33,25],"dirty":false}
[2,0]	FieldOfView	{"tiles":{"width":17,"height":17,"bv":[[0,21],[1,7],[0,8],[1,9],[0,8],[1,9],[0,7],[1,10],[0,7],[1,10],[0,7],[1,10],[0,7],[1,10],[0,7],[1,10],[0,7],[1,10],[0,7],[1,10],[0,108]]},"range":8,"center":[38,30],"dirty":false}
[2,0]	GivesExperience	10
[5,0]	Inventory	{"items":[]}
[3,0]	Item	null
[4,0]	Item	null
[6,0]	Item	null
[7,0]	Item	null
[2,0]	Monster	null
[6,0]	Name	"Health Potion"
[7,0]	Name	"Ration"
[5,0]	Name	"Player"
[3,0]	Name	"+1 Jerkin"
[4,0]	Name	"+1 Knife"
[2,0]	Name	"Blob"
[7,0]	Nutrition	750
[5,0]	Player	{}
[6,0]	ProvidesHealing	{"heal_amount":15}
[7,0]	RenderOnFloor	null
[6,0]	RenderOnFloor	null
[5,0]	RenderOnMap	null
[2,0]	RenderOnMap	null
[6,0]	Renderable	{"sym":"HealthPotion","fg":{"r":255,"g":0,"b":255},"bg":{"r":0,"g":0,"b":0}}
[7,0]	Renderable	{"sym":"Ration","fg":{"r":191,"g":92,"b":0},"bg":{"r":0,"g":0,"b":0}}
[5,0]	Renderable	{"sym":"Player","fg":{"r":255,"g":255,"b":0},"bg":{"r":0,"g":0,"b":0}}
[3,0]	Renderable	{"sym":"Jerkin","fg":{"r":170,"g":97,"b":32},"bg":{"r":0,"g":0,"b":0}}
[4,0]	Renderable	{"sym":"Knife","fg":{"r":165,"g":165,"b":165},"bg":{"r":0,"g":0,"b":0}}
[2,0]	Renderable	{"sym":"Blob","fg":{"r":89,"g":162,"b":191},"bg":{"r":0,"g":0,"b":0}}
[5,0]	Stomach	{"fullness":1491,"max_fullness":1500,"sub_hp":0}
[5,0]	Tally	{"damage_dealt":0,"damage_taken":0,"kills":0}
If you have a native build of RuggRogue, you can copy and paste this into a file named savegame.txt and the game will load it.
The above save data contains the player, a monster and some items confined in a small enclosed room in the center of the map.
We can break down this example save data, starting with the top lines:
*	GameSeed	9542716676452101438
*	TurnCount	10
*	Wins	0
*	BaseEquipmentLevel	0
*	Difficulty	{"id":[8,0],"exp_for_next_depth":40}
*	Messages	{"capacity":100,"msg_queue":["This is a test save!"],"num_highlighted":0}
*	PlayerAlive	true
*	PlayerId	[5,0]
*	Map	{"depth":1,"width":80,"height":50,"tiles":[["W",1952],["F",8],["W",72],["F",8],["W",72],["F",8],["W",72],["F",8],["W",72],["F",8],["W",72],["F",8],["W",72],["F",8],["W",72],["F",8],["W",1760]],"rooms":[{"x1":32,"y1":24,"x2":39,"y2":31}],"seen":{"width":80,"height":50,"bv":[[1,4000]]}}
All of these lines represent uniques, since they all start with an asterisk character.
There's some basic data for uniques such as GameSeed, TurnCount, Wins and PlayerAlive whose data should hopefully be self-explanatory.
Looking at some of the other lines reveals that all data is serialized in JSON format.
The line for the Map unique is interesting here.
The "tiles" field stores the contents of each tile in the map: "W" is a wall, "F" is a floor and "D" would be a downstairs tile that isn't featured in this tile data.
Tiles have a lot of redundancy, so they're stored in a special compressed form that will be covered later in this chapter.
Even with compression, this Map line will often be a lot longer than this in a typical save file.
You may have noticed the pairs of numbers present in the lines for the Difficulty and the PlayerId uniques.
These are entity IDs, so each pair uniquely identifies a entity.
Here, the difficulty tracker is represented by the [8,0] entity, while the player is represented by the [5,0] entity.
We can peek at the component data for the difficulty tracker by singling out lines of component data starting with the [8,0] entity ID, of which there is just one:
[8,0] Experience {"level":1,"exp":0,"next":50,"base":0}
As we can see, the difficulty tracking entity has a single Experience component that is at level 1 and will advance to the next level once it gains 50 experience points.
Filtering for the player by looking at lines starting with [5,0] shows that they hold a lot more data:
[5,0]	CombatStats	{"max_hp":40,"hp":40,"attack":4.8,"defense":2.4}
[5,0]	Coord	{"x":33,"y":25}
[5,0]	Equipment	{"weapon":[4,0],"armor":[3,0]}
[5,0]	Experience	{"level":1,"exp":0,"next":50,"base":0}
[5,0]	FieldOfView	{"tiles":{"width":17,"height":17,"bv":[[0,108],[1,10],[0,7],[1,10],[0,7],[1,10],[0,7],[1,10],[0,7],[1,10],[0,7],[1,10],[0,7],[1,10],[0,7],[1,9],[0,8],[1,9],[0,8],[1,7],[0,21]]},"range":8,"center":[33,25],"dirty":false}
[5,0]	Inventory	{"items":[]}
[5,0]	Name	"Player"
[5,0]	Player	{}
[5,0]	RenderOnMap	null
[5,0]	Renderable	{"sym":"Player","fg":{"r":255,"g":255,"b":0},"bg":{"r":0,"g":0,"b":0}}
[5,0]	Stomach	{"fullness":1491,"max_fullness":1500,"sub_hp":0}
[5,0]	Tally	{"damage_dealt":0,"damage_taken":0,"kills":0}
The player's CombatStats show that they're at 40 out of 40 hit points, with a base attack value of 4.8 and a base defense value of 2.4.
According to the Coord component they are located at coordinates 33,25.
Like the difficulty tracker, the player has an Experience component.
Components such as Name, Renderable, Stomach and Tally contain basic data.
The RenderOnMap component is a tag component with no data, so its serialized to the JSON null value.
The Player component would be saved the same way, except it stores some runtime data that doesn't need to be saved, so it comes out as an empty JSON object instead.
The FieldOfView component represents which tiles in the immediate vicinity of the player should be visible.
It's a very long line out of necessity since each line must hold the full data of either a unique or a component.
The "bv" field within the top-level "tiles" field is compressed in the same way as the tiles of the map unique.
The Equipment and Inventory components typically contain entity IDs.
Here, the player's inventory is empty, but they are armed with a weapon and armor.
Here are the lines for the weapon entity, which is a "+1 Knife":
[4,0]	CombatBonus	{"attack":3.2,"defense":0.0}
[4,0]	EquipSlot	"Weapon"
[4,0]	Item	null
[4,0]	Name	"+1 Knife"
[4,0]	Renderable	{"sym":"Knife","fg":{"r":165,"g":165,"b":165},"bg":{"r":0,"g":0,"b":0}}
The player's armor is a "+1 Jerkin":
[3,0]	CombatBonus	{"attack":0.0,"defense":1.4}
[3,0]	EquipSlot	"Armor"
[3,0]	Item	null
[3,0]	Name	"+1 Jerkin"
[3,0]	Renderable	{"sym":"Jerkin","fg":{"r":170,"g":97,"b":32},"bg":{"r":0,"g":0,"b":0}}
There's a "Health Potion" that's on the floor at coordinates 38,25:
[6,0]	Consumable	null
[6,0]	Coord	{"x":38,"y":25}
[6,0]	Item	null
[6,0]	Name	"Health Potion"
[6,0]	ProvidesHealing	{"heal_amount":15}
[6,0]	RenderOnFloor	null
[6,0]	Renderable	{"sym":"HealthPotion","fg":{"r":255,"g":0,"b":255},"bg":{"r":0,"g":0,"b":0}}
Finally, there's an enemy "Blob" in the opposite corner of the room to the player:
[2,0]	BlocksTile	null
[2,0]	CombatStats	{"max_hp":14,"hp":14,"attack":8.0,"defense":4.0}
[2,0]	Coord	{"x":38,"y":30}
[2,0]	Experience	{"level":1,"exp":0,"next":0,"base":0}
[2,0]	FieldOfView	{"tiles":{"width":17,"height":17,"bv":[[0,21],[1,7],[0,8],[1,9],[0,8],[1,9],[0,7],[1,10],[0,7],[1,10],[0,7],[1,10],[0,7],[1,10],[0,7],[1,10],[0,7],[1,10],[0,7],[1,10],[0,108]]},"range":8,"center":[38,30],"dirty":false}
[2,0]	GivesExperience	10
[2,0]	Monster	null
[2,0]	Name	"Blob"
[2,0]	RenderOnMap	null
[2,0]	Renderable	{"sym":"Blob","fg":{"r":89,"g":162,"b":191},"bg":{"r":0,"g":0,"b":0}}
Monsters share a lot of common component types with the player, but they have a Monster tag component instead of a Player component.
The BlocksTile tag component marks that other monsters should take a path around this monster, rather than trying to go through it.
And that's it: a full run-down of a complete save file. The format is pretty flexible: lines can technically occur in any order so long as every unique type is present. Save data is considered valid as long as all entity IDs exist, and the existence of entities is implied by the ID values at the start of component lines.
Saving
The save_game function is responsible for saving the game.
It's called from several other places in the code:
- In the
use_itemfunction in thesrc/item.rsfile when the player uses the victory item. - In the
DungeonMode::updatefunction insrc/modes/dungeon.rsin response to:- confirming when closing the game (the
AppQuitDialogModeResult::Confirmedcase) - taking the stairs (the
YesNoDialogModeResult::Yescase) - choosing to save and exit from the options menu (the
OptionsMenuModeResult::ReallyQuitcase)
- confirming when closing the game (the
The logic of the save_game function is simple: open a buffered writer for the savegame.txt file, write lines for all uniques and component storages, then flush the buffered writer.
Since this is Rust, the writer will automatically be closed when it falls out of scope at the end of the function.
The writing of a unique line is handled by the save_named_unique function, which outputs the asterisk, the unique type name and the unique data in tab-separated form.
Used as-is, it would normally appear like this in the save_game function:
save_named_unique<_, GameSeed>(world, &mut writer, "GameSeed")?;
To avoid having to specify the type name of the unique twice, the save_game function instead uses a helper macro named save_unique!, shortening the above to:
save_unique!(GameSeed, world, &mut writer)?;
While the save_named_unique function writes a single line for a unique, the save_named_storage function instead writes multiple lines for a given component type, one for each individual component.
Used as-is, it would look like this:
save_named_storage<_, AreaOfEffect>(world, &mut writer, "AreaOfEffect")?;
There's also a helper macro for this named save_storage! that shortens it to this instead:
save_storage!(AreaOfEffect, world, &mut writer)?;
That's all there is to saving the game. You should appreciate the simplicity of this, because the loading logic is a lot more involved.
It's worth noting what isn't being considered here: entity IDs. It turns out that entity IDs are not only serializable, but they're 100% safe to save as-is with no further intervention. If game data were stored and managed with something like references or pointers instead, it would need an unswizzling strategy that would have to invade the data serialization logic.
Loading
Saving is a relatively straightforward affair, free of branches and loops, with very simple error conditions. Loading, on the other hand, is a lot more complex. Part of this is due to how permissive the save file format is; in particular, lines for uniques and components can technically appear in any order and still be valid. But a lot of this complexity comes from the fact that the very nature of loading involves setting up and altering a lot of data, which is something that the saving process never has to worry about.
The loading process can be broadly broken down into these major parts:
- Load data for each line in the save file:
- If it starts with an asterisk, load the line as a unique.
- Otherwise, try to load component data and attach it to a specific entity, creating it if it doesn't exist yet.
- Check that all uniques needed were loaded from the save file.
- Fix entity IDs across all uniques and components that store them.
- Place entities with
Coordcomponents on the map. - Commit the freshly-loaded uniques and entities to the world.
- Despawn any entities that need to be despawned.
We'll look at each part one at a time.
Handling Entity Despawning
This is not a mistake: we're looking at the last phase first.
If you take a look at the load_game function, you'll notice that despawning entities is all that it really does; most of loading logic is instead handled by the load_save_file function that it calls.
Why is it set up like this?
To understand the answer, we need to step back and think about what loading actually means in terms of data. While we read in each line of the save file, we'll be loading components. In order to load components, we need to create new entities to attach them to. At this point, there will be entities in the world that existed before loading began alongside newly-created entities spawned in the process of loading. If loading fails, these new entities need to be despawned so that we don't have half-loaded entities floating about in the world. Likewise, if loading succeeds, old entities need to be despawned since they've been fully replaced by the loaded entities and are thus no longer needed.
The sole purpose of the load_game function is to give a blank list for the load_save_file function to fill with the IDs of entities that need to be despawned, and guarantee that they are despawned afterwards.
The load_game function is called from the TitleMode::update function in the src/modes/title.rs file when the player chooses to load a game from the title screen.
If the load_save_file function fails to load the game, this list will contain the newly-loaded entity IDs so that they can be cleaned up.
If it succeeds, this list will instead contain the IDs of old entities that weren't part of the save file.
Loading Data a Line at a Time
The loading of the save data proper is handled by the load_save_file function.
The top half of this function is dedicated to setting up for and loading the data out of the save file, one line at a time.
We can think of loaded data as transitioning through two phases: temporary and committed. As the save file is processed a line at a time, data is loaded in some temporary form. Once we're happy that everything was loaded successfully, we can take the temporary data and convert it into its committed form; the form that the rest of the game will see and deal with.
Loading a Unique Line
The big loop near the beginning of the load_save_file function is what reads in each line of the save file.
Just before it are a bunch of lines that look like this:
let mut game_seed: Option<GameSeed> = None;
let mut turn_count: Option<TurnCount> = None;
let mut wins: Option<Wins> = None;
let mut base_equipment_level: Option<BaseEquipmentLevel> = None;
let mut difficulty: Option<Difficulty> = None;
let mut messages: Option<Messages> = None;
let mut player_alive: Option<PlayerAlive> = None;
let mut player_id: Option<PlayerId> = None;
let mut map: Option<Map> = None;
These are all temporary variables for unique data.
When the per-line loop reads in a unique, it fills one of these with a Some variant containing the loaded data for that unique.
The first conditional block of the per-line loop checks for an asterisk character and a whitespace. If those characters are detected, the line is trimmed to the point after them and the loading process will attempt to interpret the line according to all of the unique types it knows of, one at a time.
Unique lines are loaded via the deserialize_named_unique function, which has a helper deserialize_unique! macro to reduce typing redundancy.
The deserialize_named_unique function accepts one of the temporary variables for holding unique data.
It does one of the following things, depending on the contents of the data line it sees:
- Returns
Ok(false)if the unique type name doesn't match what was expected. - Returns
Ok(false)if deserializing failed for whatever reason. - Returns
Err(LoadError::DuplicateUnique(...))if the temporary variable was already filled in and the load would otherwise have succeeded. - Returns
Ok(true)and fills in the temporary variable with the loaded data if none of the above occurred.
In other words, a return value of Ok(true) means the unique data was successfully loaded, while Ok(false) indicates that other unique types should be attempted.
Loading a Component Line
When components are loaded in, they need to be attached to newly-created entities.
These entities share the same world space as any entities that existed before the loading process started.
When entities are created during the loading process they're added to the despawn_ids vector passed into the load_save_file function.
As mentioned before, entities in this vector will eventually be despawned if they're still there when the load_save_file function is done.
Therefore, we can think of components loaded and attached to these entities as temporary storage.
With that in mind, we can now consider lines that should contain component data. The loading process will try to interpret any line that doesn't start with an asterisk character as a component line instead.
The first part of a component line is the entity that the component should be attached to.
This entity ID is meaningful within the save data, but is meaningless in the current world.
To reconcile this, we need to map each distinct entity ID that we encounter while loading components to fresh entities that have their own new entity IDs.
Near the top of the load_save_file function is the data structure whose job is to manage exactly this:
let mut old_to_new_ids: HashMap<EntityId, EntityId> = HashMap::new();
The keys of this hash map are the entity IDs as listed in the save file, while the values are the entity IDs of the corresponding fresh new entities that represent them in their real, loaded form. If the entity ID at the beginning of the component line exists, it is simply retrieved. If it doesn't, it is created and added to this hash map.
Since we have the ID of the new entity, we can proceed to attempt to load components, trying one type at a time.
This is done with the deserialize_named_component function and the deserialize_component! helper macro that work much like how deserialize_named_unique and deserialize_unique! did for uniques.
In fact, the deserialize_named_component function works the same way as the deserialize_named_unique function, except that it attaches component data to a new temporary entity passed in by ID and emits Err(LoadError::DuplicateComponent(...)) instead.
At this point, any line that cannot be read as data for a unique or for a component causes the load_save_file function to return LoadError::UnrecoginzedLine as an error.
Checking Uniques
Once every line in the save file has been processed, we need to check that every unique is accounted for. The code is short enough to show here in its entirety:
// Check that all uniques are present.
let game_seed = game_seed.ok_or(LoadError::MissingUnique("GameSeed"))?;
let turn_count = turn_count.ok_or(LoadError::MissingUnique("TurnCount"))?;
let wins = wins.ok_or(LoadError::MissingUnique("Wins"))?;
let base_equipment_level =
    base_equipment_level.ok_or(LoadError::MissingUnique("BaseEquipmentLevel"))?;
let mut difficulty = difficulty.ok_or(LoadError::MissingUnique("Difficulty"))?;
let messages = messages.ok_or(LoadError::MissingUnique("Messages"))?;
let player_alive = player_alive.ok_or(LoadError::MissingUnique("PlayerAlive"))?;
let mut player_id = player_id.ok_or(LoadError::MissingUnique("PlayerId"))?;
let mut map = map.ok_or(LoadError::MissingUnique("Map"))?;
The above code checks that each unique type was loaded, and bails with an error if any of them are missing.
It also uses shadowing to redefine the temporary unique variables into non-Option form so they're easier to work with later in the loading code.
Fixing Entity IDs
When component lines were being processed, new entities were being created according to the entity ID found at the beginning of those lines.
However, there are also entity IDs present in the data payloads at the end of unique and component lines as well that are loaded verbatim, which means they refer to the IDs at the beginning of lines.
We need to fix these IDs to point to the IDs of the entities created during the loading process by converting them according to the old_to_new_ids hash map that was built up earlier.
There are two uniques and two components that hold entity IDs and thus need fixing.
The unique types are Difficulty and PlayerId, while the component types are Equipment (weapon and armor) and Inventory (items).
The loading code takes care to only iterate over entities that were created during the loading process by filtering by the values of the old_to_new_ids hash map.
Converting old save IDs to new loaded entity IDs also doubles as an integrity check to ensure that each ID refers to an existing entity in the save file.
If any of the IDs to fix are absent from the old_to_new_ids hash map, a LoadError::UnknownId error is raised.
Placing Entities on The Map
If you look at the serialized version of the map in a save file and compare it to the definition of the Map struct in the src/map.rs file, you'll notice that the tile_entities field isn't being serialized.
This is the spatial cache that's used to speed up access to entities according to their position in the map.
It doesn't need to be saved or loaded because the same information is stored in the Coord components of each entity.
However, this spatial cache still needs to be restored when loading a save file; this is done by simply iterating over all entities with a Coord component and using the Map::place_entity function to fill in the cache.
Committing Loaded Uniques and Entities
So far all of our data has been loaded in a temporary form: uniques are loaded in local variables, while components are attached to temporary entities. We want to commit our temporary data; that is, prepare it so it can be used by the rest of the game.
Committing temporary entities involves clearing out the despawn_ids vector that was passed in at the beginning.
Its contents are replaced with old entities that were around before loading that need to be despawned.
There are only two entities that fall under this description: the difficulty tracking entity and the player entity (plus any equipment and items they may have).
We know that we only have to handle these two entities because loading only happens at the title screen, so no other unassociated entities exist at that point in the game.
After committing temporary entities comes committing uniques, which is a simple matter of assigning over or replacing each unique type individually.
The API of Shipyard 0.4 has no way to replace or remove a unique once one has been added to a world, so this involves some clumsy replace function definitions for some unique types, but otherwise it works.
After Loading
At this point all of the saved data has been loaded and prepared, so all that's left is to bounce the player right back into the gameplay.
The original invocation of the load_game function in the TitleMode::update function triggers a mode switch to DungeonMode which does pretty much that.
So like I said earlier: loading is a lot more complicated than saving. Despite all of these checks and safe-guards, there's a lot of ways a save file can be loaded and accepted by the game, but still be broken. For example:
- A map has a set width and height, but could be loaded with insufficient tiles.
- Numbers that are typically positive could be negative.
- What if entities are missing important components?
- A lot of nonsense can happen if entity IDs are changed to refer to unintended entities.
The loading logic of RuggRogue doesn't check for any of these; it's complex enough as-is and there's almost no limit to the number of things that could be wrong with the data that it loads. Instead, it's mostly content to successfully load a save file that was produced by the saving logic. If the save file is messed up, the impact on the game can vary from minor unintended behavior all the way to panicking, which is Rust's safe way of bailing out at the first sign of trouble it detects.
Opening and reading a save file is a good way of gaining insight as to what data exists at any given point in a game.
You can also have some fun by modifying a save file: try cranking up Wins to 300 and witness the flood of monsters and items, or add a zero or two to the player's maximum hit points.
Run-Length Encoding
If you've been reading up to this point, you might have noticed that something is missing in this explanation: how is serialization and deserialization actually performed? If each line of the save file ends with JSON-formatted data, how are data structures converted to and from JSON when saving and loading?
The reason that all of this has been glossed over is because RuggRogue outsources the task to two crates: serde and serde_json, that make it almost trivial. RuggRogue first uses Serde to annotate any data structure that needs this treatment using the derive macros that provides, like so:
use serde::{Deserialize, Serialize};

#[derive(Deserialize, Serialize)]
pub struct GameSeed(u64);
In the above example, GameSeed is a simple tuple struct, but this annotation works for larger structs with fields and enums as well.
Every data structure that RuggRogue needs to save into the save file is annotated in this way.
Once annotated like this, these data structures can then be serialized into JSON format using serde_json, e.g.:
// NOTE: Not real saving code!

use serde_json::Serializer;

let mut writer = SomethingToWriteInto::new();
let game_seed = world.borrow::<UniqueView<GameSeed>>();
game_seed.serialize(&mut Serializer::new(&mut writer))?;
Deserialization from JSON is also handled by serde_json:
// NOTE: Not real loading code!

use serde_json::Deserializer;

let line = GetALineFromSomewhere::new();
let mut ds = Deserializer::from_str(line);
let mut game_seed = GameSeed::deserialize(&mut ds)?;
world.borrow::<UniqueViewMut<GameSeed>>().0 = game_seed.0;
The above code samples aren't real code, but they're rough approximations of what happens inside the serialize_named_unique, serialize_named_storage, deserialize_named_unique and deserialize_named_storage functions.
For simple data, this is all that is needed for serialization and deserialization.
However, let's take a look at the definition of the Map struct in the src/map.rs file, paying attention to the annotations:
#[derive(Deserialize, Serialize)]
pub struct Map {
    pub depth: i32,
    pub width: i32,
    pub height: i32,
    #[serde(with = "crate::saveload::run_length_encoded")]
    tiles: Vec<Tile>,
    pub rooms: Vec<Rect>,
    pub seen: BitGrid,

    // (x, y) -> (blocking_entity_count, entities_here)
    #[serde(skip)]
    tile_entities: HashMap<(i32, i32), (i32, Vec<EntityId>)>,

    // zero-length non-zero-capacity vectors for reuse in tile_entities
    #[serde(skip)]
    empty_entity_vecs: Vec<Vec<EntityId>>,
}
Note the "crate::saveload::run_length_encoded" annotation on the tiles field.
This is how RuggRogue tells Serde that it wants to save the tiles field differently than how it normally would.
In this case, we know that there would be a lot of redundancy when saving the tile data of the map, so to cut it down we want to handle this field specially.
The way we want to cut down the size of the tile data that we save is by run-length encoding it. Instead of writing each tile individually, we want to write the tile followed by the number of repetitions until a different tile appears. This has a pretty dramatic impact on save file size: basic tests show that it reduces save file size by about two-thirds!
The "crate::saveload::run_length_encoded" bit refers to the run_length_encoded module near the bottom of the src/saveload.rs file.
The serialize function contained within just reads in tiles and tracks runs of repeated tiles into a temporary vector, and just serializes that vector.
Conversely, the deserialize function reads in the vector in that format and uses some Rust iterator functions to convert it back into a normal vector of tiles that the Map struct actually wants.
For the tiles of a map, that's all that we need to perform run-length encoding.
However, we also want to apply run-length encoding to things like our fields of view, specifically to the bv field of our homegrown BitGrid struct in the src/bitgrid.rs file:
/// A width-by-height-sized BitVec for convenient handling of a grid of boolean values.
#[derive(Deserialize, Serialize)]
pub struct BitGrid {
    width: i32,
    height: i32,
    #[serde(with = "crate::saveload::bit_vec")]
    bv: BitVec,
}
We have a BitVec here which is notably not Rust's standard Vec type that the run_length_encoded module wants.
The "crate::saveload::bit_vec" bit refers to the bit_vec module at the very bottom of the src/saveload.rs file.
The only job of this module is to convert the BitVec to and from a standard Rust Vec<u8> of ones and zeroes and then hand it off to the run_length_encoded module to apply its run-length encoding.
The end result is run-length encoding for BitVec fields that decreases the amount of space needed to save them.
A final note: apparently the BitVec type can be processed by Serde with an internal representation that's even more compact than the roundabout run-length encoding that RuggRogue uses.
However, the documentation of that crate warns that its output isn't guaranteed to stay stable.
What's more, even trying to use it as-is resulted in serialized output that the deserializer would choke on.
In a sense, the run-length encoding that RuggRogue uses is actually a workaround for the BitVec type not serializing and deserializing correctly to begin with.
Save Support for the Web Build
The native build of RuggRogue writes game data to the savegame.txt file in the same directory as the game itself, but what about the web build?
Obviously the web build can't just write files to the visitor's local filesystem directly.
The web version of RuggRogue is created using Emscripten, which provides an in-memory file system by default called MEMFS that enables standard file operations to just work.
The downside of this default system is that anything saved to this file system is lost the moment the player closes the tab.
In order to allow the player to save the game and load it when visiting the game page at a later point in time, we need an Emscripten file system that will preserve the save file written into it.
RuggRogue uses IDBFS to accomplish this, which provides a file system backed by an IndexedDB instance provided by the web browser.
The first step to using IDBFS is to link it in so it can be used at all.
RuggRogue does this by passing -lidbfs.js as a linker option to the Emscripten toolchain in the .cargo/config.toml file.
If you take a look near the top of the src/saveload.rs file, you may have noticed this bit regarding the location of the save file:
#[cfg(target_os = "emscripten")]
const SAVE_FILENAME: &str = "/ruggrogue/savegame.txt";

#[cfg(not(target_os = "emscripten"))]
const SAVE_FILENAME: &str = "savegame.txt";
This sets the save file location to savegame.txt when building the native version of the game, while putting the save in the fixed /ruggrogue/savegame.txt location in the web version instead.
The /ruggrogue directory is a location that we want to create in Emscripten's virtual file system, which will be mounted as an IDBFS.
This is done with some JavaScript inside the index.html file:
var Module = {
    // ...
    'preRun': [function () {
        FS.mkdir("/ruggrogue");
        FS.mount(IDBFS, {}, "/ruggrogue");
        FS.syncfs(true, function (err) {});
    }],
};
The above snippet creates /ruggrogue as a mount point in Emscripten's virtual file system, mounts an IDBFS instance there, and loads in any data saved in the web browser's IndexedDB into it.
In theory, that's all that's needed to get saving and loading to work in the web version of RuggRogue.
Unfortunately, this process is imperfect.
The final FS.syncfs call above is asynchronous, and the callback provided is supposed to be called when it's done, but I couldn't work out how to make Emscripten wait for it to be called before jumping into the title screen of the game.
If you take a peek at the menu logic in the src/modes/title.rs file, you can see that RuggRogue works around this by always including the "Load Game" option in the web build.
The other caveat of this IndexedDB approach is that persistent IndexedDB instances aren't available in private browsing tabs. In that case, the game will silently fall back to the in-memory file system, so save files will be forgotten when the game page is closed.
To be honest, I don't know if doing all of this the way I'm supposed to. Emscripten has a decent amount of reference documentation, but it's very thin on guidance, so a lot of what I did above was cobbled together from bits and pieces of the docs I could find. There feels like there should be a better and more reliable way to do what I've done here, but I haven't found one, so I just had to make do with what I could find.
Field of View
When you start a new game in RuggRogue, one of the first things you'll notice is that the player can only see their immediate surroundings. As you move around the dungeon, you'll also find that the player's sight is additionally limited from seeing through walls. In other words, the player's vision is confined to their field of view: the set of tiles that are visible from the player's position in a straight line. Limiting vision to a field of view is one of the staples of the roguelike genre, and RuggRogue is no exception.
Despite its single topic focus, this chapter is going to cover a lot of ground. The first thing this chapter will cover is how fields of view are used in RuggRogue. Next comes the general approach to calculating fields of view and the design considerations that come with it, followed by a high-level description of the algorithm used to calculate fields of view. The rest of the chapter will then describe the various parts of the RuggRogue source code that implement this algorithm.
How Fields of View are used
Before diving into how fields of view are calculated, it's worth considering how they're used to begin with. The most obvious purpose of field of view calculation is to define and limit how much of the map the player can see at any given time, in order to generate a sense of mystery and danger in exploring unknown territory. However, it's also used for a number of other purposes.
Monsters in the dungeon are subject to the same vision rules as the player and thus also have a field of view calculated for them.
Monsters and the player both possess a FieldOfView component that tells the game to calculate the field of view when needed for the corresponding entity.
The FieldOfView component itself, defined in the src/components.rs file, consists of the position and range of the field of view, a bit grid with a bit set for each visible tile and a dirty flag to prevent unnecessary recalculations.
All of this calculation is regulated by the recalculate_fields_of_view function defined in the src/vision.rs file; it's here that we get our first glimpse of the use of the ruggrogue::field_of_view function that calculates the field of view itself.
Fields of view belonging to the player will update the memory of previously-seen map tiles stored in the seen bit grid field of the Map struct defined in the src/map.rs file.
The field of view of the player is used to limit which tiles can be targeted when using an item at range to stop them from using items directly through walls.
The tiles of the player's field of view are used as the basis for valid target tiles considered by the TargetMode struct in the src/modes/target.rs file.
This is done by filling in the valid field of the TargetMode struct in the TargetMode::new function.
The final use of field of view calculation is to shape the area of effect of items according to the target epicenter of their blast.
The use_item function in the src/item.rs file fills in a targets variable with entity IDs according to their positions within the field of view of the target epicenter; note the use of the ruggrogue::field_of_view function here to achieve this.
Calculating Field of View
There are many ways that roguelikes choose to define their fields of view. RuggRogue defines its field of view as all tiles that are visible from a starting tile in a straight line within some maximum range. Roguelikes that use this definition generally approach field of view calculations in one of three ways:
- Ray casting: Cast a straight line ray between the starting tile and every other tile; a tile is visible if the ray is not blocked.
- Shadow casting: Trace visible tiles outwards from the starting tile, skipping shadows cast by blocking tiles described by slopes relative to the center of the starting tile.
- Permissive field of view: A group of approaches that try to calculate visible tiles by detecting if a straight line can be drawn between any point in the starting tile and any point in each checked tile.
RuggRogue takes the shadow casting approach. The "Field of Vision" page on RogueBasin is a good starting point for finding out more about these approaches. Ray casting runs pretty slowly, especially as fields of view grow larger, and performance matters somewhat considering RuggRogue calculates fields of view for monsters as well as the player. On the other hand, there's not much written about permissive field of view calculation, and the different approaches tend to involve corner-case handling of common input scenarios, leading to messy algorithms. Shadow casting is fast, precise and robust when it's implemented correctly.
There are two major design considerations when using shadow casting to calculate fields of view: wall shape and determining visibility.
The wall shape chosen by an implementation of the shadow casting algorithm determines the shape of the shadows that are cast by walls when they block vision. The most obvious wall shape choice is square walls, where the wall is considered to completely fill its occupying tile. This is a very common implementation choice, but surprisingly it leads to larger shadows and smaller, more claustrophobic fields of view compared to the results of other algorithms. RuggRogue instead opts for diamond-shaped walls, in which a wall consists of a diamond drawn between the mid-points of its four sides. This grants better visibility around corners and creates more natural-looking shadows behind occlusions.
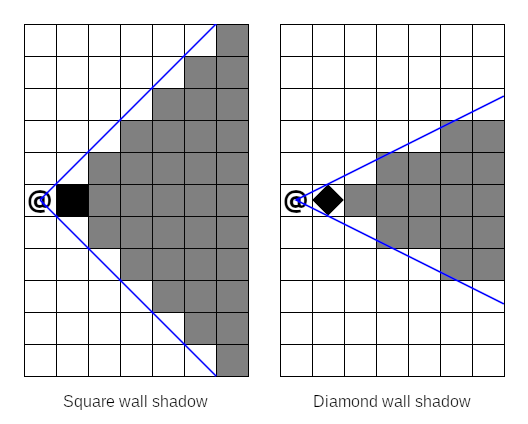
Visibility determination is about exactly how a shadow casting implementation decides whether or not a tile is visible from the starting tile. The obvious approach here is center-to-any visibility, i.e. a tile is visible if there is a straight line between the center of the starting tile to any point in the target tile. Unfortunately, this leads to asymmetry: target tiles are visible from the starting tile, but not necessarily vice versa. To preserve symmetry, we could instead opt for center-to-center visibility, i.e. a tile is visible if there is a straight line between its center and the center of the starting tile. This also has a problem when applied naively: walls become non-expansive, i.e. standing next to a long straight wall renders faraway wall tiles as not visible, even while non-wall tiles next to them are visible. RuggRogue adopts a hybrid strategy for visibility determination made up of two core rules:
- Symmetric center-to-center visibility for non-wall tiles.
- Asymmetric center-to-mid-line visibility for wall tiles.
We want to use "center-to-mid-line" visibility instead of "center-to-any" to make visibility determination match our diamond-shaped walls. Center-to-mid-line visibility exploits the fact that diamond-shaped walls can also be considered as plus-shaped walls; it doesn't matter how the mid-points of each side of the tile are connected for the purposes of shadow casting. We can therefore check if a wall is visible by seeing if any stem of the plus shape is visible from the central point of the starting tile. In the following diagram, the far wall is asymmetrically visible due to one of its mid-lines, while every other tile is symmetrically visible, including the close wall:
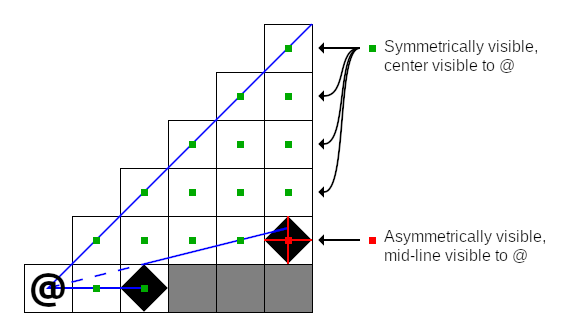
It's important to remember that wall shape and visibility determination are implementation details and not core properties of the shadow casting algorithm itself. The two are often confused in other literature when listing downsides to using shadow casting, or when comparing the results of shadow casting to that of other field of view algorithms.
The Shadow Casting Algorithm
In order to make sense of the code in RuggRogue that calculates fields of view, we'll first need to understand how shadow casting works on an algorithmic level. There are two broad approaches to implementing shadow casting: recursive and iterative. The recursive approach solves the shadow casting problem by repeatedly breaking it down into smaller sub-problems, tracking visible areas as arguments fed into successive function calls. The iterative approach loops over tiles while tracking visible areas explicitly in data structures. RuggRogue implements iterative shadow casting since iterative algorithms tend to perform better than recursive ones in real-world cases, so that's what will be covered here.
Before getting into all of this, a couple of definitions are in order. First, we'll use the word "wall" for tiles that block vision and "floor" for tiles that don't, just for convenience. Second, we'll define y as increasing upwards like in most mathematics and geometry literature, so words like "higher" and "lower" make more sense. In reality, grids and coordinates in RuggRogue treat y as increasing downwards, but shadow casting still works even when things are vertically flipped, so we can get away with it.
Dividing Space to Make Shadow Casting Easier
The first step of shadow casting is to visit the starting tile, marked with an at-sign ("@") in all of these diagrams. This seems obvious, but we won't be revisiting it at any other point in our algorithm, so it needs to be accounted for before anything else.
Beyond the starting tile, how are we going to handle all of the other tiles? With shadow casting, we'll need to work with slopes going from the center of the starting tile to the corners of our diamond-shaped walls, but if we dive straight in with this information you'll run into a problem straight away. Depending on whether our slopes are mostly horizontal or vertical, different wall corners are going to matter: mostly-horizontal slopes care about vertical wall corners, while mostly-vertical slopes care about horizontal wall corners. Another problem is that slopes will occasionally straddle two tiles exactly, so we'll have to perform rounding to break ties, but if this rounding is applied uniformly we'll end up biasing vision in certain directions. It seems like we'll need a lot of ugly special cases to avoid ugly and incorrect results... or will we?
Instead of working with the entire area all at once, we can divide the space around the starting tiles into eight slices or octants:
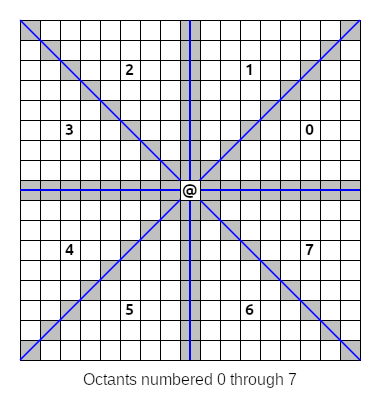
As it turns out, wall handling and rounding is handled the same way for all tiles in any single octant. In octants where our slopes are mostly horizontal (octants 0, 3, 4 and 7 above) we only care about the vertical corners of our diamond-shaped walls; conversely, we only consider the horizontal corners in the other mostly-vertical octants (1, 2, 5 and 6 above). When slopes straddle tiles, we want to round towards the nearest cardinal axis to avoid odd-looking bias, and this rounding is performed in the same direction for all tiles in an octant. Dividing our processing into octants will make our logic a lot cleaner.
However, the best part about all of this is that we can now perform shadow casting in just one octant and use some clever mathematics to reuse our work in all of the other octants! When we work in a single octant, we'll treat the starting tile as being at (0,0) coordinates and identify other tiles as offset from the starting tile by x and y values. When we need real map coordinates instead, such as when checking if a tile is a wall or floor on the map, we can convert them using the following formulas:
real_x = x * real_x_from_x + y * real_x_from_y + start_x
real_y = x * real_y_from_x + y * real_y_from_y + start_y
In the above formulas, real_x and real_y are real map coordinates, x and y are tile coordinates in the octant relative to the starting tile, and start_x and start_y are the real map coordinates of the starting tile.
The other four coefficients are different for every octant, and have the following values:
| Octant | real_x_from_x | real_x_from_y | real_y_from_x | real_y_from_y |
|---|---|---|---|---|
| 0 | 1 | 0 | 0 | 1 |
| 1 | 0 | 1 | 1 | 0 |
| 2 | 0 | -1 | 1 | 0 |
| 3 | -1 | 0 | 0 | 1 |
| 4 | -1 | 0 | 0 | -1 |
| 5 | 0 | -1 | -1 | 0 |
| 6 | 0 | 1 | -1 | 0 |
| 7 | 1 | 0 | 0 | -1 |
With these formulas and values we can write code to perform shadow casting in one octant, then run it with different sets of values from the above table to cover the other octants.
There's one final thing to note in the diagram from earlier. Look at the highlighted tiles on the edges of the octants. These tiles are shared by two octants, and we'll need to consider them in both octants in case they contain walls, but we also want to avoid visiting them twice. It's easy enough to make this happen by only visiting these tiles in even-numbered octants, i.e. octants 0, 2, 4 and 6 above.
Processing a Single Octant
To ensure that walls closer to the starting tile block vision, we'll need to process tiles near the starting tile and work our way outwards. This means that our work will be broken down into columns, like so:
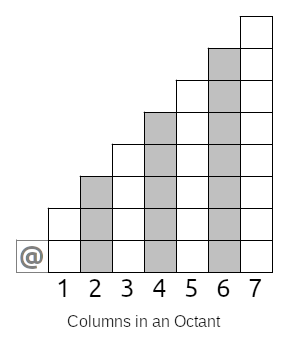
Whatever we do, we'll need to finish all of our work in one column before moving onto the next. In the image above, we start with column 1 and process it completely, then column 2, then column 3 and so on.
Determining Visible Tiles in a Column
Once we're down to the level of a single column, we need some way to describe the areas that are visible from the starting tile. To understand the type of data that we need, we'll first need to understand two concepts: slopes and sights.
A slope describes the angle between the center of the starting tile and some other point, like the corner of a wall. Here is an example of a slope of the top corner of a nearby wall:
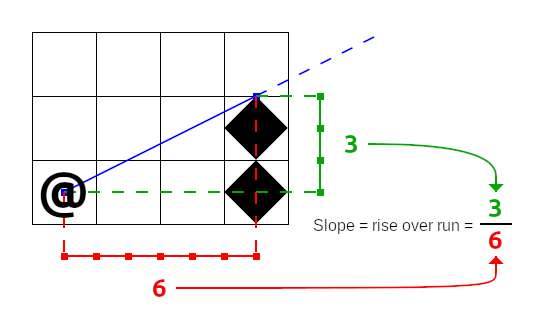
The first thing to note about the slope above, and indeed all slopes, is that they are always measured from the center of the starting tile. The center is the only point in the starting tile that stays in the same place regardless of flipping and transposing, which is what will happen when taking our work into other octants.
The next thing to note is that we're representing slopes as pairs of integers and measuring them out in half-tile units. Slopes are fractional values and could be represented as floating point values instead, as some other shadow casting implementations will choose. By measuring in half-tiles, RuggRogue avoids the performance overhead of converting between integers and floating point values.
Finally, even though a slope is created between two points, its influence extends beyond them. This is what allows our field of view to properly expand outwards from the starting tile.
An important property of slopes is that they can be compared; slope comparison will be used later on to do things like test if a tile is symmetrically visible, for example.
Low slopes are considered to be of a value less than higher slopes.
One way to compare two slopes, a and b, is to define a less-than-or-equal-to inequality, like so:
a_rise / a_run <= b_rise / b_run
To avoid the need to divide and fall back on floating point values, we can multiply both sides of this inequality by the products of the runs:
a_rise / a_run * a_run * b_run <= b_rise / b_run * a_run * b_run
This simplifies to:
a_rise * b_run <= b_rise * a_run
If this inequality is true, then slope a is less than or equal to slope b.
We can use a pair of slopes as a way to represent a visible area; we'll call this a sight. Here's an example of three sights in practice:
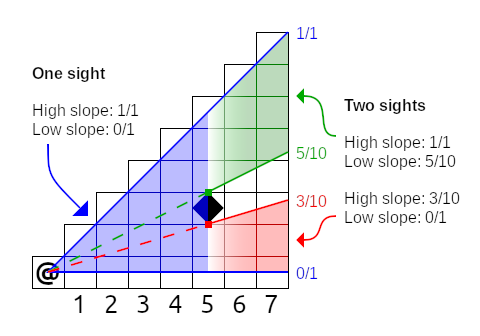
In the example above, the visible area in columns 1 through 5 can all be described by a single sight whose low slope is 0/1 and high slope is 1/1. The wall tile in column 5 creates two sights: 0/1 to 3/10 and 5/10 to 1/1. These two sights describe the visible area for columns 6 and 7.
Now that we know about sights and slopes, we can now define the (potentially) visible tiles in a column as the tiles inside the list of sights for that column. We consider a tile as 'inside' a sight if any part of its mid-line is inside the sight. Fortunately, we don't have to calculate any line intersections to determine this. If we consider the starting tile as (0, 0) and our column numbers as x values, we just need to figure out the range of y values for a sight in that column. Here's the basic line equation:
y = a * x + c
y is the value that we want, x is the column number, a is our slope and c is the constant offset.
Our c is zero since all of our slopes start at the center of the starting tile, while the a value is just rise / run, so our equation becomes this:
y = x * rise / run
There's a problem if we use this equation as-is: we're off by half a tile, since we defined our (0, 0) point as the center of the starting tile, not its bottom-left corner. To correct for this, we'll need to add half a tile:
y = x * rise / run + 0.5
We can avoid resorting to floating point values by multiplying by two, adding one and exploiting the fact that integer division rounds down to achieve the same thing with only integer arithmetic:
y = (2 * x * rise / run + 1) / 2
If we plug in the values for the low and high slopes of a sight we'll get the exact y values of the tiles whose mid-lines lie inside that sight. Here's an example of this formula in action:

In this diagram, we have a single sight with a low slope of 1/4 and high slope of 3/4, and we want to know which y values this sight covers in column 5. If we apply the formula to the low slope, we get a low y of 1; doing to the same with the high slope gets us a high y of 4. Therefore, the potentially visible tiles of this (1/4)-(3/4) sight in column 5 lie between y = 1 and y = 4 inclusive, highlighted above.
This is an example of a single sight projected onto a column, but if there are multiple active sights in a column we need to repeat this process for all of those sights in order to get all of the potentially visible tiles of that column.
Processing Visible Tiles in a Column
So far, a column takes a list of sights as input that we'll call the current sight list. For each sight in the current sight list, we can calculate the low and high y values of the potentially visible tiles of that sight in the column. As we step through each potentially visible tile of a sight, we have two jobs:
- Build up a next sight list based on the walls and floors detected in the current column.
- Visit each tile to mark it as visible.
The word "visit" here differs between shadow casting implementations; some hard-code the marking of a visibility map here, others provide a callback to permit a caller to decide what to do. RuggRogue's shadow casting implementation is built as an iterator, so it just returns the real map coordinates to whatever code is driving the iterator. This is all that's needed for wall tiles, which are asymetrically center-to-mid-line visible. All other tiles are only symetrically center-to-center visible, so we need to test if the tile is symmetrically visible and return it as a flag alongside the tile coordinates. We can do this by testing if the slope of the tile's center point lies inside the low and high slopes of the current sight:
low_slope <= tile_center_slope <= high_slope
If this condition is true, the tile is symmetrically visible from the starting tile and should be marked visible.
Reading from the current sight list while building up a next sight list means we need two sight lists at any given time when working with a column. The start of the shadow casting logic creates these lists and hands them to the octants. Each octant initializes the lists: an empty even list and an odd list with a single sight covering the whole octant, i.e. a low slope of 0/1 and a high slope of 1/1. Each odd column treats the odd list as its current sight list, then clears and starts pushing to the even list as the next sight list; even columns swap the roles of the even and odd lists. This list-flipping strategy allows us to avoid the need to allocate extra lists during all of this.
To build up the next sight list, we'll need to scan for consecutive runs of floor tiles.
We need to step through each potentially visible tile in the sight while keeping track of a working slope.
The working slope is set to None to begin with or when stepping through a run of walls, and is set to Some(slope) when stepping through a run of floors, where slope is the slope where the current run of floors began.
Whenever the working slope changes from Some(...) to None we push a new sight onto the next sight list.
When we put all of this together, the logic for a single column looks something like this:
- Pick current and next sight lists out of the even and odd lists based on whether this column is even- or odd-numbered.
- Clear the next sight list.
- For each sight in the current sight list:
- Calculate the low and high y values of potentially visible tiles to iterate over.
- Initialize
working_slopetoNone. - For each potentially visible tile in the sight:
- Calculate
low_mid_slope: the slope of the center of the bottom edge of the tile. - If the tile is a wall and
working_slopeisSome(...):- Push a new sight onto the next sight list:
- Set the low slope of the sight to
working_slope. - Set the high slope of the sight to
low_mid_slope.
- Set the low slope of the sight to
- Set
working_slopetoNone.
- Push a new sight onto the next sight list:
- If the tile is a floor and
working_slopeisNone:- Set
working_slopeto the higher oflow_mid_slopeand the low slope of the current sight.
- Set
- Visit the tile by returning its real map coordinates and test its center for symmetric visibility.
- Calculate
- If
working_slopeisSome(...)after all of the tiles, push a final sight onto the next sight list:- Set the low slope of the sight to
working_slope. - Set the high slope of the sight to the high slope of the current sight.
- Set the low slope of the sight to
This looks like a lot to take in, but really all it's doing is looking for runs of consecutive floor tiles and adding them as sights to the next sight list when they end, while visiting potentially visible tiles. If you do this for all of the columns in an octant, then repeat it for all eight octants, you'll have the full shadow casting algorithm!
Algorithm Wrap-Up
If you poke around online, you'll find that there are many different ways to implement shadow casting. The algorithm described here has a number of nice properties:
- It uses iteration instead of recursion for performance.
- It avoids the use of floating point values for performance.
- It performs no allocations except for the two sight lists, again for performance.
- It is precise: slopes are exact and nothing is approximated.
- It combines asymmetric vision for nice-looking walls with symmetric vision for other tiles for fair gameplay.
- It uses diamond-shaped walls for better visibility around corners.
Implementing Shadow Casting in RuggRogue
Armed with an understanding of the shadow casting algorithm that RuggRogue uses to calculate fields of view, we can finally start looking at the code itself.
Initializing and Using the Iterator
The most important part of the field of view story starts in the recalculate_fields_of_view function in the src/vision.rs file, and the most important part of that is reproduced below:
// Update field of view.
for (x, y, symmetric) in
    ruggrogue::field_of_view(&*map, coord.0.into(), fov.range, FovShape::CirclePlus)
{
    if symmetric || matches!(map.get_tile(x, y), &Tile::Wall) {
        fov.set((x, y), true);
    }
}
The ruggrogue::field_of_view function returns the iterator that implements shadow casting.
That iterator is initialized with the map and center starting tile, but you'll also notice the "range" and "shape" being given as well.
Vision is calculated up to a maximum range given in tiles.
The "shape" of a field of view determines how that range is treated: FovShape::CirclePlus effectively asks for a circle with a radius of that range plus half a tile.
Adding half a tile prevents single tiles poking out on the four cardinal directions that would occur with an exact radius circle of vision.
The iterator returns the map coordinates of visible tiles, along with a symmetric flag if the tile is considered symmetrically visible, i.e. its center point is visible to the center of the starting tile. The body of the loop then makes the final decision about whether that tile is visible: a symmetrically visible tile is always visible, and walls are visible regardless of symmetry.
The ruggrogue::field_of_view function itself lives at the bottom of the src/lib/field_of_view.rs file.
It does nothing more than initialize an instance of the FovIter struct whose definition can be found near the top of the file.
The first interesting thing about the FovIter struct is the map that it takes.
The map it wants needs to adhere to two traits: the BoundedMap trait (defined in src/lib/lib.rs) that allows the upcoming logic to query the bounds of the map to avoid out-of-bounds access, and the ViewableField trait to check if a given coordinate blocks vision.
The other thing to note about the FovIter struct is that it holds a lot of book-keeping data aside from its initial parameters.
We can break down the fields into three groups:
- Initial data
map: The map to calculate the field of view over.start_pos: The map coordinates of the center starting tile to calculate the field of view from.range: The maximum range of the field of view, in tiles.fov_shape: The shape that the field of view should take: the game only usesFovShape::CirclePlusas described earlier.
- Temporary data
bounds: Cached map bounds describing the inclusive range of valid coordinates of the map.max_dist2: Maximum distance squared, derived fromrangeand used as part of distance checking in order to shape the field of view.sights_evenandsights_odd: Even and odd sight lists described in the shadow casting algorithm section earlier.low_yandhigh_y: Range of y values for the current sight being processed.low_sight_angle: The working slope that holds the slope of the first floor tile as described in the shadow casting algorithm section earlier.
- Iteration progress
octant: The current octant being processed;Nonemeans we're just getting started, whileSome(8)means that the iterator is finished.x: The column being processed within an octant:Nonemeans the octant was just entered.s: The index into the current sight list within the column.y: The y value of the tile being processed within the sight, ranging fromlow_ytohigh_yinclusive.
To fully appreciate why all of this data needs to be tracked in the FovIter struct and not, say, in variables in a function with nested loops, we need to dive into what happens after initialization.
Driving the Iterator
Iterators are fundamentally inert: they'll never do any work or produce any values until something else drives them.
The driving of the FovIter iterator is done by the for loop that was shown earlier.
This repeatedly calls the Iterator::next function defined just above the code for the ruggrogue::field_of_view function.
You'll quickly notice that this function does very little on its own.
It exists only to call the FovIter::advance function defined above it repeatedly until it gets a valid Some(...) value or self.octant reaches 8, meaning that the iterator is finished.
This is due to the fact that the FovIter::advance function occasionally needs to perform logic without producing a valid tile output, so it needs to be called until it produces one.
Advancing through the Shadow Casting Algorithm
The entire shadow casting algorithm implementation used by RuggRogue is housed in the FovIter::advance function that makes up the largest part of the src/lib/field_of_view.rs file.
There's a lot going in here, but if you've read through the shadow casting algorithm section earlier in the chapter you'll be equipped to understand it.
By far the most unusual thing about this function is that despite the multiple octants, columns, sights and tiles that need to be handled, there is not a single loop in the whole function.
This comes back to the fact that this is all one big iterator: it gets called once, does some work and produces an output, gets called again and does some more work.
This is why the FovIter struct housed so much temporary and iteration progress data: to remember where to pick up from after returning a single tile's worth of data.
The FovIter::advance function begins by declaring and initializing two variables: out_pos and out_symmetric, for the tile position and symmetry test to output respectively.
Setting these variables signals that the function should return their values after this iteration.
Leaving them be instead causes nothing to be returned, in turn causing the function to be called again immediately if the iteration hasn't finished yet.
The very first call to FovIter::advance sets the octant field to Some(value) where the value is the octant index of -1 to visit the starting tile, 0 through 7 for each of the octants, or 8 when shadow casting is complete.
The first level of if branches performs the logic for each of these cases.
Visiting the starting tile when octant is -1 provides the simplest example of how FovIter produces output while setting up for its next iteration.
Setting out_pos and out_symmetric causes these values to be returned by that iteration, while setting octant to Some(octant + 1) sets up the next iteration to resume processing in the very first octant.
When processing an octant the very first step is to prepare the even and odd lists.
This case is detected when the x (column) field is set to None: the odd list is cleared and set to a single sight covering the whole octant, i.e. low slope of 0/1 and high slope of 1/1.
The x field is then set to Some(1) where 1 is the index of the first column in the octant, which prevents this logic from running again until we need it.
The logic for processing a single column is gated with a check on if x <= self.range.
One of the first things done in this branch is this:
// Flip between using even and odd sights for current and next.
let (current, next) = if x % 2 == 0 {
    (&mut self.sights_even, &mut self.sights_odd)
} else {
    (&mut self.sights_odd, &mut self.sights_even)
};
If x is even, the current sight list is set to sights_odd and the role of the next sight list is given to sights_even; the lists are swapped when x is odd.
This gets us to the point where we need to loop over sights in the current sight list.
The index into this sight list is the s field which was previously initialized to None.
If s is None at this point we need to prepare the next sight list to be filled in by clearing it and setting s to Some(0) where 0 is represents the first entry in the current sight list.
If s is a valid index into the current sight list (i.e. s < current.len()), then we need to process the sight.
This starts by checking if y is None: in that case the low_y and high_y for the sight need to be calculated, low_sight_angle (i.e. the working slope) needs to be initialized to None and y needs to be be initialized to Some(low_y) to kick off iteration of potentially visible tiles in the sight.
There's a quick range and shape test to see if the tile being tested lies within the desired range; assuming it does, there's a bunch of things that need to be set up to deal with individual tiles:
real_xandreal_yare calculated with the help of the octant coefficients, depending on which octant is being processed.low_mid_angleis assembled, representing the slope of the mid-point of the bottom edge of the tile.- An
in_boundscallback is defined to avoid indexing coordinates outside of the map bounds. - An
angle_lt_or_eqcallback is defined to compare slopes.
The next conditional block that checks self.map.is_opaque(...) is responsible for detecting runs of floor tiles and adding them as sights to the next sight list when those runs end.
If the tile is a wall and low_sight_angle is Some(...) value, a sight is added to the next sight list and low_sight_angle is reset to None.
On the other hand, if the tile isn't a wall and low_sight_angle is None, low_sight_angle is set to either low_mid_angle or the low slope of the sight, whichever is higher; we need this check to ensure that we're never expanding sights in a way that doesn't make sense.
With sight management out of the way we can finally visit the tile.
As mentioned earlier, this involves setting the out_pos and out_symmetric variables, but there's a catch to this.
First, we need to ensure that the tile is within the map bounds; we don't want to return out-of-bounds coordinates.
Second, remember those shared edges between octants?
This is the point where we check for that.
We don't have to worry if y is strictly between 0 and x, but those exact values are the shared edge tiles.
We only want to visit those if we're in octants that set the include_edges flag, which you may have noticed was part of the octant data amongst the hard-coded coefficients.
This include_edges flag is set for octants 0, 3, 4 and 7, so the shared edge tiles will be visited in these octants and skipped in the others.
Tile visitation is concluded by incrementing y.
When y ticks past the high_y set for the current sight, it needs to wrap up with a final sight if low_sight_angle is still set to Some(...) value at this point.
Other than that, s is incremented to move onto the next sight in the current sight list, and y is reset to None to invoke the start-of-sight logic the next time it's called.
Beneath that is the case where s has iterated through all of the sights in the current sight list, meaning that the whole column has been processed.
The x value is incremented to move onto the next column, while s is reset to None.
The final else block under that is when every column of the octant has been processed.
The iterator moves onto the next octant by incrementing the octant field and resetting x to None.
When the octant field takes on the Some(8) value, shadow casting is complete and the field of view has been fully calculated!
Conclusion
The field of view code is some of the earliest code I ever wrote for RuggRogue. Indeed, RuggRogue started as a fake terminal demo, and spent a lot of its early life as a proof-of-concept for shadow casting. There's no doubt in my mind that I would write this differently if I were to revisit this today: make better use of Rust's iterator API, define slopes as a proper type instead of an integer tuple so I could define ordering and use normal inequality operators, and so on. However, if I stayed and continually refined this field of view code, I would never have moved onto finishing the rest of the game.
Despite its issues, I'm still quite happy with how field of view calculation turned out: it runs well, the results are good and I can be confident that I understand shadow casting well enough to implement it from scratch.
Pathfinding
As the player explores the dungeon in RuggRogue they'll encounter monsters. When a monster sees the player they will move towards the player to attack them. The path taken by that monster is determined by pathfinding, which makes up the most important part of their AI. This chapter touches on the algorithm used for pathfinding, then covers the details needed to make it work in the context of the game.
The A* Search Algorithm
Getting a monster to approach the player is about finding a path between their positions on the map. The traditional approach to calculating a path in this context is the A* search algorithm (pronounced "a-star"). Unlike shadow casting approaches in the Field of View chapter, all A* search implementations have a similar structure. Instead of painstakingly describing it here, I'll link to Red Blob Games instead:
The A* search algorithm is an enhancement to breadth-first search that prioritizes fringe nodes by the sum of the distance travelled plus estimated distance to the destination based on a heuristic function. If any part of that sentence did not make sense, you should read the Red Blob Games link first and come back here later. The rest of this chapter will address implementation details surrounding the use of the A* search algorithm in RuggRogue and less the algorithm itself.
Overview of Pathfinding in RuggRogue
Pathfinding in RuggRogue can be broken down into several parts:
- The monster AI that uses pathfinding.
- Deciding which map tiles are blocked and which are walkable for the purposes of pathfinding.
- The front-end pathfinding function and the iterator it prepares and returns.
- The back-end function that forms the core of the pathfinding implementation.
The monster AI lives in the do_turn_for_one_monster function in the src/monster.rs file.
It calls the ruggrogue::find_path function to find a path to the player and takes a single step towards them.
The map informs the pathfinding system about which of its tiles are blocked and which are walkable by implementing the ruggrogue::PathableMap trait defined in the src/lib/path_find.rs file.
The map defines a single is_blocked function for this trait in the src/map.rs file to do this, the result of which is based on the type of tile at that position, along with any entities there.
The ruggrogue::find_path function is the front-end function for pathfinding, defined in the src/lib/path_find.rs file.
It calls the back-end a_star function in the same file to calculate the raw path data, then prepares the path it finds into an AStarIter struct, which is an iterator describing that path.
Pathfinding in Monster AI
The do_turn_for_one_monster function in the src/monster.rs file handles the AI for a single monster turn.
The following code runs when the monster can see the player:
if let Some(step) = ruggrogue::find_path(&*map, pos, player_pos, 4, true).nth(1) {
    if step == player_pos {
        damage::melee_attack(world, monster, player_id.0);
    } else {
        let blocks = world.borrow::<View<BlocksTile>>();
        let mut coords = world.borrow::<ViewMut<Coord>>();
        let mut fovs = world.borrow::<ViewMut<FieldOfView>>();

        map.move_entity(monster, pos, step, blocks.contains(monster));
        (&mut coords).get(monster).0 = step.into();
        (&mut fovs).get(monster).dirty = true;
    }
}
The call to the ruggrogue::find_path function retrieves the path from the monster to the player as an AStarIter instance, which is an iterator that returns the position of each step in that path.
Since this handles only single turn, we want the monster to only take the next step towards the player.
The first step of the AStarIter iterator is the starting position of the monster, so we need to use nth(1) for the next step.
This whole thing is wrapped in an if let block, so if the monster cannot find a path to the player it will simply do nothing.
Assuming that the monster finds a path, if that next step is the player's position, the monster performs a melee attack, otherwise it takes a step.
When the monster moves, its position is updated for the map by the Map::move_entity function defined in the src/map.rs file.
The Coord component of the monster entity needs to be similarly updated.
Finally, the monster's field of view needs to be recalculated based on its new position, so its FieldOfView component is marked dirty.
Blocked Map Tiles
RuggRogue uses the A* search algorithm to find a path from a monster to the player. This path has two main concerns:
- Don't walk through walls.
- Don't walk through other monsters.
The Map struct (defined in src/map.rs) implements the ruggrogue::PathableMap trait (defined in src/lib/path_find.rs) to tell the pathfinding code about these two things.
The implementation itself can be found in the lower half of the src/map.rs file, and looks like this:
impl ruggrogue::PathableMap for Map {
    fn is_blocked(&self, x: i32, y: i32) -> bool {
        matches!(self.get_tile(x, y), &Tile::Wall)
            || self
                .tile_entities
                .get(&(x, y))
                .map_or(false, |(block_count, _)| *block_count > 0)
    }
}
The wall check should be self-explanatory, but the part concerning entities warrants some explanation.
The position of all entities placed on the map is stored in their Coord component, but it's also redundantly stored in the tile_entities field of the Map struct, which is the spatial entity cache:
pub struct Map {
    // ...

    // (x, y) -> (blocking_entity_count, entities_here)
    #[serde(skip)]
    tile_entities: HashMap<(i32, i32), (i32, Vec<EntityId>)>,

    // ...
}
The keys of the tile_entities hash map are map positions.
The value is made up of two parts: a count and a list of entities present at that map position.
As you might have guessed from the comment in the code above, the count tracks the number of entities in the list that block pathfinding.
All entities that block pathfinding are marked with a BlocksTile component, and every monster is spawned with this component in the spawn_monster function in the src/spawn.rs file.
The maintenance of the spatial entity cache is managed by three functions associated with the Map struct:
Map::place_entityMap::remove_entityMap::move_entity
These functions are called in numerous places for all entities, such as when starting or loading a game, player movement, and picking up and dropping of items. They are especially important when called for monsters in order to update the blocking entity count of tile positions in the spatial entity cache when they move or are spawned or despawned.
Based on all of this, the is_blocked function from earlier can therefore determine if a tile contains a blocking entity by simply checking the spatial entity cache for a non-zero blocking entity count, saving it from having to scan the whole entity list for entities with a BlocksTile component.
The ruggrogue::find_path Function and AStarIter Struct
When the monster AI wants to find a path to the player, it requests it by calling the ruggrogue::find_path function defined in the src/lib/path_find.rs file.
This function returns its result as an instance of the AStarIter struct, which is an iterator that yields each step in the path that it finds from the starting position to the destination.
The first thing the ruggrogue::find_path function does is prepare a hash map for the back-end a_star function to fill in with raw pathfinding data:
let mut came_from: HashMap<(i32, i32), (i32, i32)> = HashMap::new();
The key of this hash map is a tile position, while the value is the position of the pathfinding step taken to get to this tile. Following this linkage of steps from any keyed position will eventually lead back to the starting position. In other words, the path data that will be stored in here will be backwards; that will be dealt with later.
The ruggrogue::find_path function calls the a_star function defined above it to perform the pathfinding itself:
let closest = a_star(map, start, dest, bound_pad, &mut came_from);
The first thing to note is the bound_pad argument.
In order to avoid excessive path exploration when no path exists between a monster and the player, pathfinding in RuggRogue is not typically performed over the entire map.
Instead, pathfinding is bounded by a rectangle of tiles that includes the monster and player positions as corners.
If the bound_pad argument is non-zero, this rectangle is expanded to include bound_pad-worth of extra tiles on all sides; a zero bound_pad causes pathfinding to explore the whole map if needed.
The call to the a_star function populates the came_from hash map, but it also returns the position of the tile closest to the destination out of all the tiles that it explored.
If a path is found to the destination, this closest tile will be the destination itself.
If there is no such path, the caller of ruggrogue::find_path can opt into receiving a path to this closest tile instead by setting the fallback_closest argument to true; monster AI uses this to allow multiple monsters to pursue the player down a single-tile-wide corridor for example.
As mentioned earlier, the raw path data in the came_from hash map has each tile point backwards to the tile it was reached via and is thus backwards from how the caller of ruggrogue::find_path needs it.
The links of the path need to be reversed so that each tile on the path points forwards and not backwards.
The code looks like this:
// Reverse the path from closest to start.
let mut current = came_from.get(&closest).copied();
let mut prev = closest;

came_from.remove(&closest);

while let Some(c) = current {
    let next = came_from.get(&c).copied();

    came_from.insert(c, prev);
    prev = c;
    current = next;
}
This is the same kind of logic used to reverse a linked list.
If you're clever, you might be wondering why the ruggrogue::find_path function doesn't just reverse the start and destination positions to avoid having to manually reverse path data.
Doing that would only save work if a path is definitely found between a monster and the player.
If no path exists, the closest tile position is useless since it's only reachable from the destination and not the starting position; a second pathfinding run starting from the starting position would be needed anyway in that case.
The a_star Function
The a_star function lives just above the ruggrogue::find_path function in the src/lib/path_find.rs file; this is where the A* search algorithm is implemented in the game code.
Its main job is to populate the came_from hash map passed into it with path data that hopefully connects the start and destination positions; to do this it needs some supporting data:
// (priority, (x, y))
let mut frontier: BinaryHeap<(Reverse<i32>, (i32, i32))> = BinaryHeap::new();
// ((x, y), cost)
let mut cost_so_far: HashMap<(i32, i32), i32> = HashMap::new();
The frontier holds the set of tiles that the A* search algorithm will want to explore next; this is sometimes referred to as the open set.
To minimize the number of explored tiles, tiles need to be popped out of the frontier based on how long the algorithm thinks the final path will be if it were to go through those tiles.
Tiles therefore need to be popped out of the frontier in priority order: the BinaryHeap collection from Rust's standard library is perfect for this purpose.
The data held in the frontier binary heap is a priority paired with a tile position.
Rust's BinaryHeap type pops values out with highest numeric priority first, but we want the shortest path, not the longest, hence the Reverse<i32> type that reverses comparison order of numbers held within it.
There's one more piece of data that needs to be remembered for each tile explored by the path finding algorithm: the path cost from the starting position to that tile.
This is held in the cost_so_far hash map whose keys are tile positions and values are the distance from the starting position.
As part of the A* search algorithm, the priority of a tile in the frontier is the sum of the distance so far and the estimated distance to the destination.
This estimate is calculated using a heuristic function; the one used by the a_star function looks like this:
let dist100 = |(x1, y1), (x2, y2)| {
    let x_diff = if x1 < x2 { x2 - x1 } else { x1 - x2 };
    let y_diff = if y1 < y2 { y2 - y1 } else { y1 - y2 };
    let (low_diff, high_diff) = if x_diff < y_diff {
        (x_diff, y_diff)
    } else {
        (y_diff, x_diff)
    };

    // Prefer axis-aligning with (x2, y2).
    low_diff * 141 + (high_diff - low_diff) * 99
};
This function calculates the approximate distance between two points, times 100 to avoid having to convert between integers and floating point values. This estimates the path cost where every diagonal step costs 141 (i.e. the square root of 2, multiplied by 100) and every cardinal step thereafter costs 100...
Wait, why is there a multiplication by "99" and not "100"?
To understand why this is, we need to go all the way back to monster AI.
A monster will only pursue the player if they can see the player; if the monster loses sight of the player it will no longer give chase.
If the player retreats down a corridor, a monster's best chance of keeping the player in its sights involves lining up with the player directly on either the horizontal or vertical axes.
In other words, a monster wants to maximize the number of cardinal moves left in its path to the player while minimizing the number of diagonal moves left.
By making cardinal moves cost 99 instead of 100 in the heuristic function, the monster's path will "hoard" cardinal steps by taking diagonal steps as early as possible.
Take a moment to think through why this works: it definitely took me some time to wrap my head around at first.
Just remember that dist100 is only a heuristic function; it doesn't actually affect the real path cost, just the priority of tiles explored in the frontier.
There's another oddity about this heuristic function that, unlike the quirk above, is also reflected in the real path cost. Diagonal steps have an extra cost compared to cardinal moves in all of this pathfinding code, but steps in all eight directions cost a single turn during actual gameplay; why the discrepancy? Using Euclidean distance for pathfinding like this leads to paths that look more like what a human would choose. Using the exact distance calculations used by the gameplay instead leads to many intermediate frontier tiles with equal priority values, and the tie-breaking involved often leads to technically correct shortest paths that look ugly or bizarre.
The big while loop in the a_star function performs the main part of the A* search algorithm: pop a tile from the frontier, terminate if it's the destination and add surrounding tiles to the frontier based on path cost priority.
However, there's a little bit of extra tracking data:
let mut closest = start;
let mut closest_cost = 0;
let mut closest_dist = dist100(start, dest);
Each tile popped from the frontier is additionally checked to see if it's the closest to the destination.
The big while loop updates this so that there's a fallback destination to take a path towards if the real destination cannot be reached.
Conclusion
The pathfinding code in RuggRogue was written fairly early in its life cycle, so it does things a bit strangely compared to how I would author the code nowadays.
Astute readers may notice that the code calculates the whole path for a monster, takes just a single step and recalculates the path again on its next turn. This is less wasteful than it seems: the book-keeping data for the A* search algorithm has to be allocated anyway even for a single step, so discarding it immediately doesn't differ much from creating an iterator, taking a single step and throwing away the iterator.
The tweak to the heuristic function to get monsters to line up with the player to chase them down corridors works pretty well. It's still possible to juke monsters by leaving their fields of view, but it makes it more likely that monsters in a room that see a player in a corridor will chase the player down that corridor.
Randomness
RuggRogue is a roguelike, and the signature feature of roguelikes is the use of procedural content generation: levels, items and enemy placement differ from play to play. This is typically achieved through the use of a random number generator (or RNG). This chapter will cover generation, usage and considerations of random numbers by RuggRogue.
Generating Random Numbers
Roguelikes typically get their random numbers from what's called a pseudo-random number generator (or PRNG). "Pseudo" means "fake", so a PRNG produces a deterministic series of numbers that just happen to look random enough for the purposes of a computer game. RuggRogue takes advantage of this determinism. Most roguelikes just initialize a single PRNG, hang onto it and share it across the whole game logic. RuggRogue instead creates temporary PRNGs whenever some code needs random numbers and discards those PRNGs afterwards. By carefully controlling how these PRNGs are initialized we can achieve seeded games, where two games with the same seed produce the same dungeon and spawns. Seeded games are useful for debugging and play-testing, and can be fun for players to mess around with.
The nuts and bolts of generating random numbers is handled via external crates: rand, rand_xoshiro and wyhash. rand provides a convenient interface to make use of random numbers generated from a backend source crate. rand_xoshiro is a fast PRNG that provides the actual random numbers. wyhash is a hasher that takes input values and produces seed values to initialize PRNGs. These three crates serve as the foundation of all of the randomness in RuggRogue.
A PRNG is initialized with a seed value that determines the sequence of random numbers that will be produced, so the first step in generating random numbers is to create this seed value. These seed values are created by combining the following input values using wyhash:
- A unique magic number.
- The game seed.
- Any other relevant differentiating input values.
Each place in the code that needs random numbers starts by feeding a magic number into a wyhash hasher.
Each magic number is an arbitrary number that is used in only one place in the code, the values of which can be found in the src/magicnum.rs file:
///! Arbitrary constants to seed hashers whose output is in turn used to seed RNGs.

pub const GENERATE_ROOMS_AND_CORRIDORS: u64 = 0x3fdc77fb4d7f5d2f;
pub const SPAWN_GUARANTEED_WEAPON: u64 = 0x67caf3e7b16e9df2;
pub const SPAWN_GUARANTEED_ARMOR: u64 = 0x74e90549dbcadfd0;
pub const FILL_ROOM_WITH_SPAWNS: u64 = 0xd85af3d2cf6dcbc5;
pub const MELEE_ATTACK: u64 = 0x258890651a33d5d;
Since there are five magic number constants, there are five unique places in the code where PRNGs are created. The fact that the magic numbers have different values helps to avoid the same seed being used by different PRNGs, which would otherwise produce the same random number sequence.
The game seed is a unique number associated with a game that is the sole reason that different games have different dungeon layouts and outcomes.
The initial game seed value can be provided as a command line argument or randomly generated as needed; this is one of the first things done in the main entry point function in the src/main.rs file.
Starting a new game causes that game to adopt that initial value as that game's seed; this value is preserved across saves and loads.
If the player returns to the title screen for whatever reason, the initial game seed value is changed into another random value to avoid accidentally playing the same dungeon again.
With the magic number and game seed fed into the hasher, the final thing the hasher needs is some relevant differentiating input values.
For example, the PRNG associated with GENERATE_ROOMS_AND_CORRIDORS provides the dungeon depth so that depth 2 has a different layout to depth 1.
The final hash value is then used as the seed for that particular PRNG.
Here's a code excerpt for GENERATE_ROOMS_AND_CORRIDORS from the src/map.rs file that demonstrates initializing a PRNG from hashed input values:
use rand::SeedableRng;
use rand_xoshiro::Xoshiro128PlusPlus as GameRng;
use std::hash::Hasher;
use wyhash::WyHash;

use crate::{magicnum, GameSeed};

pub fn generate_rooms_and_corridors(/* ... */) {
    // ...

    let mut rng = {
        let mut hasher = WyHash::with_seed(magicnum::GENERATE_ROOMS_AND_CORRIDORS);
        hasher.write_u64(game_seed.0);
        hasher.write_i32(map.depth);
        GameRng::seed_from_u64(hasher.finish())
    };

    // Use rng to get random numbers...
}
Uses of Random Numbers
RuggRogue uses random numbers to control map generation, monster and item spawns and combat outcomes.
Map Generation
The PRNG for map generation is initialized in the generate_rooms_and_corridors function in the src/map.rs file with the help of:
magicnum::GENERATE_ROOMS_AND_CORRIDORS- The game seed.
- The dungeon depth for that map.
This PRNG determines:
- the position and size of rooms,
- whether to connect rooms with a horizontal corridor followed by a vertical corridor or vice versa, and
- which pairs of rooms are connected with additional corridors beyond the minimum required to connect all of the rooms together.
Monster and Item Spawns
The main PRNG for determining monster and item spawns is initialized in the fill_rooms_with_spawns function in the src/spawn.rs file with the help of:
magicnum::FILL_ROOM_WITH_SPAWNS- The game seed.
- The dungeon depth of the map being filled with spawns.
This PRNG determines:
- the placement of the starting weapon and armor in the room that the player starts in,
- the placement of the guaranteed ration on each level,
- whether a room should spawn items and where they should be placed,
- whether a spawned item should be equipment or consumable,
- whether spawned equipment should be a weapon or armor,
- the exact type of a spawned consumable item,
- the random extra bonus for spawned weapons and armors, and whether to round fractional power values up or down,
- whether a room should spawn monsters and where they should be placed, and
- the power levels of spawned monsters, and whether to round fractional power values up or down.
The game makes use of two additional PRNGs to periodically spawn guaranteed weapons and armors beyond the first level.
Both of these PRNGs exist in the spawn_guaranteed_equipment function in the src/spawn.rs file.
The PRNG for spawning guaranteed weapons is initialized with:
magicnum::SPAWN_GUARANTEED_WEAPON- The game seed.
- The sum of the dungeon depth and the numeric value of the low four bytes of the game seed, all divided by four.
The division by four in the last value causes each sequence of four adjacent levels to seed the guaranteed weapon PRNG with the same value and thus produce the same random number sequence. This allows those levels to effectively share the same PRNG sequence so that only one of those levels will spawn a guaranteed weapon. The four bytes of game seed adjusts the offset of the levels so the depth sequences aren't just 1-4, 5-8, etc. for every single game.
The initialization of the PRNG to determine guaranteed armor spawning is identical to that of the guaranteed weapon, except for the use of magicnum::SPAWN_GUARANTEED_ARMOR and the use of the high four bytes of the game seed instead of the low four bytes.
Combat Outcomes
The combat PRNG exists in the melee_attack function in the src/damage.rs file, and is initialized with the help of:
magicnum::MELEE_ATTACK- The game seed.
- The current turn count.
- The x and y coordinates of the attacker.
- The x and y coordinates of the defender.
The combat PRNG determines:
- whether the melee attack hits or misses, assuming the defender is not asleep,
- whether to fluctuate damage, and if so, whether to modify it plus or minus 50%, and
- whether to round fractional damage values up or down to the nearest whole number.
Ensuring Identical Randomness with Native and Web Builds
In the course of testing, I noticed that there were differences between the native and web versions of the game with the presence and placement of monsters and items, given the same game seed. This meant that the same game seed was causing different random numbers to be produced by the same PRNG across the two builds!
After a lot of debugging, I discovered that this was due to the native and web builds pulling out different amounts of data from the PRNGs.
This divergence comes from pulling a usize from a PRNG; this is 64 bits on the x86_64 architecture of the native build, but only 32 bits on the wasm32 architecture of the web build.
Replacing the usize with a u32 fixes the issue, but where this fix is needed can be pretty subtle.
For example, can you spot the problem here?
let num = rng.gen_range(1..2);

for pos in room.iter_xy().choose_multiple(rng, num) {
    spawn_random_item_at(world, rng, pos);
}
In the above code, the num variable is inferred by Rust to be of the usize type due to the lack of type annotations and the fact that it's the type of the second argument of the choose_multiple function.
This causes rng.gen_range(1..2) to produce different values for the native and web versions of the game.
Annotating the 1..2 input with an integer type of a fixed size resolves the issue:
let num = rng.gen_range(1i32..2i32);

for pos in room.iter_xy().choose_multiple(rng, num as usize) {
    spawn_random_item_at(world, rng, pos);
}
The use of rng.gen_range(1i32..2i32) extracts a 32-bit i32 value on both the x86_64 and wasm32 architectures.
Note that the num variable above is now also of type i32, so it needs to be cast into usize when being passed into the choose_multiple function.
Conclusion
This chapter serves as a high-level overview of RuggRogue's approach to generating and using random numbers. The biggest thing to take away from all of this is the focus on determinism by seeding PRNGs with the hashed combination of carefully selected input values. I've deliberately glossed over the nitty gritty details of exactly how each random number is used to produce random outcomes, which are better covered by other chapters.
Map Generation
As the player descends the dungeon, the game procedurally generates new levels that are unique to the game seed and dungeon depth. Levels are created in two phases: laying out the map and placing interesting things in it like monsters and items. This chapter is about map layout: deciding where rooms and corridors should appear, then drawing them out with wall and floor tiles.
Map Data
Before diving into the logic, it helps to be familiar with how the map is represented in terms of data.
The main data structure involved is the Map struct that can be found in the src/map.rs file.
The relevant parts of it are reproduced below:
pub struct Map {
    pub depth: i32,
    pub width: i32,
    pub height: i32,
    tiles: Vec<Tile>,
    pub rooms: Vec<Rect>,
    // ...
}
The depth field is the dungeon depth of the map; this is 1 for the first level.
The width and height fields hold the dimensions of the map in terms of tiles.
The tiles field contains the tiles themselves, stored in row-major order, i.e. store a full row of tiles, then the next row, then the next and so on.
The Tile enum is defined higher up in the src/map.rs file:
pub enum Tile {
    Floor,
    Wall,
    DownStairs,
}
The final relevant field of the Map struct is the rooms field.
This is a list of Rect structs, one for each room:
pub struct Rect {
    pub x1: i32,
    pub y1: i32,
    pub x2: i32,
    pub y2: i32,
}
Here, (x1, y1) is the top-left corner of the room, while (x2, y2) is the bottom-right corner.
Even though rooms are drawn out as wall and floor tiles, the game needs to keep track of room positions like this in order to place other things in the level such as monsters and items later on, hence this list.
A single Map struct is allocated and added as unique data at game launch in the main function in the src/main.rs file, like so:
world.add_unique(Map::new(80, 50));
Every time a new level is needed, this Map struct is cleared and reused.
There's no special reason for this except that it just happens to be the easiest way to do this for how unique game data is handled.
Since this map is initialized here to be 80 tiles wide and 50 tiles high, all maps in the game share these dimensions.
When Levels are Generated
Levels are generated by calling the map::generate_rooms_and_corridors function, which happens in two places:
- When starting a new game in the
new_game_setupfunction in thesrc/modes/title.rsfile. - When the player descends a dungeon level in the
player_do_descendfunction in thesrc/player.rsfile.
Rooms and Corridors
Map generation takes place in the map::generate_rooms_and_corridors function in the src/map.rs file.
As the name suggests, its job is to draw rooms and corridors in terms of map tiles, and produce a list of rooms for later use.
The very first thing this function does is fill the map with wall tiles.
Rooms and corridors are placed randomly about the map, so a random number generator is created for this purpose. This is seeded with the game seed and the dungeon depth for the map as described in the Randomness chapter, so each map is effectively unique across game seeds and dungeon depths.
Placing Rooms
Rooms are placed onto the map as follows:
- Make a rectangle with a random width and height.
- Pick a random position on the map.
- If the rectangle doesn't intersect any existing room, draw floor tiles and add it to the room list.
This process is repeated thirty times, so the code looks like this:
for _ in 0..30 {
    let w: i32 = rng.gen_range(6i32..15i32);
    let h: i32 = rng.gen_range(6i32..11i32);
    let x: i32 = rng.gen_range(1i32..map.width - w - 1);
    let y: i32 = rng.gen_range(1i32..map.height - h - 1);
    let new_room = Rect::new(x, y, w, h);

    if !map.rooms.iter().any(|r| new_room.intersects(r, 1)) {
        map.set_rect(&new_room, Tile::Floor);
        map.rooms.push(new_room);
    }
}
This typically results in about a dozen rooms per level.
Rooms look better when they're surrounded by wall tiles, so the x and y values are chosen to avoid placing the room flush with the edges of the map.
The new_room.intersects(r, 1) part checks if new_room intersects with a room r that cycles through all of the existing rooms.
The Rect::intersects function higher up in the src/map.rs file takes a margin argument that's set to 1 tile here, so the new_room is 'inflated' by one tile in all directions when checking to avoid placing it flush against another room.
Connecting Rooms with Corridors
Once the rooms have been placed they need to be connected in a way that guarantees that all of the rooms can be reached. Rooms are connected with corridors as follows:
- Add the first room to a
connectedlist and the rest to adisconnectedlist. - While the
disconnectedlist still has rooms:- Pick the
disconnectedroom that is closest to a room in theconnectedlist. - Join those rooms with a corridor drawn out of floor tiles.
- Move the room from the
disconnectedlist to theconnectedlist.
- Pick the
Once every room is in the connected list, they can all be reached via corridors.
The code itself looks like this:
let mut connected: Vec<usize> = Vec::new();
let mut disconnected: Vec<usize> = Vec::new();

// Consider the first room as the start of connectedness.
connected.push(0);

// All other rooms start disconnected.
for i in 1..map.rooms.len() {
    disconnected.push(i);
}

// Connect all the disconnected rooms to the connected rooms based on closeness.
while !disconnected.is_empty() {
    // Find the closest match between connected and disconnected.
    let (closest_connected, closest_disconnected) = connected
        .iter()
        .enumerate()
        .flat_map(|c| std::iter::repeat(c).zip(disconnected.iter().enumerate()))
        .min_by_key(|&((_, &croom), (_, &droom))| {
            let ccenter = map.rooms[croom].center();
            let dcenter = map.rooms[droom].center();
            (ccenter.0 - dcenter.0).abs() + (ccenter.1 - dcenter.1).abs()
        })
        .map(|((ci, _), (di, _))| (ci, di))
        .unwrap();

    // Connect the closest connected and disconnected rooms together.
    connect_rooms(
        &mut map,
        connected[closest_connected],
        disconnected[closest_disconnected],
        rng.gen::<bool>(),
    );

    // Transfer newly-connected room index from disconnected to connected.
    connected.push(disconnected.remove(closest_disconnected));
}
The connected and disconnected lists above store indices into the map's rooms list.
The code for finding the closest disconnected room to a connected room can be a bit tricky to read.
The connected/iter/enumerate/flat_map lines create an iterator that pairs up each connected room index with a disconnected room index.
For example, if connected contains [0, 1] and disconnected contains [2, 3, 4], this iterator produces these pairs in order:
(0, 2)(0, 3)(0, 4)(1, 2)(1, 3)(1, 4)
The min_by_key code block calculates the approximate corridor length between the center tiles of the connected and disconnected rooms and returns the pair that would need the shortest corridor to connect.
In the example above, if the (1, 3) pair had the shortest estimated corridor length, connected room 1 and disconnected room 3 would be joined with a corridor, and 3 would be moved from the disconnected list to the connected list.
The task of drawing a corridor out of floor tiles is done by connect_rooms:
let connect_rooms = |map: &mut UniqueViewMut<Map>, r1: usize, r2: usize, h_then_v: bool| {
    let (r1x, r1y) = map.rooms[r1].center();
    let (r2x, r2y) = map.rooms[r2].center();
    if h_then_v {
        map.set_hline(r2x, r1x, r2y, Tile::Floor);
        map.set_vline(r2y, r1y, r1x, Tile::Floor);
    } else {
        map.set_vline(r2y, r1y, r2x, Tile::Floor);
        map.set_hline(r2x, r1x, r1y, Tile::Floor);
    }
};
The h_then_v argument is a flag to draw horizontal floor tiles, then vertical floor tiles; this is decided with a random coin flip by the map generation random number generator.
Corridors can freely overlap rooms and each other.
Savvy readers may notice that joining rooms with corridors this way is like using Prim's algorithm for finding the minimum spanning tree of a graph, i.e. the least cost edges to join every node. A tree of a graph contains no loops, so what we have so far is a map with a lot of dead end rooms, which in gameplay terms means a lot of backtracking that we don't want. To reduce the number of dead ends and backtracking needed, several extra pairs of rooms are picked at random and joined with corridors as well.
Finishing Touches
If the player hasn't descended deep enough into the dungeon, a downstairs tile is placed in the center of the last room in the room list. If they have, the coordinates of that same tile is passed back to the calling code so that the victory item can be placed there instead.
With the map tiles drawn out and the room list prepared, the map is ready to be populated with things like monsters and items.
Map Population
Once a map has been generated, the next task at hand is to place interesting things in it, such as monsters and items.
When Map Population Takes Place
Maps are populated right after they're generated with the map::generate_rooms_and_corridors function, in two places:
- When starting a new game in the
new_game_setupfunction in thesrc/modes/title.rsfile. - When the player descends a dungeon level in the
player_do_descendfunction in thesrc/player.rsfile.
Placing the Victory Item
If the map::generate_rooms_and_corridors function doesn't place stairs, it will instead return a position where the victory item should be placed; this is the center of the last room in the room list.
The code looks like this in both places it occurs:
if let Some(victory_pos) = world.run(map::generate_rooms_and_corridors) {
    spawn::spawn_present(world, victory_pos);
}
The spawn::spawn_present function creates the victory item and places it in the given position on the map.
The function can be found in the src/spawn.rs file.
Placing the Player
The player entity exists beyond the life of any one map, so whenever a map isn't ready, the player entity lacks a Coord component.
To place the player, this component is added again by calling the player::add_coords_to_players function defined in the src/player.rs file.
The player can then be moved to their starting position on the map using the map::place_player_in_first_room function defined in the src/map.rs file.
The player is guaranteed to start the map in a different room than the downstairs (or victory item), so long as the map has more than one room (which is almost always true).
Placing Monsters and Items
With the player and possibly the victory item out of the way, all that's left is to fill the map with monsters and items.
The function responsible for this is spawn::fill_rooms_with_spawns, defined in the src/spawn.rs file.
This in turn kicks off three main tasks:
- Spawn any weapons or armor that should be guaranteed based on the map's dungeon depth.
- Spawn monsters and items in random rooms.
- Spawn a guaranteed ration somewhere on the level.
A random number generator is created to decide how most, but not all, of this should play out; consult the Randomness chapter for details.
The exact order of these tasks doesn't matter, and they're simplest to talk about in reverse order, so we'll start with the ration.
Guaranteed Ration
Every map is guaranteed to contain a single ration; this is the job of the spawn_guaranteed_ration function in the src/spawn.rs file.
It uses the pick_random_pos_in_room function to pick a random spot in a random room, and spawns a ration there with the spawn_ration function; both of these helper functions are in the same file.
Filling the Rooms
The spawn::fill_rooms_with_spawns function goes through every room and randomly decides to place monsters and items in it, except for the first room where the player starts.
It calls the fill_room_with_spawns helper function (note the singular "room") to do this.
There is a 1-in-4 chance for an item to be spawned in each room.
The spawn_random_item_at helper function chooses, creates and places items.
The exact item selection is covered in a different chapter, but generally consists of consumable scrolls and potions, with the occasional weapon or armor.
Each room also has a 1-in-2 chance of spawning between one to three monsters. Early levels limit the number of monsters that can spawn per room:
- Depths 1 and 2: one monster per room only.
- Depths 3 and 4: up to two monsters per room.
- Depth 5 and deeper: up to three monsters per room.
Like item spawning, there's a spawn_random_monster_at helper function that chooses, creates and places monsters.
Monster selection is a topic of a different chapter.
Finally, the limit for the number of items and monsters that can be spawned per room increases by one every time the player beats the game and picks New Game Plus.
Guaranteed Weapons and Armor
The spawn_guaranteed_equipment function in the src/spawn.rs file is responsible for creating and placing weapons and armor beyond those from random room filling.
Unlike their random counterparts, guaranteed weapons and armor are always created at a power level appropriate for the current difficulty of the level.
The first kind of guaranteed equipment is the starting weapon and armor. The game picks two random spots in the starting room and spawns and places the weapon and armor in them.
The second kind of guaranteed equipment needs some explanation. As the player descends the dungeon, the monsters get stronger. The player's base attack and defense power rises as they gain levels, but it rises slower than the power of the monsters. To keep up, the player must pick up weapons and armor. If weapons and armor were only created at random, it would be possible for the player to be left far less powerful than the monsters they face for a very long time.
To counter this issue, the game creates weapons and armors periodically according to the dungeon depth. The simplest approach would be to spawn such equipment once every, say, four levels. RuggRogue does essentially that, with a couple of twists to make the pattern less predictable:
- The period offset is adjusted per game, e.g. one run groups levels 1-4, 5-8, 9-12, etc. while another groups them 1-2, 3-6, 7-10, etc.
- The chosen level differs per group, e.g. pick level 2 out of levels 1-4, then level 7 out of levels 5-8, etc.
There's no data carried between different levels to affect their generation.
Instead, new random number generators are created that are seeded such that each level in a group gets the same seed; this is accomplished by integer dividing the map depth by the EQUIPMENT_SPAWN_PERIOD constant whose value is 4.
The periodic_weapon_rng uses the low bits of the game seed to adjust the period offset.
A single random number from 0 to 2 is extracted from this random number generator (3 is never chosen to avoid guaranteed equipment spawning in adjacent levels).
This number is checked against the depth of the level within its group; a successful match spawns a weapon in a random room and position.
This process is repeated for armor using periodic_armor_rng, except offsetting with the high game seed bits.
Auto-Run
Most of the time playing RuggRogue is spent moving around the dungeon. Instead of repeatedly pressing the movement keys, the player can tell the game to move in a direction for them until something interesting is seen. This feature is known as auto-running.
Auto-run is activated by holding the Shift key while pressing a movement key. There are three types of auto-run:
- Resting in place: Pressing Shift+Space will wait in place until the player is fully healed.
- Straight auto-run: Pressing Shift+direction in open space or against a wall will move in a straight line until the open space or wall ends.
- Corridor auto-run: Pressing Shift+direction in a corridor will follow that corridor until it branches or opens up.
Once auto-run starts the game will move the player until it's interrupted by:
- the player pressing a key
- a monster appearing in the player's field of view
- the player moving next to an item or the downstairs tile
- the player getting hungrier or losing hit points to starvation
Auto-Run Data Structures
Auto-running requires the game to perform actions across multiple frames. This means it needs to remember that auto-run was requested, as well as type of auto-run and desired movement direction. This means that the state of auto-running needs to be stored in data structures.
Everything that auto-run needs to operate is stored in the Player struct in the src/components.rs file:
pub struct Player {
    pub auto_run: Option<AutoRun>,
}
If the value of the auto_run field here is None it means that auto-run is not happening and the game will wait on the player for input.
On the other hand, a Some(...) value here means that auto-run is active, and the data within keeps track of the state of auto-running.
The rest of the data structures relating to auto-run, as well as most of the logic, live in the src/player.rs file.
The AutoRun struct is what's held in the aforementioned auto_run field, and appears as follows:
pub struct AutoRun {
    limit: i32,
    dir: (i32, i32),
    run_type: AutoRunType,
}
The limit field is the maximum number of steps that auto-run can proceed by itself, and exists mostly as a fail-safe against the possibility of any bugs that could cause infinite auto-running.
The dir field holds the last direction that the player moved, which determines the direction that auto-running will proceed.
This direction is interpreted as a (dx, dy) pair where the two values are one of -1, 0 or 1.
The run_type field determines the type of auto-running that should occur; it's set when auto-run is requested and doesn't change.
It holds one of the three values of the AutoRunType enum that looks like this:
enum AutoRunType {
    RestInPlace,
    Corridor,
    Straight { expect_wall: AutoRunWallSide },
}
These enum variants each correspond to the three types of auto-running that were described earlier.
The AutoRunType::Straight variant holds extra data that it needs to remember that the other two AutoRunType variants don't need.
This expect_wall field holds one of the variants of the AutoRunWallSide enum that looks like this:
enum AutoRunWallSide {
    Neither,
    Left,
    Right,
}
Straight auto-run keeps track of walls and open tiles to the left and right of the direction that the player is auto-running.
AutoRunWallSide::Neither: Expect neither left nor right walls, i.e. both sides of the player should be fully open.AutoRunWallSide::Left: Expect a solid wall on the left and open space on the right.AutoRunWallSide::Right: Expect a solid wall on the right and open space on the left.
Straight auto-run is stopped if the arrangement of tiles falls into a different category than expected, or doesn't fit into any of these categories.
Auto-Run Control Flow
Auto-run integrates with the input and control flow logic as follows:
- The player holds Shift when pressing a movement key, handling the turn as usual but also filling in the
auto_runfield of thePlayerstruct to start auto-running. - While auto-running, the end of the
DungeonMode::updatefunction tells the game loop to run on the next frame instead of waiting for an event as it normally would. - While auto-running, auto-run checks if it should proceed; if so, it automatically moves the player instead of doing the usual input handling logic.
The Shift key during normal input handling is picked up in the player::player_input function in the src/player.rs file.
This is handed off as a boolean value to either the try_move_player or wait_player functions, which fills in the auto_run field of the Player struct after doing their usual business.
This kicks off the auto-run process.
The player::player_input function is called from the DungeonMode::update function in the src/modes/dungeon.rs file.
Its return value controls when the next update should happen, and looks roughly like this:
impl DungeonMode {
    fn update(/* ... */) -> (ModeControl, ModeUpdate) {
        if world.run(player::player_is_alive) {
            //
            // A *lot* of stuff skipped here...
            //

            (
                ModeControl::Stay,
                if world.run(player::player_is_alive) && world.run(player::player_is_auto_running) {
                    ModeUpdate::Update // <-- !!!
                } else {
                    ModeUpdate::WaitForEvent
                },
            )
        } else if player::player_is_dead_input(inputs) {
            // ...
        } else {
            // ...
        }
    }
}
In the above code, if the player is alive and auto-running, the DungeonMode::update function returns ModeUpdate::Update instead of ModeUpdate::WaitForEvent.
This causes the main loop further up in the call stack to run the DungeonMode::update function again on the next frame, even if the input buffer is empty.
On subsequent updates while auto-run is active, the control flow through the player::player_input function looks different.
Here's a rough outline of that function:
pub fn player_input(/* ... */) -> PlayerInputResult {
    let player_id = world.borrow::<UniqueView<PlayerId>>();

    inputs.prepare_input();

    if item::is_asleep(world, player_id.0) {
        //
        // sleep input handling...
        //
    } else if world.run(player_is_auto_running) {
        //
        // --> AUTO-RUN LOGIC HERE <--
        //
    } else if let Some(InputEvent::AppQuit) = inputs.get_input() {
        PlayerInputResult::AppQuit
    } else if let Some(InputEvent::Press(keycode)) = inputs.get_input() {
        //
        // normal player input handling here...
        //
    } else {
        PlayerInputResult::NoResult
    }
}
In the above code, the process of auto-running overrides normal player input handling.
The first thing that the auto-run logic in the player::player_input function does is check for reasons to stop, such as:
- receiving the
AppQuitinput event - receiving any keyboard input event from the player
- the player stepping onto or next to something interesting (checked by the
player_check_frontierfunction) - the player seeing any monsters (checked by the
player_sees_foesfunction)
Auto-run is stopped by the player::player_stop_auto_run function, which simply clears the auto_run field of the Player struct to None.
Auto-run logic then decrements the limit_reached field of the AutoRun struct, and when it hits zero also stops auto-run.
At this point, auto-run logic needs to perform final checks that vary based on the different auto-run types: resting in place, straight auto-run and corridor auto-run.
This is the job of the auto_run_next_step function, which works as follows:
- Resting in place returns
Some((0, 0))if the player can still heal by resting (i.e. below maximum hit points and isn't starving) orNoneotherwise. - Straight auto-run and corridor auto-run check the tiles around the player and return
Some((dx, dy))to run in the desired direction orNoneto stop.
In the case that it returns Some(...), the direction value within is unpacked and causes the auto-run logic to call either the try_move_player or wait_player functions to perform the auto-run step.
Note that these two functions are exactly the same ones called during normal input handling, so auto-run effectively acts like smart automatic input handling.
Resting in Place
RuggRogue has a regeneration mechanic based on hunger level. The hunger levels are "Full", "Normal", "Hungry", "Very Hungry", "Famished" and "Starving". The player will gradually regenerate lost hit points over time as long as the player is "Full", "Normal" or "Hungry".
Sometimes the player may wish to simply pass turns in order to recover hit points. Instead of passing turns manually, the player can press Shift+Space to rest in place. Resting in place will pass turns automatically until the player can no longer recover (due to maximum hit points or hunger) or is interrupted by a monster.
The choice of the Shift+Space key combination might seem odd, given that the usual key to wait a turn is Period. However, Shift+Period produces the greater-than sign, which is the ASCII character for the downstairs tile and therefore (one of) the inputs that lets the player move downstairs. Since Shift+Period is already spoken for, and the Space key is the alternate key for waiting a turn, resting in place is thus triggered by Shift+Space.
In terms of code, resting in place starts when the normal input logic detects the Shift+Space key combination.
The Space key triggers the usual logic for waiting a turn, so the wait_player function is called as usual.
The pressing of the Shift key causes the rest_in_place argument of that function to be set to true.
The first thing that the wait_player function does in this case is check for any reason that resting in place should not start.
If any monsters are present in the player's field of view, the player gets a message and no turns are spent waiting.
The game then calls the hunger::can_regen function (defined in the src/hunger.rs file) to perform hunger-related checks; any hunger-related reason to not rest appears as a message and prevents any waiting from taking place.
Assuming that there is no reason to prevent it, resting in place is started by setting the auto_run field of the Player struct with a run_type of AutoRunType::RestInPlace.
Auto-run then takes over as described earlier in the auto-run control flow section.
For each turn that auto-run is about to spend resting in place, the auto_run_next_step function consults the result of the hunger::can_regen function to determine if it should continue.
The final unique detail of resting in place is that, unlike other forms of auto-run, it ignores the presence of items and downstairs in adjacent tiles.
The player_check_frontier function that normally performs this check contains an early return if the run_type is AutoRunType::RestInPlace.
Straight Auto-Run
Oftentimes the player will find themselves in a room with no monsters in sight. By holding Shift while pressing a direction, the player will perform a straight auto-run, moving in a single direction until they're blocked or something interesting appears. This allows the player to quickly cross empty and cleared-out rooms.
Straight auto-run that starts in the open will advance until the player finds themselves adjacent to any walls. Straight auto-run that starts with a wall to one side of the player will advance until that wall ends.
The logic for auto-running in a direction starts when normal movement code detects that the Shift key is being held down.
As per usual, the move is handled with a call to the try_move_player function, but the Shift key sets the start_run argument to true.
If the player tries to start auto-running but a monster is in their field of view, the move is cancelled with a corresponding message.
After the usual movement logic, if the player indeed moved, the game must decide between engaging straight auto-run or corridor auto-run.
This decision is made by checking the pattern of walls and open tiles around the player.
Corridor wall patterns are checked for first by the auto_run_corridor_check function; we'll assume that its check fails for the sake of this section.
With the corridor check out of the way, the game decides if straight auto-run should be engaged with the result of the auto_run_straight_check function.
This function wants to check for patterns of walls and open tiles, but the exact tiles to check differ based on the player's movement direction.
The player can move in eight directions, but we don't want to repeat similar code for every direction.
This repetition can be avoided with the help of rotation.
Rotating by Movement Direction
The auto_run_straight_check function needs to check the tile straight ahead of the player, as well as the tiles to either side.
To cut down on repeated code it uses logical dx and dy values such that it only needs to check tiles for the player moving right (cardinally) and up-right (diagonally).
Every other direction can be represented by rotating the logical dx and dy values to match the player's movement direction, resulting in real map coordinates.
To perform the correct rotation, the auto_run_straight_check function feeds the player's movement direction into another function named rotate_view, filling in these variables:
real_x_from_xreal_x_from_yreal_y_from_xreal_y_from_y
With the convention of positive y pointing upwards, these variables are filled in based on the player's movement direction (dx and dy) as follows:
dx | dy | real_x_from_x | real_x_from_y | real_y_from_x | real_y_from_y |
|---|---|---|---|---|---|
| 1 | 0 | 1 | 0 | 0 | 1 |
| 1 | 1 | 1 | 0 | 0 | 1 |
| 0 | 1 | 0 | -1 | 1 | 0 |
| -1 | 1 | 0 | -1 | 1 | 0 |
| -1 | 0 | -1 | 0 | 0 | -1 |
| -1 | -1 | -1 | 0 | 0 | -1 |
| 0 | -1 | 0 | 1 | -1 | 0 |
| 1 | -1 | 0 | 1 | -1 | 0 |
If player_x and player_y represent the player's map coordinates, the following helper closures can then rotate logical dx and dy values to get real map coordinates:
let real_x = |dx, dy| player_x + dx * real_x_from_x + dy * real_x_from_y;
let real_y = |dx, dy| player_y + dx * real_y_from_x + dy * real_y_from_y;
The dx and dy values here are the x and y deltas of the tile we want to check relative to the player's position, assuming the player is moving right or up-right.
For example, if the player is moving right or up-right, real_x_from_x and real_y_from_y are both set to 1 by the rotate_view function, leading to results similar to this:
let real_x = |dx, dy| player_x + dx * 1 + dy * 0;
let real_y = |dx, dy| player_y + dx * 0 + dy * 1;

// simplified
let real_x = |dx, _| player_x + dx * 1;
let real_y = |_, dy| player_y + dy * 1;
Above, changes to dx and dy match one-to-one to the same changes in real map coordinates.
As another example, suppose the player is moving up or up-left.
This requires a 90-degree counter-clockwise rotation for the dx and dy values.
The values returned by the rotate_view function in this case fill real_x_from_y with -1 and real_y_from_x with 1, leading to something like this:
let real_x = |dx, dy| player_x + dx * 0 + dy * -1;
let real_y = |dx, dy| player_y + dx * 1 + dy * 0;

// simplified
let real_x = |_, dy| player_x + dy * -1;
let real_y = |dx, _| player_y + dx * 1;
Above, you'll notice that changes to the logical dy value lead to reversed changes to real x, e.g. logical upwards steps travel left in reality.
Meanwhile, logical dx value changes lead to non-reversed changes to real y, e.g. logical rightward steps travel up in reality.
Savvy readers will notice that conversions of logical dx and dy values into real map coordinates like this are affine transformations, involving rotating according to player movement direction and translation to the player's real map coordinates.
Checking Walls and Open Space
Armed with the real_x and real_y helper closures, the auto_run_straight_check function can now tie them together into a single helper closure that checks real map coordinates for the presence of walls:
let check_wall = |dx, dy| map.wall_or_oob(real_x(dx, dy), real_y(dx, dy));
The Map::wall_or_oob function defined in the src/map.rs file is just a little helper function that returns true if the given tile coordinates are a wall or out-of-bounds.
check_wall is used like this: If the player is moving cardinally, check_wall(1, 0) checks the tile in front of the player, check_wall(0, 1) checks the tile to their left and check_wall(0, -1) the tile to their right.
For a diagonally moving player, the tile in front is checked using check_wall(1, 1).
This brings us to the whole purpose of the auto_run_straight_check function: to look at tiles adjacent to the player according to their movement direction to yield one of these possible return values:
Some(AutoRunWallSide::Left)- A complete wall to the left of the player and completely open tiles on the right.Some(AutoRunWallSide::Right)- A complete wall to the right of the player and completely open tiles on the left.Some(AutoRunWallSide::Neither)- Completely open tiles to the left and right of the player.None- Anything else.
If the first call to auto_run_straight_check made in the try_move_player function returns one of the Some(...) values, that value is stored in the expect_wall field of the AutoRunType::Straight enum variant.
Each step of straight auto-run calls auto_run_straight_check again in the auto_run_next_step function and compares the result with the expect_wall field, only continuing if they match.
This is the crux of straight auto-run.
For cardinal movement, the exact tiles that need to be checked are marked below, where @ is the player and f/1/2 are the tiles to check:
.11
.@f
.22
f is the tile in front of the player (check_wall(1, 0)) and must be open for straight auto-run to proceed.
The 1 tiles are to the left of the player (check_wall(0, 1) and check_wall(1, 1)), as if the player is logically moving right.
These tiles must be either both walls (implying AutoRunWallSide::Left) or both open (implying AutoRunWallSide::Right or AutoRunWallSide::Neither).
Mismatching tiles here means that there is a partial wall to the left, so the auto_run_straight_check function should return None to prevent straight auto-running.
The 2 tiles are to the right of the player (check_wall(0, -1) and check_wall(1, -1)), and are checked the same way as the tiles to the left.
For diagonal movement, the pattern is different, but otherwise all the checks are the same as for cardinal movement.
Again, @ is the player, and f/1/2 are the tiles to check:
11f
.@2
..2
That's it for the auto_run_straight_check function.
Checking for Items and Downstairs
Recall that that the auto-run control flow in the player::player_input function needs to stop auto-running if the player finds themselves on top of or next to an item or the downstairs.
This is the job of the player_check_frontier function, which returns true if either of these things are found or false otherwise.
The player_check_frontier function does pretty much the same rotation trick as the auto_run_straight_check function.
This time the checks are for items and downstairs (or rather, any tile that isn't a wall or floor).
For cardinal movement, the @ and ! tiles are checked, where the ! tiles are newly adjacent:
..!
.@!
..!
Likewise, for diagonal movement:
!!!
.@!
..!
Corridor Auto-Run
The rooms of any given dungeon map are connected with corridors that are single tile wide. If the player holds Shift while moving in a corridor, corridor auto-run will engage, automatically moving them along the corridor until it opens up or ends. This allows the player to quickly move between rooms on the current dungeon level.
In order to implement corridor auto-run, the game must check the tiles near and around the player according to their movement direction, much like straight auto-run.
At each step, corridor auto-run checks for a single open tile in the direction of movement for the player to step into, and walls for other surrounding tiles.
This means corridor auto-run changes the player's movement direction at each step; the job of the auto_run_corridor_check function is thus to check for a pattern of corridor-like surrounding walls and produce this direction.
The direction change is dealt with in the auto_run_next_step function under the handling for AutoRunType::Corridor.
The same idea of rotation from straight auto-run carries into the logic for corridor auto-run in the auto_run_corridor_check function.
However, corridor auto-run needs to check for many more patterns of walls and open tiles.
To make this easier, the state of each of these tiles is represented by a single bit in an unsigned 16-bit integer variable named nearby_walls.
The code near the top of the auto_run_corridor_check function populates the bits of the nearby_walls variable using a different helper closure to that used by the straight auto-run logic:
let check_unknown_or_wall = |dx, dy| {
    !player_fov.get((real_x(dx, dy), real_y(dx, dy)))
        || map.wall_or_oob(real_x(dx, dy), real_y(dx, dy))
};
The check_wall helper closure has transformed into this new check_unknown_or_wall that treats tiles outside the player's field of view like walls for corridor-testing purposes.
This is used to test tiles that are two tiles away from the player, which is needed to test for some of the more unusual corridor wall tile patterns.
Single-Tile Cases
A lot of the time, corridor auto-run logic is looking for a single tile to advance into that requires no more than a 90-degree turn to the left or right, with walls for all other possible steps.
If the player is moving cardinally, the code exploits rotation so it only has to work as if the player is moving right.
In the ASCII diagrams below, @ is the player moving right, # is a wall and the numbers are the direction of the next step to take:
#1#  .#2  .##  .##  .##
.@#  .@#  .@3  .@#  .@#
.##  .##  .##  .#4  #5#
Note the extra wall tile needed for cases 1 and 5 to ensure that the open tile is enclosed by walls and is thus corridor-like.
If the player is moving diagonally, rotation allows the code to treat all diagonals as if the player is moving up-right. The diagonal cases look like this:
1##  #2#  ##3  ###  ###
#@#  .@#  .@#  .@4  .@#
..#  ..#  ..#  ..#  .#5
Each of these cases can be represented as data as follows:
- Mask bits that confine our wall-or-open tile pattern matching to only the tiles we care about.
- Open bits for any tiles that must be open.
- A direction that corridor auto-run should take the player on their next step.
Each of the cases above is stored in a table of mask bits, open bits and directions, with separate tables for cardinal versus diagonal movement. Each pattern is tested as follows:
- Obtain a masked version of the nearby tiles by applying the bitwise AND operation to
nearby_wallsand the pattern's mask bits. - Separately, obtain the desired pattern by applying the bitwise AND operation to the pattern's mask bits and open bits.
- If the two values are equal, we have a match, so return with the corresponding direction.
The final wrinkle in all of this is that the dx and dy values of the direction are hard-coded in the table for the player moving right or up-right.
They need to be converted to real map directions, which involves the parameters retrieved from the rotate_view function call based on the player's current movement direction.
Thus the returned direction is processed for final consumption like this:
return Some((
    move_dx * real_x_from_x + move_dy * real_x_from_y,
    move_dx * real_y_from_x + move_dy * real_y_from_y,
));
Handling Corridor Corners
Most of the time when the player is auto-running in a corridor, there will be one obvious tile to move into as described in the previous section. However, what happens when the player encounters the corner of a corridor? Suppose the player is moving to the right and encounters the corner of a corridor:
  #.#
###!#
..@!#
#####
There are now two adjacent open tiles for the player to step into, marked as ! above.
The simple single-tile cases fail to recognize that the player is still in a corridor, so we need more patterns to handle this.
What's more, these patterns need to check tiles that are two steps away from the player, which is why the nearby_walls variable needed them earlier.
If the player is moving cardinally, the corresponding rightward-moving patterns for corridor corners look like this:
##
#66  #7   ###   ##
 @#  @7#  @8#   @#
 ##  ###  #8   #99
               ##
The cases for 7 and 8 are the most common, corresponding to a corridor corner taking a 90 degree turn either left or right respectively. The more exotic cases for 6 and 9 handle little zig-zags that a corridor might choose to take.
If a corner case is matched, corridor auto-run could choose either of the two numbered open tiles to step into. RuggRogue prefers to step into the corner, but it could just as easily cut the corner with just minor changes to the pattern tables.
If the player is moving diagonally, the corresponding up-right-moving patterns are as follows:
 ##  ##
66#  #77  #8   ###
#@#   @#  @8#  @9#
           ##  #9
These cases are rather exotic, and are mostly triggered when the player chooses to start auto-running when stepping diagonally into the entrance of a corridor.
The choice of which tiles to check for corners tries to strike a balance of permissiveness to allow corridor auto-run as often as possible, and strictness to prevent it when it isn't wanted. Settling on these patterns involved some trial-and-error, so improvements and simplifications to them might exist.
Interrupting Auto-Run for Hunger
Aside from player input, tile layout, items and monsters, there are two final reasons that the game may interrupt auto-run, both related to hunger:
- The player drops down a hunger level.
- The player loses hit points due to starvation.
Both of these cases are handled in the tick_hunger function in the src/hunger.rs file.
The player's current hunger level is shown in the sidebar as one of these labels: "Full", "Normal", "Hungry", "Very Hungry", "Famished" and "Starving".
If the hunger level drops and the new hunger level is not "Normal" then auto-run is interrupted by setting the auto_run field of the Player struct to None.
If the player's hunger level is "Starving" then they'll periodically lose hit points ("Player aches with hunger!"). Each time this happens auto-run will also be interrupted to prevent the player auto-running themselves into a starvation death.
Turn Order and Combat
RuggRogue is a turn-based game, so the game waits until the player finishes their turn, then gives the monsters a turn. There's no special speed system, so turns just alternate between the player and the monsters.
The most common interaction between the player and the monsters during their turns is performing a melee attack. These melee attacks inflict damage to their target until they eventually die, and these dead targets need special handling and clean-up.
Alternating Turns Between the Player and the Monsters
Time advances in the game with repeated calls to the DungeonMode::update function in the src/modes/dungeon.rs file.
For the purpose of understanding turns, it looks roughly like this:
impl DungeonMode {
    pub fn update(&mut self, world, inputs, _grids, pop_result) -> (ModeControl, ModeUpdate) {
        if world.run(player::player_is_alive) {
            // ...
            let time_passed: bool = if let Some(result) = pop_result {
                //
                // Dialog and menu result handling here.
                //
            } else {
                match player::player_input(world, inputs) {
                    //
                    // Player input result handling here.
                    //
                }
            };

            if time_passed {
                world.run(damage::handle_dead_entities);
                world.run(experience::gain_levels);
                // field of view stuff...
                world.run(monster::enqueue_monster_turns);

                if world.run(player::player_is_alive) {
                    monster::do_monster_turns(world);
                    world.run(damage::handle_dead_entities);
                    world.run(experience::gain_levels);
                    // field of view stuff...

                    if world.run(player::player_is_alive) {
                        // hunger handling...
                        world.run(damage::handle_dead_entities);
                        world.run(experience::gain_levels);
                        // field of view stuff...

                        if world.run(player::player_is_alive) {
                            world.run(damage::clear_hurt_bys);
                            world.borrow::<UniqueViewMut<TurnCount>>().0 += 1;
                        }
                    }
                }

                // ...
            }

            // ...
        } else if player::player_is_dead_input(inputs) {
            (
                ModeControl::Switch(GameOverMode::new().into()),
                ModeUpdate::Immediate,
            )
        } else {
            // ...
        }
    }
}
The most important thing to pick up in the above code skeleton is the time_passed variable.
The player's turn consists of everything that they're allowed to do while time_passed is set to false.
Once the player performs a time-consuming action, the time_passed variable is set to true.
The time_passed variable is either set directly after player input handling, or indirectly after handling the result of a dialog or menu.
A return value of PlayerInputResult::TurnDone from the player::player_input function sets time_passed to true, while PlayerInputResult::NoResult sets it to false.
The other variants of PlayerInputResult defined at the top of the src/player.rs file will cause the DungeonMode::update function to create a dialog or menu to show.
Confirming or performing actions in these dialogs and menus usually sets time_passed to true, while cancelling out sets it to false.
Once the time_passed variable is set to true, the if time_passed ... conditional block performs the rest of the turn:
- Handle dead entities and level gains.
- Give monsters their turn, handle dead entities and level gains again.
- Tick hunger, handle dead entities and level gains yet again.
- Clear damage book-keeping and increment the turn counter.
Note that dead entities and experience levels need to be dealt with at each point after damage can occur.
Monster Turns
Once the time_passed variable in the DungeonMode::update function is set to true, the monsters get their turn.
All monsters are given a turn with a call to the monster::enqueue_monster_turns function in the src/monster.rs file.
Its job is to fill in the MonsterTurns queue with the entity ID of each monster.
The monster::do_monster_turns function then pops entity IDs out to give each monster their turn.
Why not just loop through all monsters, handle their turns directly and avoid the need for a queue?
The answer to this is that the MonsterTurns queue grants turns to monsters closest to the player first to minimize blocking when a group of monsters chase the player down a corridor.
At the top of the src/monster.rs file, the MonsterTurns queue is declared as a heap that stores monster entity IDs and their distance from the player.
Since MonsterTurns is a heap, monster IDs are popped out closest-first, giving the desired monster turn order.
Each monster's turn is individually handled by the do_turn_for_one_monster function in the src/monster.rs file.
Monster AI is trivial: if the player can be seen, move towards them as described in the Pathfinding chapter and perform a melee attack if adjacent.
Melee Attacks and Damage
If the player moves into a monster or vice versa, a melee attack is performed.
Melee attacks are handled by the damage::melee_attack function in the src/damage.rs file.
Player melee attacks call this in the try_move_player function in the src/player.rs file.
Monster melee attacks call this in the do_turn_for_one_monster function in the src/monster.rs file.
The first consideration of the damage::melee_attack function is accuracy.
There is a flat 10% miss chance for any attack against a target as long as they aren't asleep.
The damage::melee_attack function deals with two entities that each have a CombatStats component, defined in src/components.rs like so:
pub struct CombatStats {
    pub max_hp: i32,
    pub hp: i32,
    pub attack: f32,
    pub defense: f32,
}
Notice that the attack and defense fields are typed f32, i.e. 32-bit single precision floating point numbers.
This allows for much finer-grained control of their values compared to if they were integers instead.
The player has an Equipment component that points to any equipped weapon or armor:
pub struct Equipment {
    pub weapon: Option<EntityId>,
    pub armor: Option<EntityId>,
}
Any such weapon or armor has a CombatBonus component:
pub struct CombatBonus {
    pub attack: f32,
    pub defense: f32,
}
The damage::melee_attack function thus calculates attack and defense values by starting with their base values in the CombatStats component, and adding bonuses from the CombatBonus components of any equipped weapon and armor.
The base damage calculation considers the attack power of the attacker versus the defense of the target. The code looks like this:
let mut damage = if attack_value >= defense_value * 2.0 {
    attack_value - defense_value
} else {
    attack_value * (0.25 + (0.125 * attack_value / defense_value.max(1.0)).min(0.25))
};
There are two key take-aways of the above calculation. First, if attack is at least twice defense, base damage is just the difference between the two values. Second, to avoid zero damage when attack is less than defense, damage from lower attack values is varied from 25% to 50% of the attack value, depending on how much lower it is than the defense value.
This approach has some nice properties:
- High attack values have a simple one-to-one relationship to damage.
- Attacks still do a little bit of damage even if defense is higher than the attack value.
- Low-damage attacks are still reduced by increases to defense.
After base damage has been calculated it has a 25% chance of being multiplied by 1.5 (a critical hit) and 25% chance of being multiplied by 0.5 (a weak hit).
At this point, the damage needs to be converted from a floating point number to an integer. Fractional values are rounded up with the help of an RNG, e.g. 3.1 damage has a 10% chance of being rounded up to 4.
To inflict damage, the freshly-minted integer damage value is deducted from the hp field of the target's CombatStats component.
This may push the hp field to zero or negative, but entity death is handled elsewhere.
An appropriate hit message is also added to the message log, with suffix punctuation to match normal (exclamation mark), critical (double exclamation mark) and weak hits (period).
A damaged entity is given a HurtBy component that's defined like this in the src/components.rs file:
pub struct HurtBy {
    Someone(EntityId),
    Starvation,
}
In this case, the target entity is given a HurtBy::Someone(attacker), where attacker is the entity ID of the attacker.
If the target is a monster, this will be used later on try to grant whoever killed it experience.
If the target is the player, this will point to the monster that killed them so it can be shown on the game over screen.
These HurtBy components are cleared off of all entities at the end of the turn back up in DungeonMode::update with a call to the damage::clear_hurt_bys function.
On the topic of the game over screen, the damage::melee_attack function also modifies any Tally component that it finds attached to the attacker or defender:
pub struct Tally {
    pub damage_dealt: u64,
    pub damage_taken: u64,
    pub kills: u64,
}
The damage_dealt of the attacker and the damage_taken of the target are incremented by the final damage value if either entity has a Tally component.
This information is also shown on the game over screen, so in practice only the player is given a Tally component.
Handling Death
If an entity falls below zero hit points, it is now dead and needs to be handled appropriately.
This job falls upon the damage::handle_dead_entities function defined in src/damage.rs.
The damage::handle_dead_entities function goes through all entities with a CombatStats component and checks to see if their hit points are zero or less.
The entity IDs of any such entities are gathered in batches of ten each, then processed before taking up to another ten, etc.
A dead entity grants experience points to whoever hurt it last so long as the following conditions hold:
- The dead entity is marked with a
HurtBy::Someone(...)component. - The dead entity has a
GivesExperiencecomponent, holding the number of experience points it should grant. - The entity referred to by the
HurtBy::Someone(...)component has anExperiencecomponent to accept the granted experience points.
If the dead entity is a monster, it is removed from the map before the entity is deleted entirely.
If the dead entity is the player, "Press SPACE to continue..." is added to the message log, the PlayerAlive unique flag is set to false, any existing save file is deleted and any remaining dead entity handling is skipped.
The PlayerAlive unique flag is checked by the player::player_is_alive function that is checked all the way back in the DungeonMode::update function.
Once the player is dead, control flow in the DungeonMode::update function flows into the player::player_is_dead_input function defined in the src/player.rs file.
Its only job is to wait for the aforementioned Space key press, to allow the player to see the dungeon at the moment of their untimely passing.
After the Space key is pressed, the player is whisked away to the GameOverMode defined in src/modes/game_over.rs to be shown the game over screen with the cause of death, final stats and tallied damage and kills.
Proceeding from the game over screen takes the player back to the title screen.
Items
Items are scattered throughout the dungeon of RuggRogue; they reward the player for exploration. The player can pick up and drop items to add and remove them from their inventory. Weapons and armor are items that can be equipped by the player, conferring bonuses during combat. Other items can be applied (used) for a variety of effects, such as healing the player, hurting monsters and inflicting status effects.
This chapter starts by giving a run-down of the items that exist in RuggRogue, their effects and how often they're found, with source code references sprinkled throughout. Following this is an overview of the interface used to interact with items, and how items move between the map, the player's inventory and equipment. Finally, targeting and effects of items that can be applied are described.
List of Items
All items are spawned by calling functions named like spawn_foo in the src/spawn.rs file, where foo is the name of the item.
The list is as follows:
- Present (
spawn_present) - The player wins the game when this item is used. - Ration (
spawn_ration) - Consumable; restores 750 nutrition to the player. - Health Potion (
spawn_healh_potion) - Consumble; restores 20 hit points if the player is hurt, or increases maximum hit points by 2 otherwise. - Magic Missile Scroll (
spawn_magic_missile_scroll) - Consumable; inflicts 8 damage to a single target up to 6 tiles away. - Fireball Scroll (
spawn_fireball_scroll) - Consumble; inflicts 20 damage to targets in a 3-tile area of effect up to 6 tiles away. - Sleep Scroll (
spawn_sleep_scroll) - Consumable; inflicts the sleep status effect to targets in a 1-tile area of effect up to 6 tiles away. - Weapon (
spawn_weapon) - Equipped in the "Weapon" slot; provides a bonus to attack. - Armor (
spawn_armor) - Equipped in the "Armor" slot; provides a bonus to defense.
Note that weapons only vary by appearance and combat bonuses and so are treated as a single item type; likewise for armor.
Item Distribution
Items spawn in one of two broad ways: by room and by level.
When a map is being populated, one in four rooms will spawn items, following the logic in the fill_room_with_spawns function in the src/spawn.rs file.
Each such room generally spawns a single item, but may spawn an additional one for every win the player has accumulated.
The distribution of room items is determined by the spawn_random_item_at function, and looks like this:
- 1 / 11 - a weapon or armor with an extra +1 to +3 power bonus
- 3 / 11 - Health Potion
- 3 / 11 - Magic Missile Scroll
- 2 / 11 - Fireball Scroll
- 2 / 11 - Sleep Scroll
Each level spawns a single Ration with the help of the spawn_guaranteed_ration function.
The spawn_guaranteed_equipment function spawns a starting weapon and armor on the first level, and depth-appropriate weapon and armor at irregular depth intervals.
The exact process for all of this is described in detail in the Map Population chapter.
Inventory and Equipment
For the player to pick up and use items, they need an inventory to serve as space to hold them.
The list of items carried by the player is represented by the Inventory component, defined in the src/components.rs file:
pub struct Inventory {
    pub items: Vec<EntityId>,
}
The game will only allow entities to be picked up if they are marked with the Item tag component:
pub struct Item;
The player can equip certain items from their inventory.
The player's equipment slots are represented by the Equipment component:
pub struct Equipment {
    pub weapon: Option<EntityId>,
    pub armor: Option<EntityId>,
}
Note that equipment slots are separate from the inventory, so for example, equipping a weapon moves it out of the inventory and into the player's "Weapon" slot.
Items that can be equipped are marked with an EquipSlot component:
pub struct EquipSlot {
    Weapon,
    Armor,
}
The exact value of the EquipSlot component determines which equipment slot the item will be moved into when it is equipped.
Item User Interface
Most of the time spent playing the game that isn't moving around the dungeon or fighting monsters is spent dealing with items. As a result, about half of the interface code is dedicated solely to dealing with items.
Although these item-related menus and dialogs allude to actions, note that they never perform these actions themselves. For example, if the player chooses to drop an item from the inventory, the inventory returns a result that captures that intent, and the job of dropping the item is handled elsewhere.
Pick Up Menu
The player presses either the 'g' or the Comma key whenever they want to pick up an item at their position.
This pushes onto the mode stack the PickUpMenuMode, defined in the src/modes/pick_up_menu.rs file.
If the player isn't standing over any items, they're given a message saying as much and no menu appears.
If the player is standing over at least one item, a menu appears, allowing them to select an item on the map to be picked up.
This menu has cursor-based controls, along with most of the menus and dialogs in the game.
The entity ID of the selected item is returned as part of the PickUpMenuModeResult.
Inventory Menu
The player presses the 'i' key to bring up the inventory menu.
This is the biggest and most advanced of the menus, represented as the InventoryMode in the src/modes/inventory.rs file.
It shows the player's currently-equipped weapon and armor in a small section at the top, with a larger inventory listing beneath it.
There's also an option to sort the inventory, which sorts inventory items according to hard-coded criteria.
If an inventory item is selected, an inventory action menu is presented for it; a similar equipment action menu is presented if an equipped item is selected.
Any action returned by either of these menus is relayed back as an InventoryModeResult with the item's entity ID, the action and a target location for items usable at range.
Inventory Action Menu and Equipment Action Menu
Selecting an inventory item presents an inventory action menu, represented by the InventoryActionMode in the src/modes/inventory_action.rs file.
It shows a list of possible actions that can be performed with the item, such as "Equip", "Apply" and "Drop".
If one of these actions is chosen, it will be returned in the form of an InventoryActionModeResult.
Selecting an equipped weapon or armor in the inventory menu brings up the equipment action menu, represented by the EquipmentActionMode in the src/modes/equipment_action.rs file.
It presents "Remove" and "Drop" as possible actions, but otherwise works much the same as the InventoryActionMode.
An EquipmentActionModeResult holds the selected action in this case.
Ranged Item Targeting Mode
If "Apply" is chosen in the inventory action menu for an item that is usable at range, a targeting mode needs to be brought up to choose a target location.
This is represented by the TargetMode, defined in the src/modes/target.rs file.
Unlike everything listed up to this point, the TargetMode is not a menu!
Instead, it draws the map and interface much like the DungeonMode in which most of the gameplay occurs.
However, instead of performing actions and taking turns, the TargetMode highlights valid target tiles for the ranged item it was invoked for.
The movement keys move around a cursor that allows the player to choose a target location out of the valid target tiles.
This selected target location is returned as part of the TargetModeResult.
Shortcut Menus
The inventory menu allows interacting with items in the player's possession through a single centralized menu, but players who already know what they want to do may find this cumbersome. RuggRogue provides shortcut menus to bypass the inventory in this case, brought up with these shortcut keys:
- 'a' to "Apply"
- 'e' or 'w' to "Equip"
- 'r' to "Remove"
- 'd' to "Drop"
Shortcut keys and actions are associated in the InventoryAction::from_key function in the src/modes/inventory_action.rs file, separate from the definition of these shortcut menus.
This shortens interaction from "Inventory -> Item -> Action" to just "Action -> Item".
Pressing one of these keys brings up the InventoryShortcutMode, defined in the src/modes/inventory_shortcut.rs.
This presents a prompt such as "Apply which item?" with a list of inventory items narrowed down to only those with which the action can be performed.
The chosen item is encapsulated in the InventoryShortcutModeResult along with the action that brought the shortcut menu up in the first place.
The "Remove" action brings up a similar EquipmentShortcutMode that returns an EquipmentShortcutModeResult.
Note that the "Drop" shortcut menu only lists inventory items even though equipment can be directly dropped while equipped. This is a technical limitation due to how this was originally designed.
The shortcut keys are used beyond these shortcut menus. For example, pressing any of them in the inventory will bring up the inventory action menu with the matching action pre-selected. Further, pressing them in the inventory action menu will move the cursor to the matching action, or confirm the action if it's already selected.
Menu Memory
When a menu that deals with items is closed, the position of the cursor will be remembered upon reopening the menu. This makes it easier to perform the same action on a sequence of items in menus.
This menu cursor memory is stored in the MenuMemory unique defined in the src/menu_memory.rs file.
It's simply an array with an entry for a cursor position for each of the different item menus that the player will see:
InventoryModeInventoryShortcutModefor "Equip"InventoryShortcutModefor "Apply"InventoryShortcutModefor "Drop"EquipmentShortcutModefor "Remove"EquipmentShortcutModefor "Drop" (unused as described in the previous section)PickUpMenuMode
For PickUpMenuMode, the MenuMemory will recall the map coordinates of the last time the PickUpMenuMode appeared.
If the player's coordinates differ from last time, the PickUpMenuMode will reset the cursor memory.
Moving Items Around
While the user interface permits the player to choose actions to perform with items, the task of performing the actions themselves falls upon mode result handling logic near the top of the DungeonMode::update function in the src/modes/dungeon.rs file.
The most fundamental of these actions are the ones that simply move items around, such as picking up, dropping and equipping items.
Items exist in one of three places:
- on the map,
- in an inventory, or
- equipped as a weapon or armor.
An item on the map is like any other entity, and thus must have a Coord component with its map coordinates, as well as be present in the map's spatial cache (the tile_entities field of the Map struct).
For the item to be visible but not over the player or any monsters, it must also have a RenderOnFloor tag component.
An item in an inventory is listed by its entity ID in the items vector of the Inventory component.
An item equipped as a weapon has its entity ID set in the weapon field of the relevant Equipment component.
An equipped armor item is set to the armor field instead.
Picking up an item moves it from the map to the player's inventory.
The player::player_pick_up_item function in the src/player.rs file encapsulates this action, calling upon the item::remove_item_from_map and item::add_item_to_inventory functions defined in the src/item.rs file to do the heavy lifting.
Dropping an item moves it from the player's inventory to the map.
The player::player_drop item function in the src/player.rs file handles this with the help of the item::remove_item_from_inventory and item::add_item_to_map functions defined in the src/item.rs file.
Equipment is dropped by the item::drop_equipment function with the help of an unequip_item helper function, both also in the src/item.rs file.
Equipping an item moves it from the inventory to an equipment slot.
This is the task of the item::equip_item function in the src/item.rs file.
The EquipSlot component of the item is checked here to determine if the item should be equipped as a weapon or as armor.
Unequipping an item moves it from an equipment slot back to the inventory.
This is handled by the item::remove_equipment function in the src/item.rs file.
This first unequips the item using the aforementioned unequip_item helper function, then moves it to the inventory with the item::add_item_to_inventory function.
Using Items
The "Apply" action can be used on an item that is marked with either the Consumable or Victory tag components.
If one of the item-related menus requests that an item be applied, the DungeonMode::update function will handle it by calling the item::use_item function defined in the src/item.rs file.
Victory
The first thing the item::use_item function checks is if the item in question has a Victory tag component and the user is the player.
If these conditions are true, the player has won the game!
The first step of handling victory is to immediately perform an auto-save.
The victory sequence involves switching from the DungeonMode to the GameOverMode.
If the game window closes for whatever reason, there's no confirmation dialog or any chance to save the game, since those tasks would normally be handled by the DungeonMode.
Auto-saving in advance mitigates this issue.
The victory item is then deleted and the win counter is incremented.
The item::use_item function returns a result that signals to the DungeonMode::update function that it should switch to the GameOverMode.
The GameOverMode defined in the src/modes/game_over.rs file detects that the player is still alive and has thus won the game, showing a congratulatory message in response.
Proceeding from the GameOverMode switches back to the DungeonMode to start a New Game Plus run.
Gathering Targets
Back in the item::use_item function, most items won't win the game outright, so they must have some sort of effect.
The first thing to do in this case is to figure out which entities should be affected by the item.
Items with a Ranged component will already have target map coordinates chosen previously.
Items that aren't used at range imply self-use; the coordinates of the entity using the item are used in this case.
Affected entities are gathered by calling the ruggrogue::field_of_view function, centered about the target location.
The radius of this field is either zero for just the target tile, or a non-zero value extracted from the AreaOfEffect component attached to the item.
Using field of view calculation to determine targets like this prevents items with an area of effect from blasting through walls.
Applying Item Effects
Items can have any number of effects according to the components attached to the item and the targets.
Nutrition is added to the target if the target entity has a Stomach component to fill.
The fullness field of that Stomach component is filled according to the amount stated in the item's Nutrition component that found only on rations.
Healing is applied if the item has a ProvidesHealing component and the target has a CombatStats component.
If the target is at less than full health, the hit points of that target are restored by the amount stated in the ProvidesHealing component, up to maximum hit points.
If the target is at full health, their hit points and maximum hit points are increased by two.
Damage is applied if the item has an InflictsDamage component and the target has a CombatStats component.
This does a few things:
- The target's hit points are reduced according to the amount stated in the
InflictsDamagecomponent. - The target is given a
HurtBy::Someone(id)component, whereidis the entity ID of the item user so they can be credited if the target dies. - If the user has a
Tallycomponent, add the damage amount to thedamage_dealtfield. - If the target has a
Tallycomponent, add the damage amount to thedamage_takenfield.
Sleep is applied if the item has an InflictsSleep component and the target has a CombatStats component.
It adds the Asleep component to the target with a sleepiness amount determined by the InflictsSleep component.
Once all targets have been processed, if the item is marked with the Consumable tag component it is removed from the inventory of its user and then destroyed.
The Sleep Status Effect
The sleep status effect renders the target unable to do anything other than pass turns until it wears off. It affects both the player and monsters.
In the case of a sleeping player, there is sleep-related input handling near the top of the player::player_input function in the src/player.rs file.
In this state, almost every key press will cause the player to automatically pass their turn.
The wearing off of the sleep status is handled by calling the item::handle_sleep_turn function back in the src/item.rs file.
Sleeping monsters are dealt with by the do_turn_for_one_monster function in the src/monster.rs file.
A monster that is asleep simply calls the item::handle_sleep_turn function and bypasses the usual monster AI.
The item::handle_sleep_turn function is responsible for counting down the sleepiness of sleep-afflicted entities and waking them back up.
The sleepiness counter of the entity is decremented according to the following rules:
- -1 per turn.
- -1 if the entity is the player and a monster is in their field of view, or vice versa.
- -10 if the entity lost hit points since their last turn; the
Asleepcomponent tracks changes to hit points to detect this.
Once the sleepiness counter reaches zero, the Asleep component is removed from the entity, waking them up.
The Sleep Scroll inflicts 36 points of sleepiness, by its construction in the spawn_sleep_scroll function back in the src/spawn.rs file.
This renders one sleeping monster vulnerable to three hits before waking up if the player wastes no turns to attack them.
Hunger and Regeneration
RuggRogue features a hunger mechanic: the player has a 'stomach fullness' level that slowly depletes over time. This fullness can be restored by finding and eating rations that spawn as consumable items on each level. If the player stays well-fed they will slowly regenerate hit points; conversely, being very hungry stops hit point regeneration. If fullness drops to zero, the player is considered starving and will lose hit points over time; this can kill the player.
The hunger mechanic serves as a soft timer that urges the player to move forward instead of staying in any one place for too long. In addition, rations act as an extra incentive to explore unseen areas.
Stomach and Nutrition
The fullness level of the player is stored in a Stomach component that looks like this in the src/components.rs file:
pub struct Stomach {
    pub fullness: i32,
    pub max_fullness: i32,
    pub sub_hp: i32,
}
The fullness field is the exact internal fullness level of the player; zero means the player is starving, while the max_fullness field simply caps its value.
The sub_hp field is used to determine when the player should regenerate a hit point (or lose one, in case of starvation).
It can be thought of as a 'fractional hit point', serving as the numerator with the denominator decided elsewhere.
This is explained later in this chapter.
The player is the only entity in the game with a Stomach component and is thus the only entity that can regenerate hit points or starve.
The player is created with a Stomach component with fullness and max_fullness both set to 1500 in the spawn_player function in the src/spawn.rs file.
The player can restore the fullness of their stomach by eating a ration.
The Nutrition component attached to rations is what enables this:
pub struct Nutrition(pub i32);
A ration provides 750 points of nutrition, as per its creation in the spawn_ration function in the src/spawn.rs file.
Rations work like any other consumable item, restoring nutrition as an effect in the item::use_item function in the src/item.rs file.
Hunger States
Fullness is tracked internally as a continuous value, like hit points, but all of the visible effects of hunger involve first converting that value into a discrete hunger state.
This is represented by the HungerState enum defined in the src/hunger.rs file:
enum HungerState {
    Starving,
    Famished,
    VeryHungry,
    Hungry,
    Normal,
    Full,
}
Each variant maps to a range of i32 values according to the HungerState::from function as follows:
Starving: 0Famished: 1 to 150VeryHungry: 151 to 300Hungry: 301 to 750Normal: 751 to 1200Full: 1201 and above
These values are hard-coded and probably should have been calculated relative to the max_fullness field of the Stomach struct, but since there's only one Stomach component in the whole game, it's been left as-is.
The hunger state is what appears in the sidebar, not the raw value. The hunger state determines whether the player regenerates or loses hit points, and messages appear in the message log when it changes.
Sidebar Hunger Display
The hunger state appears in the sidebar in a label that looks like "Hunger: Normal".
This hunger state label is drawn along with other player status information by the draw_status function in the src/ui.rs file.
The label and its foreground and background colors are determined by consulting the hunger::player_hunger_label function back in the src/hunger.rs file.
Different foreground and background colors are used to draw the player's attention to their hunger state according to urgency.
Regeneration and Starvation
There are two hunger-related tasks that must be handled on a per-turn basis: decrementing fullness and changing hit points based on hunger state.
These tasks are handled by the hunger::tick_hunger function found at the bottom of the src/hunger.rs file.
This function is called by the DungeonMode::update function in the src/modes/dungeon.rs file after handling of monster turns.
The hunger::tick_hunger function depletes one point of fullness per turn.
If the player's hunger state and hit points allow them to regenerate, an extra point of fullness is deducted from their stomach.
The hunger::tick_hunger function is also responsible for changing hit points, either raising them for regeneration or depleting them for starvation.
However, even though the function is called every turn, we don't want to alter hit points every turn.
Instead, the function deals with what we could consider a 'partial' hit point in the form of the sub_hp field of the Stomach component.
The field is used by the hunger::tick_hunger function to regenerate hit points as follows:
- The player's fullness level is converted into a
HungerState. - The
HungerState::turns_to_regen_to_max_hpfunction is consulted. - If it returned a number, add the maximum hit points of the player to the
sub_hpfield. - If the
sub_hpfield is at least the value from step 2, integer dividesub_hpby the step 2 value, add the quotient to the player's hit points and keep the remainder insub_hp.
For example, if the player has 60 maximum hit points, is hurt and full, the HungerState::turns_to_regen_to_max_hp function will return Some(300).
This adds 60 to the sub_hp field each turn.
When it reaches 300, the player regenerates a single hit point and 300 is subtracted from the sub_hp field.
Since 300 divided by 60 produces 5, this player will regenerate a hit point every five turns, and indeed will be able to regenerate their full 60 hit points in 300 turns.
The hunger states that permit regeneration are decided by whether or not the HungerState::turns_to_regen_to_max_hp function returns a number.
The player can only regenerate when their hunger state is "Full", "Normal" or "Hungry".
When the player's hunger state is "Starving", they will lose hit points instead of regenerating them.
The process plays in reverse: the HungerState::turns_to_starve_from_max_hp function is used instead, while the sub_hp and player's hit points are subtracted from instead of added to.
According to the HungerState::turns_to_starve_from_max_hp function, the player will lose their maximum worth of hit points in 400 turns spent in the "Starving" hunger state.
Since starving causes damage, the hunger::tick_hunger function is responsible for tracking the damage taken in the player's Tally component.
It is possible for starvation to kill the player, so there's a HurtBy::Starvation cause attached to the player entity in case of death to show on the game over screen.
Hunger Messages
The hunger::tick_hunger function compares hunger state before and after deducting fullness.
If a change is detected and the new hunger state isn't just "Normal", a message chosen by the HungerState::reduced_to function is logged, producing something like "Player is getting hungry."
If the player loses hit points due to starvation, they're informed with a message: "Player aches with hunger!"
Hunger and Auto-Run
Changes to hunger state and losing hits points to starvation not only produce messages, but also interrupt all forms of auto-run.
Hunger impacts the ability for the player to begin or continue resting in place, in the wait_player and auto_run_next_step functions found in the src/player.rs file respectively.
They both hinge on the value returned by the hunger::can_regen function back in the src/hunger.rs file.
It returns a variant of the hunger::CanRegenResult enum that can be found at the top of the src/hunger.rs file, which looks like this:
pub enum CanRegenResult {
    CanRegen,
    NoRegen,
    FullyRested,
    TooHungry,
}
The CanRegen variant allows resting in place to begin or continue; the other results represent reasons the player cannot regenerate hit points.
The NoRegen variant means the player has no Stomach component, which shouldn't happen in normal play.
FullyRested means the player's hit points are already at their maximum.
TooHungry means that the HungerState::turns_to_regen_to_max_hp function is producing None because the player's fullness is too low to allow for hit point regeneration.
Experience and Difficulty
Combat between the player and the monsters is at the core of RuggRogue. Combat is defined by the damage formula described in the Turn Order and Combat chapter, but that by itself isn't enough; the formula operates on numbers that still need to be decided. These numbers include the hit points, attack and defense of the player and the monsters, as well as the attack and defense bonuses of weapons and armor. The values of these numbers need to be able to answer questions such as how many hits are needed for a player to defeat a monster of equal level.
There's another problem. Like many roguelikes and RPGs, the player in RuggRogue earns experience points when defeating monsters. When enough experience points are earned, the player gains a level, rewarding them with more power. How does the game avoid becoming easier over time?
Game Balance
Questions about picking numbers are really questions about how easy or hard the game should be; in other words, they're questions about game balance. For game balance to be reasoned about, we need to consider the relationship between the numbers of the player and those that make up the challenges and rewards encountered in the dungeon.
If the player has an experience level, the game must spawn monsters with some concept of a level as well. Rewards that the player finds in the dungeon, such as weapons and armor, must also consider the concept of a level, if only to avoid being too strong or too weak when found.
Everything that becomes more powerful over time is created with an experience level, but exactly how powerful should each level be?
We definitely don't want level 2 to be twice as powerful as level 1, for example.
RuggRogue defines a level factor to control how powerful each level should be.
It's definition can be found in the src/experience.rs file, and looks like this:
fn level_factor(level: i32) -> f32 {
    (1.0 + (level - 1) as f32 * 0.1).max(0.1)
}
The level factor is 1.0 at level 1, 1.1 at level 2, 1.2 for level 3, and so on. In other words, every level is 10% more powerful than level 1.
The level factor is used to derive every other number that grows more powerful over time.
The formulas are described as functions in the src/experience.rs file:
| Function Name | Formula (f = level factor) | Description |
|---|---|---|
calc_player_max_hp | (f * 30.0).round() as i32 | Player maximum hit points |
calc_player_attack | f * 4.8 | Player base attack |
calc_player_defense | f * 2.4 | Player base defense |
calc_monster_max_hp | (f * 14.0).round() as i32 | Monster maximum hit points |
calc_monster_attack | f * 8.0 | Monster attack |
calc_monster_defense | f * 4.0 | Monster defense |
calc_monster_exp | (f * 10.0).ceil() as u64 | Experience points for defeating monster |
calc_weapon_attack | f * 3.2 | Weapon attack bonus |
calc_armor_defense | f * 1.6 | Armor defense bonus |
For example, consider a player at experience level 6.
The level factor at level 6 is (1.0 + (6 - 1) as f32 * 0.1).max(0.1) = 1.5.
Such a player thus has (1.5 * 30.0).round() as i32 = 45 maximum hit points, 1.5 * 4.8 = 7.2 base attack and 1.5 * 2.4 = 3.6 base defense.
Note that attack and defense values are internally stored and handled as floating point values; the interface rounds them to whole numbers for display purposes.
Defining numbers in terms of the level factor like this allows us to make statements about things when their experience levels are equal:
- The sum of player attack (4.8) and weapon attack (3.2) is 8.0, which is equal to monster attack (8.0).
- Likewise, the sum of player defense (2.4) and armor defense (1.6) is 4.0, which is equal to monster defense (4.0).
According to the damage formula described in the Turn Order and Combat chapter, melee hits cause 50% of the attack value worth of damage when attack is twice defense. A melee hit of 8.0 attack versus 4.0 defense causes 4.0 damage. This allows us to talk about how tough the player and monsters are:
- A player with 30 maximum hit points is defeated by 4.0-damage monster attacks in 7.5 turns.
- A monster with 14 maximum hit points is defeated by 4.0-damage player attacks in 3.5 turns.
Statements like this establish numeric relationships that form the foundation of game balance in RuggRogue.
Player Experience
The experience data for the player is stored in an Experience component defined in the src/experience.rs file:
pub struct Experience {
    pub level: i32,
    pub exp: u64,
    pub next: u64,
    pub base: u64,
}
The level field is the player's experience level.
The exp field is the number of experience points the player has accumulated.
When it reaches the threshold value stored in the next field, the player gains a level, next is deducted from exp and next is increased to a larger value.
The base field stores the total amount of experience points that have been cashed in as levels.
The sum of base and exp is the total number of experience points earned by the player, which is shown in the sidebar while playing the game.
The player is initially spawned with a level of 1 and next set to 50 experience points to gain for their next level, as defined in the spawn::spawn_player function in the src/spawn.rs file.
Meanwhile, the number of experience points awarded for defeating a monster is stored in a GivesExperience component attached to monster entities, defined in the src/components.rs file like so:
pub struct GivesExperience(pub u64);
When the player attacks a monster, the monster is tagged with a HurtBy component that credits the player for the damage.
This is done within the damage::melee_attack function in the src/damage.rs file.
If the hit kills the monster, the damage::handle_dead_entities function in the same file will award the experience points in the monster's GivesExperience component to the player's Experience component.
Gaining Levels
The experience points stored in Experience components are checked when the DungeonMode::update function in the src/modes/dungeon.rs file calls the experience::gain_levels function in the src/experience.rs file.
These calls occur whenever experience could have been awarded, i.e. when time passes.
The experience::gain_levels function checks if the exp value exceeds the next value; if so:
- The entity's level is increased by 1.
nextis deducted fromexp.nextis added tobase.nextis increased by 10% of its current value.
If the entity has a CombatStats component, then their hit points, attack and defense are increased to match their freshly-gained level.
For players, this involves the calc_player_max_hp, calc_player_attack and calc_player_defense functions.
If monsters could gain levels, they would use the calc_monster_max_hp, calc_monster_attack and calc_monster_defense functions instead.
Care is taken to preserve any maximum hit points gained from drinking health potions while fully healed.
Finally, a message is logged if the entity gaining the level happens to be the player.
Difficulty Tracker
The player gains experience levels over time while playing the game and thus becomes more powerful over time. If the game never increased the levels of spawned monsters, the game would get easier over time! But how quickly should the level of spawned monsters increase? Too slowly and game would still get easier over time. Too quickly and the player would eventually be overwhelmed.
It would be tempting to solve this by simply spawning monsters with the same level as the player. However, this would lead to rubber banding, which can make players feel like they're being punished for playing too well.
RuggRogue takes a different approach in the form of a difficulty tracker.
The difficulty tracker is associated with an entity that has an Experience component and is thus able to gain experience and levels, but is invisible and has no CombatStats component.
The spawn::spawn_difficulty function in the src/spawn.rs file creates this entity when called from the title::new_game_setup function in the src/modes/title.rs file.
The difficulty tracker itself is a unique Difficulty struct defined in the src/experience.rs file as follows:
pub struct Difficulty {
    pub id: EntityId,
    exp_for_next_depth: u64,
}
The difficulty tracker gains experience in a different way to the player:
After map population, the experience::calc_exp_for_next_depth function defined in the src/experience.rs file is called.
This sums the experience carried by all monsters on the map and saves it to the exp_for_next_depth field.
When the player descends, the points saved in the exp_for_next_depth field are transferred to the difficulty tracker entity.
From there, the experience::gain_levels function is called so the difficulty tracker entity can gain levels if it needs to.
The level of the difficulty tracker entity determines the maximum level of monsters to spawn. It also decides the base power level of spawned weapons and armor.
Oftentimes, the difficulty tracker will be part-way towards the next level in experience points.
For example, if the difficulty tracker is at level 4 and has 10% of the experience points needed for level 5, it will effectively be considered level 4.1 for the purpose of spawning monsters, weapons and armor.
If an integer level is needed, the Difficulty::get_round_random function in the src/experience.rs file will return something like "5" 10% of the time and "4" the remaining 90% of the time.
Spawning code will also often want the direct "4.1" value, retrieved via the Difficulty::as_f32 function in the same file.
Such code will often use the experience::f32_round_random helper function to turn it into an integer after processing if needed.
Monster Selection
The level of a spawned monster decides its name and appearance.
This data is stored in the MONSTERS array at the top of the src/spawn.rs file, which is consulted by the spawn_random_monster_at function in the same file.
The spawn_random_monster_at function doesn't always spawn a monster matching the level of the difficulty tracker; this would lead to a very monotonous dungeon population.
Instead, it considers the level provided by the difficulty tracker as the highest level to spawn a monster, then picks one of the following outcomes:
- 20% for a level-matching monster
- 40% for a monster 1 to 3 levels lower
- 40% for an even lower-level monster
The final level chosen decides the name and appearance for the monster.
The correct numbers for such a monster at the chosen level is filled in by the spawn_monster function with the help of the monster-related functions in the src/experience.rs file: calc_monster_max_hp, calc_monster_attack, calc_monster_defense and calc_monster_exp.
Weapon and Armor Selection
The name and appearance of weapons is determined by the WEAPONS array near the top of the src/spawn.rs file.
The spawn_weapon function in the same file accepts the difficulty tracker's level externally at either the spawn_random_item_at or spawn_guaranteed_equipment functions.
The WEAPONS array is shorter than the MONSTERS array, so the rescale_level function in the same file is used to cycle through the WEAPONS array at a slower pace.
The name and appearance of armor works exactly like those of the weapons, except using an ARMORS array consulted by the spawn_armor function.
Weapons and armor spawned by the spawn_random_item_at function are granted a +1 to +3 bonus to their power, but this doesn't affect the name and appearance chosen for them.
Picking the Final Dungeon Level
The MONSTERS array at the top of the src/spawn.rs file has 25 entries.
Once the difficulty tracker has allowed them all to spawn, there are no new monsters to be seen; the player has effectively seen all of the content the game has to offer.
Since monsters are chosen directly from the level of the difficulty tracker, this point is reached once the difficulty tracker reaches level 25.
If this point has been reached when a new map is spawned by the map::generate_rooms_and_corridors function in the src/map.rs file, the downstairs is replaced by the location for the victory item that ends the game.
Depending on how many monsters spawn over the course of the game, the final dungeon depth usually ends up being between 25 to 30 levels deep.
Monsters
This is a mini-chapter that exists mostly for the sake of completeness. The truth about monsters in RuggRogue is they mostly overlap with the player, with a small handful of differences:
- Their
Monstertag component gives them turns between player turns. - They move towards and fight the player if they can see the player.
- They have no
Stomachcomponent, so they don't eat or regenerate. - They grant experience when they die to whoever defeated them.
- They do not pick up, drop or use items.
Monsters differ only in name, appearance and stats; they're treated uniformly in every other way.
Monster List
The following is a list of monsters and their ASCII representations in the approximate order that they'll be encountered by the player:
- (
b) Blob - (
B) Bat - (
c) Crab - (
S) Snake - (
g) Goblin - (
k) Kobold - (
G) Gnome - (
o) Orc - (
u) Unicorn - (
P) Pirate - (
L) Lizardman - (
G) Ghost - (
Z) Skeleton - (
O) Ogre - (
N) Naga - (
W) Warlock - (
&) Demon - (
E) Sentinel - (
R) Robber - (
K) Skateboard Kid - (
J) Jellybean - (
A) Alien - (
D) Dweller - (
h) Little Helper - (
H) Big Helper
The monster list exists in the form of the MONSTERS array near the top of the src/spawn.rs file.
The ASCII symbols are mapped to monsters in the Symbol::text_fallback function that can be found in the src/gamesym.rs file.
Monsters in Other Chapters
The topic of monsters is covered across other chapters in this book:
- Map Population: Where monsters are spawned and how many appear.
- Experience and Difficulty: Choice of appearance and power level of monsters, and granting experience when defeated.
- Field of View: Monsters have their own fields of view, and will pursue the player on sight.
- Pathfinding: Monsters step towards the player by first finding a path to follow.
- Turn Order and Combat: Monsters get a turn between player turns and fight the player in melee combat.
New Game Plus
RuggRogue allows the player to continue playing the game after they win by way of the New Game Plus mode. When the player dismisses the victory screen, they're fully healed and are allowed deeper into the dungeon. The player keeps their level, experience, stats and all of their equipment and items, apart from the victory item. The game in turn will allow more monsters and items to spawn the more times the player wins. The power of weapons and armor spawned will continue to increase, but the power of monsters resets. Thus, New Game Plus is intended to serve as a victory lap for the player to collect ever more powerful equipment, and not so much deliver a proper challenge.
Starting New Game Plus
The player wins the game by using the Present item.
The Present item has a Victory tag component that is checked by the item::use_item function in the src/item.rs file.
The game auto-saves itself before consuming the Present item, then increments the win counter before guiding the DungeonMode::update function in the src/modes/dungeon.rs file to bring up the GameOverMode.
Recall that GameOverMode is used both for player victory and defeat, depending on the state of the unique PlayerAlive flag.
When the player presses a key to dismiss the screen, the following code in the GameOverMode::update function in the src/modes/game_over.rs file runs:
let player_alive = world.borrow::<UniqueView<PlayerAlive>>().0;

title::post_game_cleanup(world, !player_alive); // <-- (1)
if player_alive {
    title::new_game_setup(world, true); // <-- (2)
}

inputs.clear_input();
return (
    ModeControl::Switch(if player_alive {
        // Jump straight into new game plus.
        DungeonMode::new().into() // <-- (3)
    } else {
        TitleMode::new().into()
    }),
    ModeUpdate::Immediate,
);
In the case of victory in the above code, the player_alive boolean flag will be true, so the game does the following:
- Run the
title::post_game_cleanupfunction. - Run the
title::new_game_setupfunction. - Switch back to the
DungeonMode.
The title::post_game_cleanup function is defined in the src/modes/title.rs file.
It simply despawns map-local entities such as monsters still alive and any items left behind, and in the case of victory that's all it does.
The title::new_game_setup function in the same file is used to start both new games and the New Game Plus runs.
If New Game Plus is needed, the new_game_plus argument is set to true, causing the function to:
- Increment the turn count and depth, as if the player had taken a downstairs on the final level.
- Restore the player to full health.
- Store the level of the difficulty tracker as the base equipment level for the New Game Plus run.
Since the difficulty tracker is reset for both new games and New Game Plus runs, the last point ensures that new weapons and armor that spawn will do so with ever-increasing power.
Win Counter
As mentioned earlier, the win counter tracks the number of times the player beats the game.
It's defined in the form of the Wins unique all the way back in the src/main.rs file, like so:
pub struct Wins(u32);
The Wins unique is increased by one when the player uses the Present item in the item::use_item function in the src/item.rs file.
The win counter increases the maximum number of randomly-spawned items and monsters per room by one in New Game Plus runs.
The fill_rooms_with_spawns function in the src/spawn.rs file checks the Wins unique to accomplish this.
Base Equipment Level
Recall that the difficulty tracker is reset by the title::new_game_setup function.
This resets the power of spawned monsters, but would also do the same thing to weapons and armor!
To counteract this, there's a concept of a base equipment level, stored in the form of the BaseEquipmentLevel unique in the src/main.rs file like so:
pub struct BaseEquipmentLevel(i32);
The title::new_game_setup function stores the level of the difficulty tracker in the BaseEquipmentLevel unique before resetting the difficulty tracker.
The BaseEquipmentLevel is then consulted by the spawn_weapon and spawn_armor functions in the src/spawn.rs file to add to the power of spawned equipment in New Game Plus runs.
This prevents equipment in New Game Plus runs from being useless relative to the equipment that the player was allowed to carry over from the previous run.